Finance
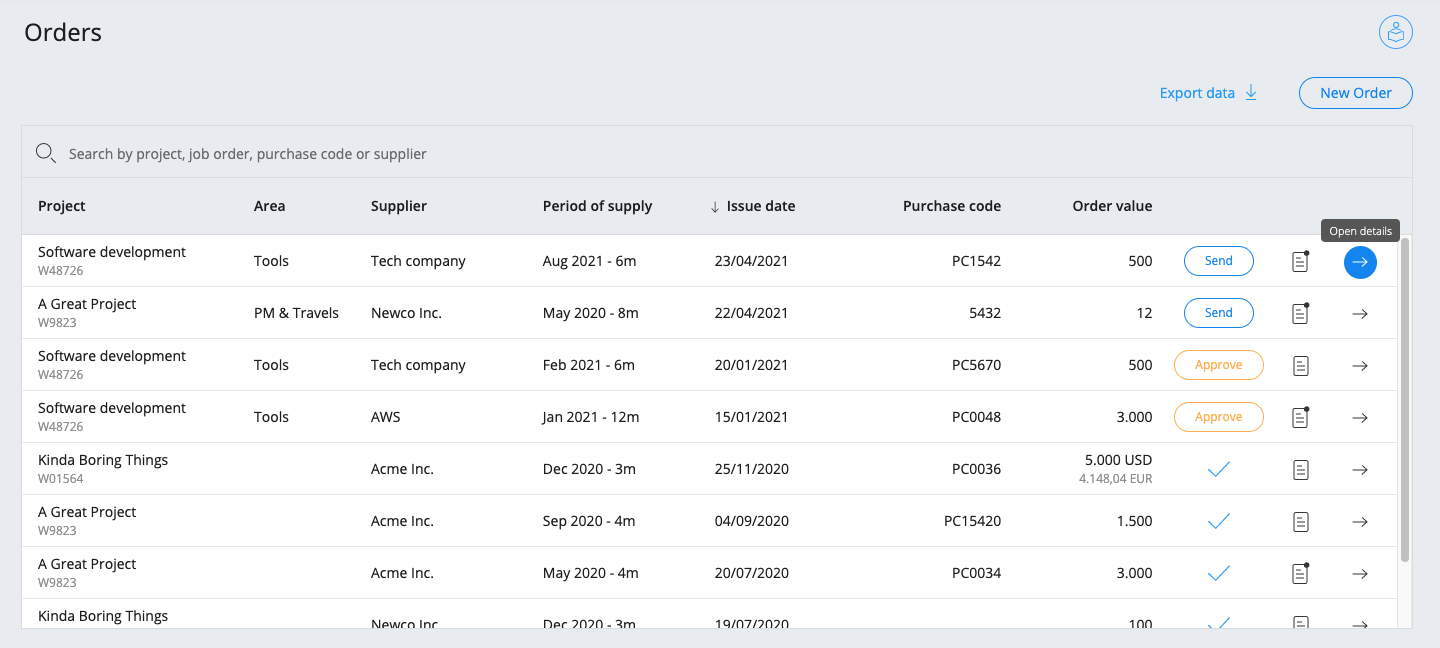
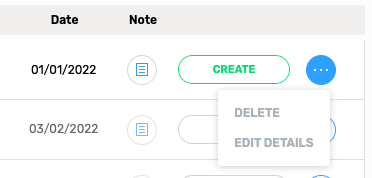
Orders
In this section you can see all your orders and create new ones.
Create a new order
- Click button New Order and a sidebar will open.
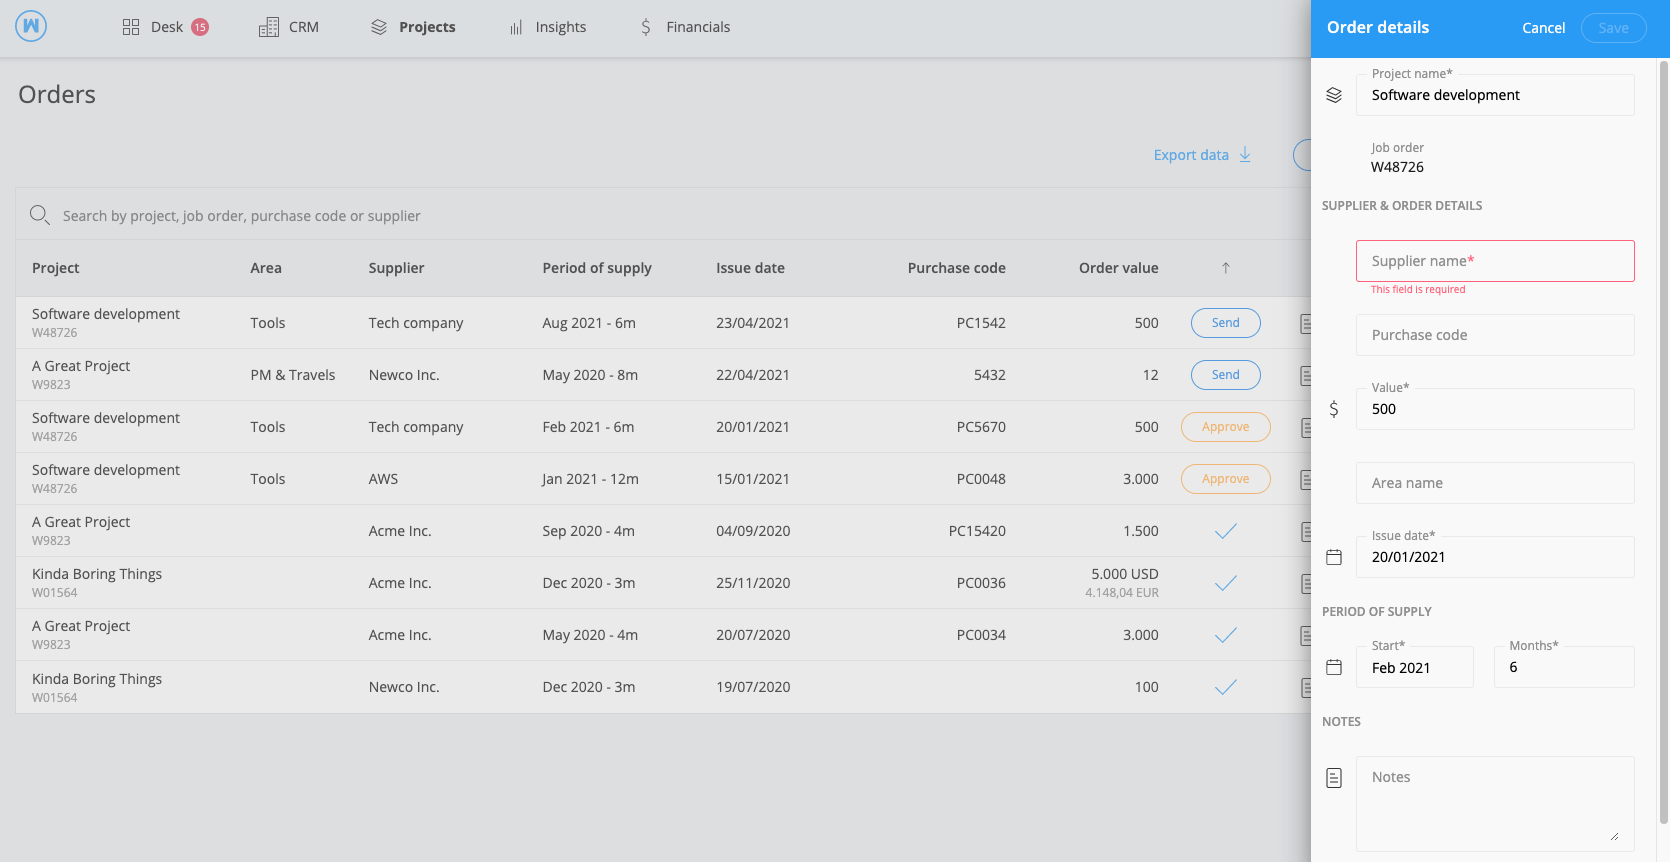
- Insert project name. The job order will be automatically filled by the system.
- Compile all the required fields
- Click on the “save” button
- Your order will be added to the list
Order’s fields description
- Project: the target Project
- Job Order: automatically filled selecting the project
- Supplier: the target Supplier for this Order
- Purchase Code: an identifier for the Order
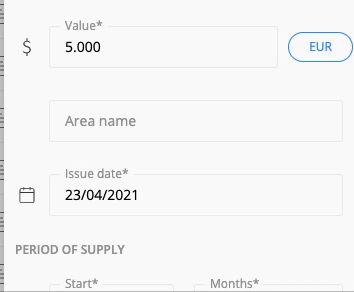
- Value: the total cost of this Order
- Area: the area of the budget this Order is about
- Date: the issue date of this Order
- Duration: answers to the question “when this order will used for the project?”, by default uses the project’s start month and duration. For example: some external employees works for you on April and May so you should set start month to April and duration of 2 months.
- Notes: a brief text about the order. This is attached to the order’s email and can be seen by your colleagues
Send an order
- Click the button Send.
- Choose a recipient for the order. To insert one or more email addresses as recipients head to the settings Email Bot section.
- The recipient will receive an email.
When an order is sent, you will need specific permissions to edit it.
Role based permissions for Orders can be managed from the permissions section.
A sent order can be approved.
Approve an order
You can approve an order by clicking on the “Approve” button. Approving an order isn’t mandatory but can be useful if you want to keep track of which orders can be actually issued.
By clicking the “Approve” button you will presented with a confirmation modal and then you can optionally send an email to notify someone. Recipients for this notification can be selected from those listed under orders Email Bot from the settings.
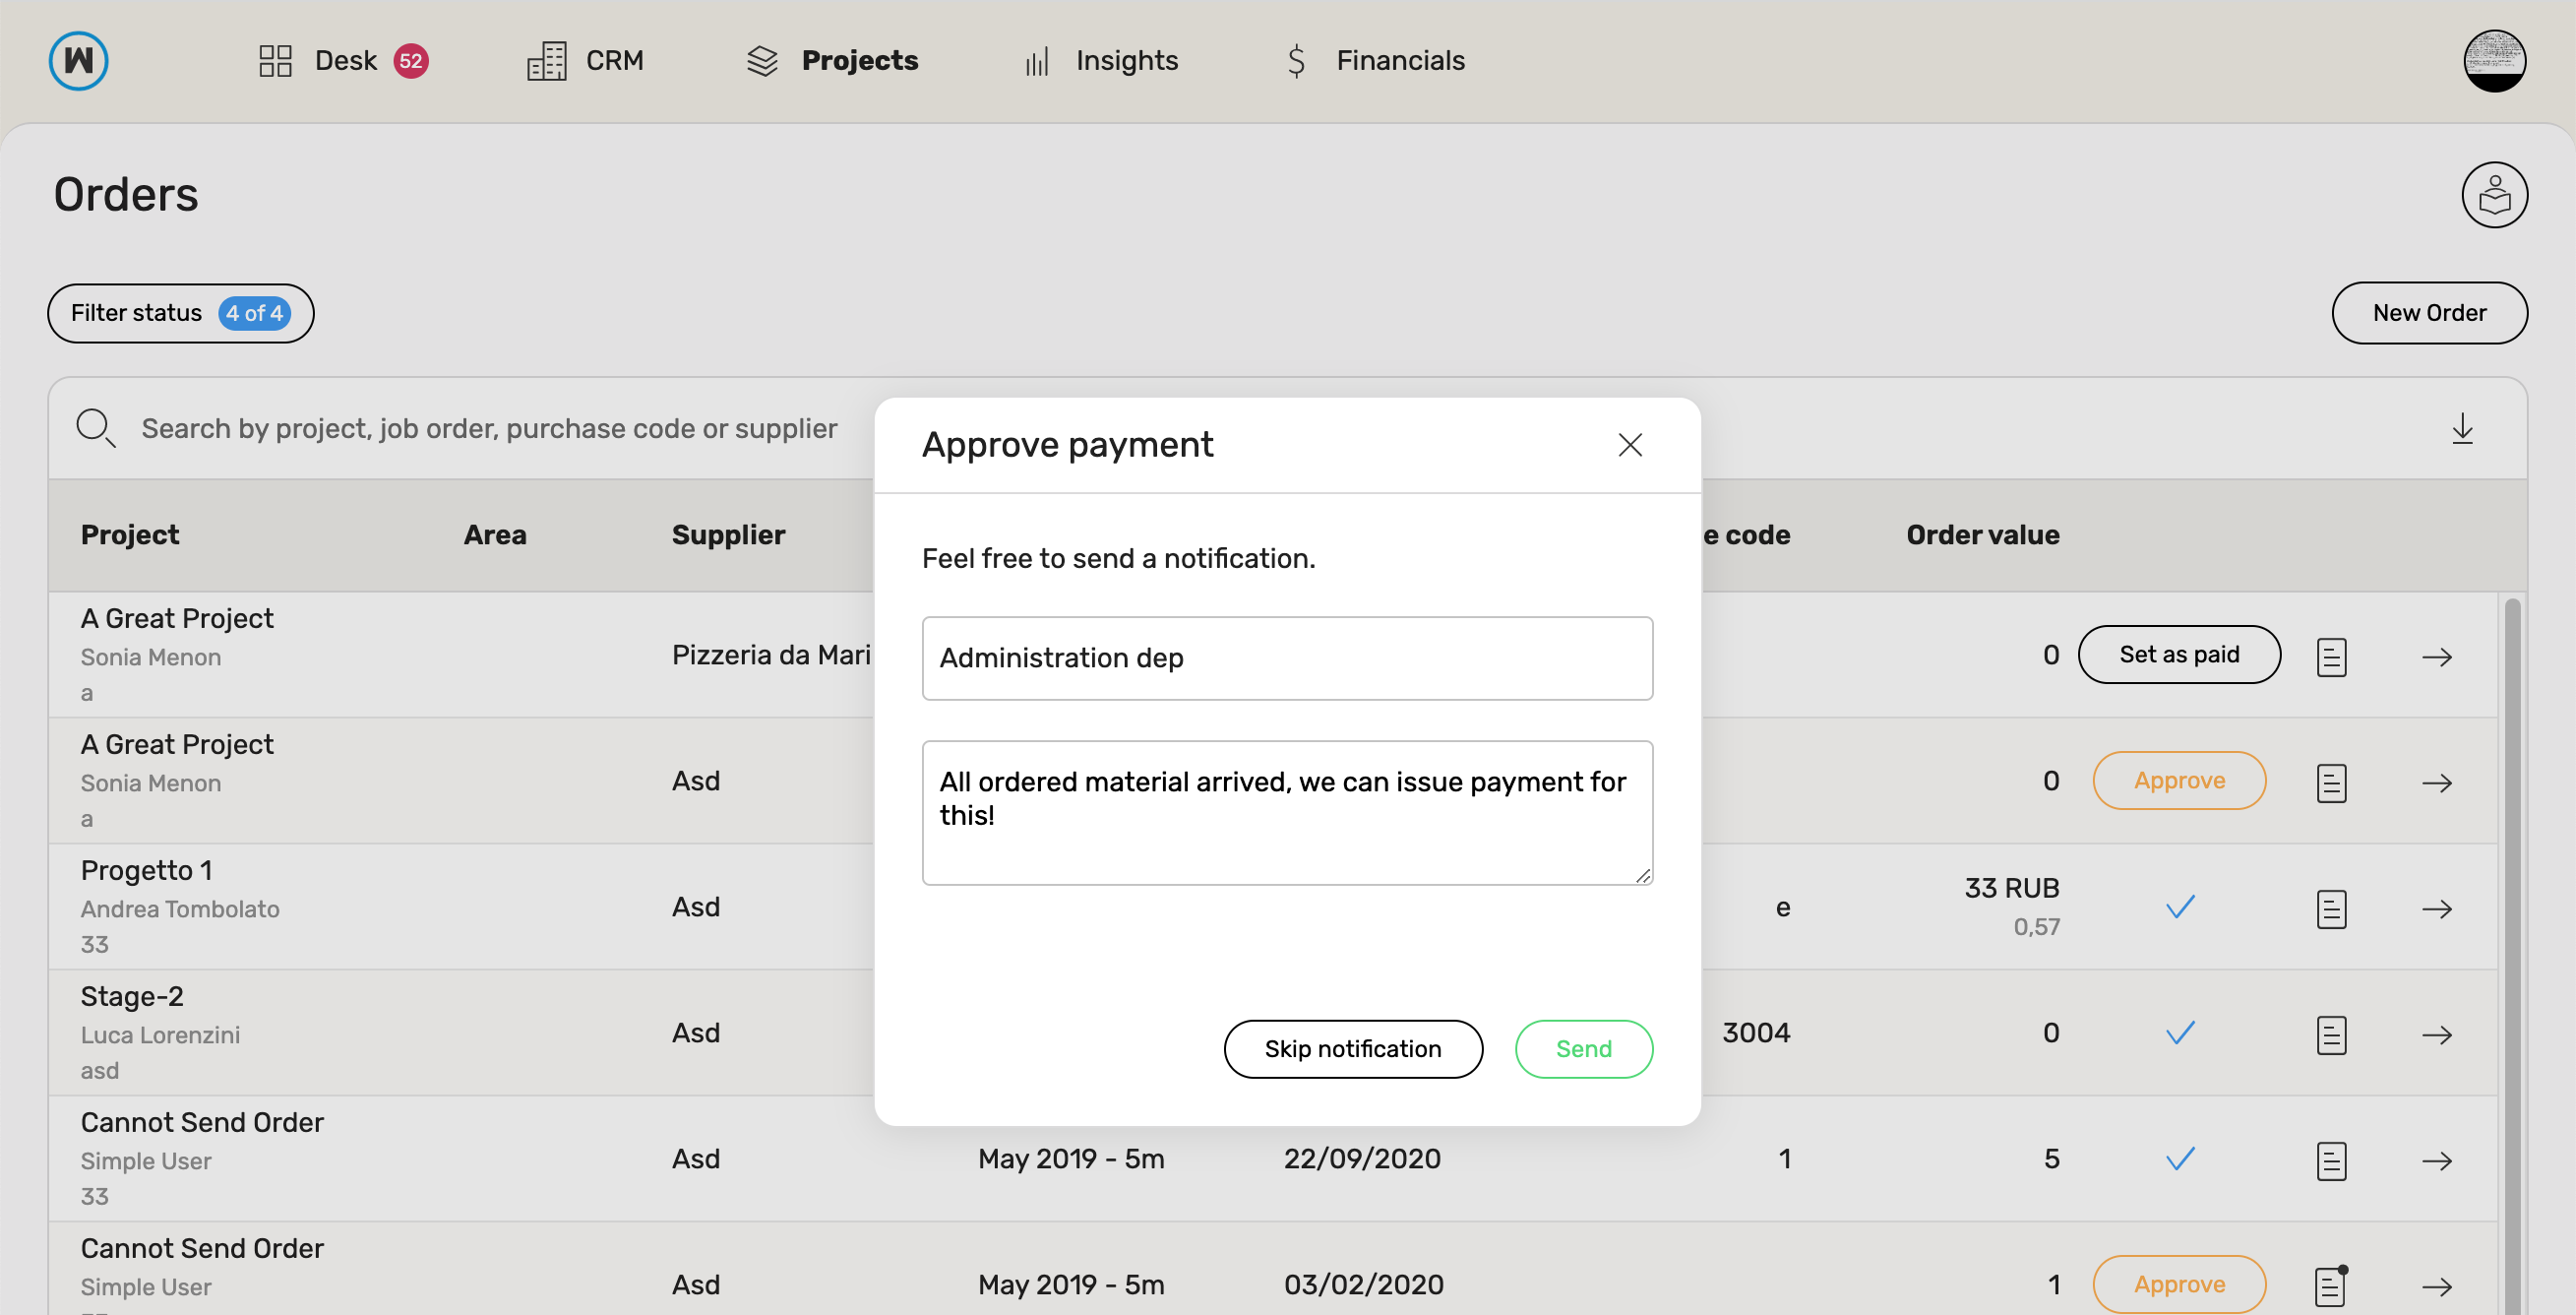
A approved order can be set as paid.
Set order as paid
You can set an order as paid by clicking on the “Set as paid” button. This isn’t mandatory but can be useful if you want to keep track of which orders has actually been paid.
Currency
Orders belonging to a multicurrency budget are displayed with their currency. Currency can be picked between those used in the budget’s external costs. The exchange rate for the currency refers to the budget’s creation date, but you can change it in any moment by editing it manually.
Order’s value must be lower or equal then the external costs provided in the budget for the currency picked for the order.
Export a spreadsheet with the list of orders:
- Click on “Export data”.
- Choose if you want to download all data or just a list of orders belonging to a time range.
- (Segment) Select the time range you want collect data from.
- Click on “Email me”.
- You will receive an email with the spreadsheet with requested data.
Note
You can create orders only for projects you have already provided with job order and budget.
Order’s value must be lower or equal then the external costs provided in the budget.
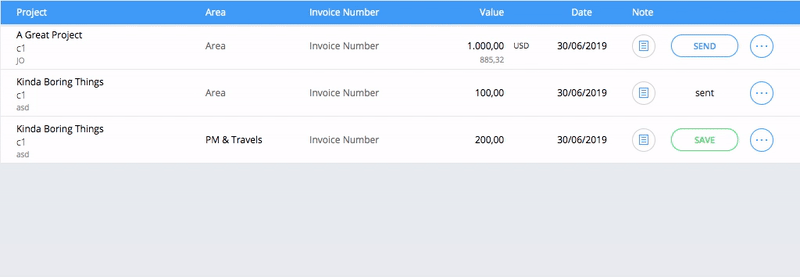
Invoices
In this section you can see all your invoices and create new ones. Once you click on the “Send” button, an e-mail is sent to the address inserted in the Email Bot section.
To create an invoice:
- Click on the top left “+ invoice” button and an empty invoice will be added to the list;
- Compile the invoice’s empty fields;
- Click on the “create” button.
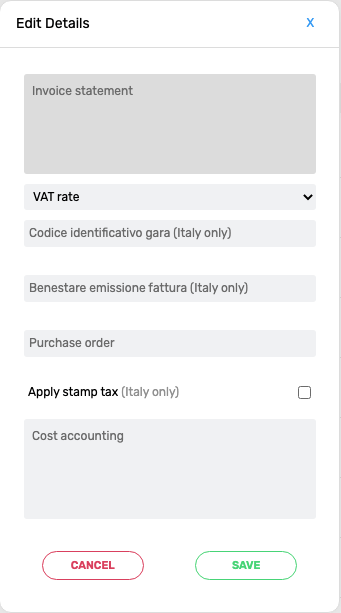
Edit details
You can add more information about your invoice by clicking on the options button of the invoice.
A window with further details will show up, letting you fill in the info you need.
Please mind the vat rate is automatically compiled with the client’s vat rate (if one has been provided).
Once you’re done, remember to click on the save button.
Currency
Invoices belonging to a multicurrency budget are displayed with the final net’s currency. The exchange rate for the currency refers to the budget’s creation date, but you can change it in any moment by editing it manually.
Note
You can create invoices only for projects you have already provided with job order and budget
Client List
In this section, you will find a comprehensive list of your clients, which are represented as companies. This list includes crucial details such as the company name and the group they are associated with.
To access this section, navigate to CRM > Clients > Client List.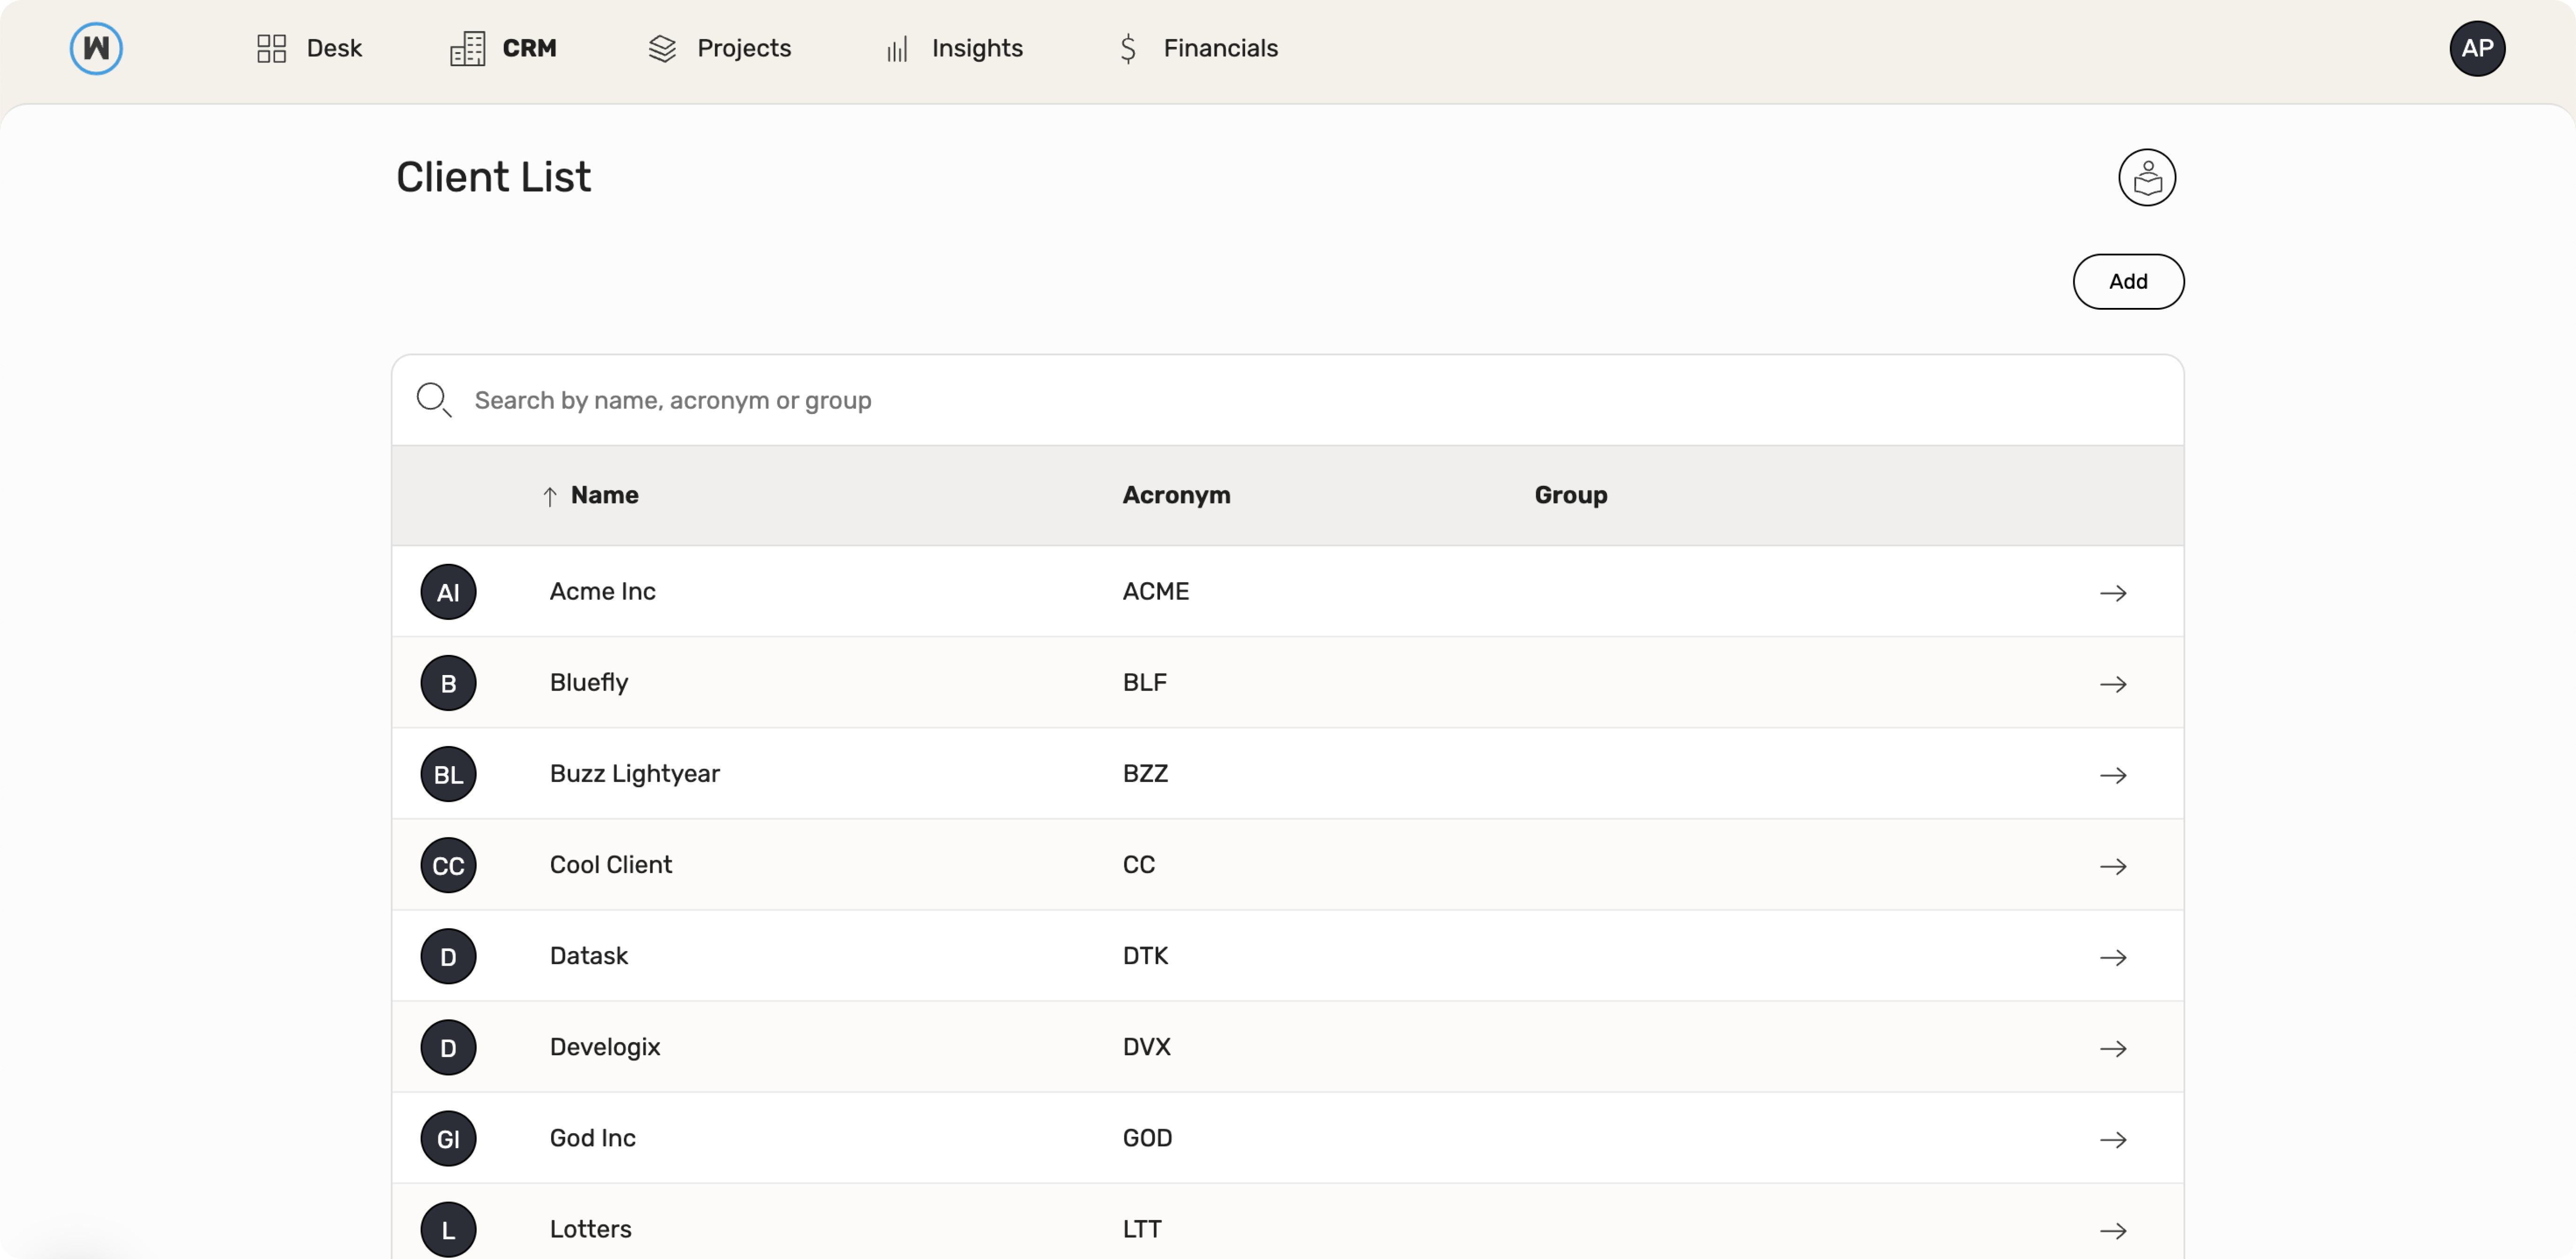
Using the search bar, you can easily hunt down your customers by their name, acronym, or the group they belong to.You can sort your list of customers in ascending or descending alphabetical order by name, acronym, or group. To do so, simply click on the column header.
Add a new client:
Adding a new customer on wethod is a piece of cake! You have a couple of options: you can create them right from your opportunity panel, or if you already have all the information, you can upload their profile directly from here, following these simple steps.
Click the “Add” button.
Complete all the required fields:
- Name: in this field enter the name of the customer you want to display on wethod’s pages.
- Acronym: this field allows you to associate an abbreviation with your customer’s name. This field is what will be shown in general reports where it’s necessary to display customer names in a shortened format.
- Click the “Save” button.
Once you’ve created a Client, you can access at its profile to add, edit, or delete information as needed at any time directly from its client details page by just clicking on the right-arrow in their row.
Client Details
In this page, you’ll discover all the information about your customers. Let’s dive into each section point by point now.
For each company listed on your Client List, click on the arrow icon to enter the company’s dedicated page.

This page contains all the information related to each customer. These details can be grouped into two sections:
- Client Company Details - this view includes all you client profile information, payment methods, and terms.
- Client Dashboard - a dashboard that includes data related to performance, projects, and all opportunities associated with the client.
Let’s explore them one at a time!
Company Details
To access your Client Company Details, click the right arrow next to the client’s name.
The client company details you enter in this section are directly linked to the customer and will be used for billing information on each project, according to the settings on this customer’s page.
Now, let’s take a closer look at the main element in this panel, step by step.
- Name
In this field enter the name of the customer you want to display on wethod’s pages. This field is required - Acronym
This field allows you to associate an abbreviation with your customer’s name. This field is what will be shown in general reports where it’s necessary to display customer names in a shortened format. This field is required - Legal Name
Enter your client’s official business name. This detail is crucial for accurate invoicing and should match the name on the invoice. - Intercompany ID
Only if your company has enabled the intercompany module, you will see this field. This field is used to uniquely associate profiles of other companies within your group. When you select the cell, a dropdown menu opens, allowing you to choose from the other companies within your group. Simply select the company name you want to associate, and you’re good to go. If you don’t see the company name you want to associate, it’s because it’s already linked to another profile.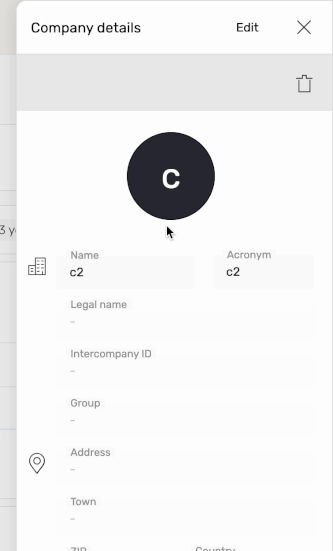
- Legal Name
Enter your client’s official business name. This detail is crucial for accurate invoicing and should match the name on the invoice. - Group
If your client is part of a larger group, enter the group name in this field. This enables you to filter and categorize this client in the client list based on this attribute. - Address, Town, ZIP, Country, Province
Provide the complete street address, city or town, postal code, and country for your client’s location. If the selected country is “Italy” you can also specify the province within Italy where your client is situated. - Website, Linkedin
Enter your client’s website and LinkedIn profiles to help keep their online presence up to date. - VAT Number (🇮🇹 P.Iva)
If applicable, enter your client’s VAT (Value Added Tax) number, which is essential for tax and invoicing purposes. - Tax Code (🇮🇹 Codice Fiscale)
If applicable, enter your client’s tax code, which is important for tax-related transactions and records. - SDI Code
If applicable, provide your client’s SDI (Sistema di Interscambio) code, which is essential for electronic invoicing and communication with public administrations in Italy. - Payment Condition
Specify the payment conditions agreed upon with your client, ensuring smooth financial transactions and clear expectations (ex: bank transfer, cash, cheque, bank receipt…) - Payment Terms
This field cannot be customized independently but allows you to select a predefined payment term that has been set in your company settings.This ensures uniformity and approval of all payment terms across your organization. - Bank Account
This field allows you to select the specific bank account where you’d like to receive payments from this client. It cannot be newly filled out but allows you to choose from bank accounts that have been configured in your company settings. - VAT Rate
You can’t input a new value here; instead, it enables you to select a predefined VAT (Value Added Tax) rate that has been configured in your company settings. - Email / Email 2
Enter in the email field the client’s primary email address, which serves as a key contact point for communication and correspondence. If needed, provide a secondary email address for the client, which can serve as an alternate contact point for communication. - PEC Mail
If applicable, input the client’s certified email address, often required for official, invoicing and legal communications in Italy. - Phone
Enter the client’s primary contact phone number for direct communication and inquiries. - Notes
Use this field to add any additional remarks, comments, or special instructions related to this client, helping to provide context or important details. - Declaration of Intent
In this section, specify the date and protocol related to the declaration of intent, indicating the formal declaration’s key details.
Add, Edit or Delete Clients
To add a client follow these steps.
To edit the information of a client open its company details panel, click the edit button make the necessary changes, and then click save. 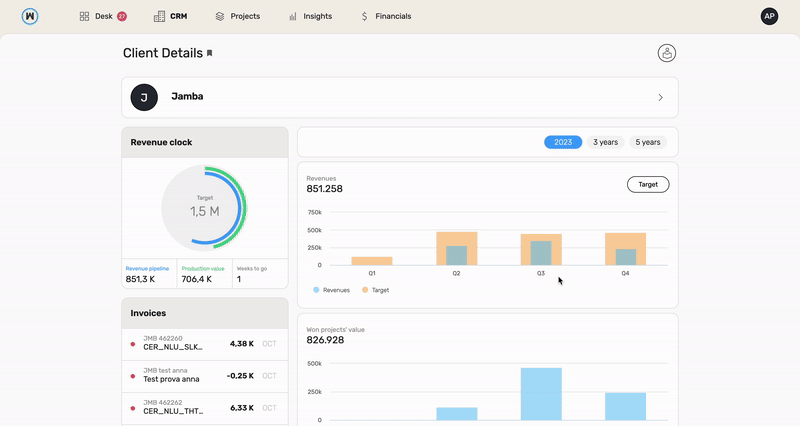
To delete a client open its company details panel, and then click the trash can icon. You’ll see a pop-up asking if you’re sure to proceed.
If the client doesn’t have any projects assigned to them and has no associated contacts, simply click on the green “Yes, delete” button to proceed.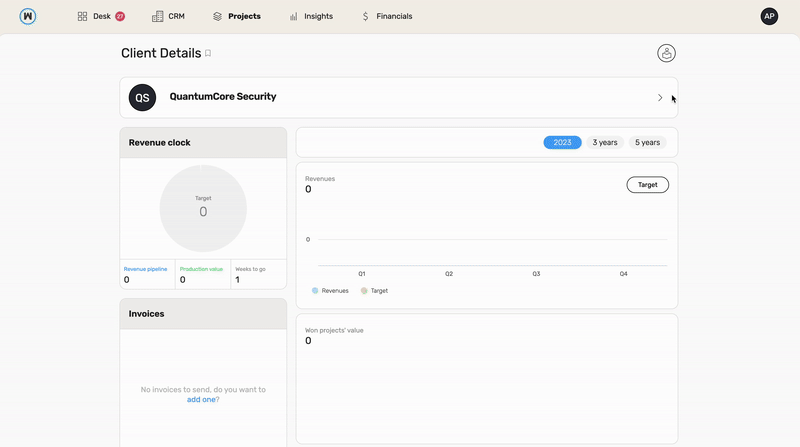
If the client has projects assigned to them and/or associated contacts, after clicking the green “Yes, delete” button, you’ll see another pop-up warning that you can’t delete the client due to associated data.
You can choose to migrate the associated data to another client; if this option suits your needs - for example, if you’ve identified a duplicate client - select the customer to whom you want to transfer all existing projects in the “choose new client” bar (please note that the receiving customer profile must already exist; you cannot create a new one from this panel) and click “Delete and Replace”.
However, if you want to delete all projects and contacts related to a client, you must first manually delete these items before being able to delete the client.
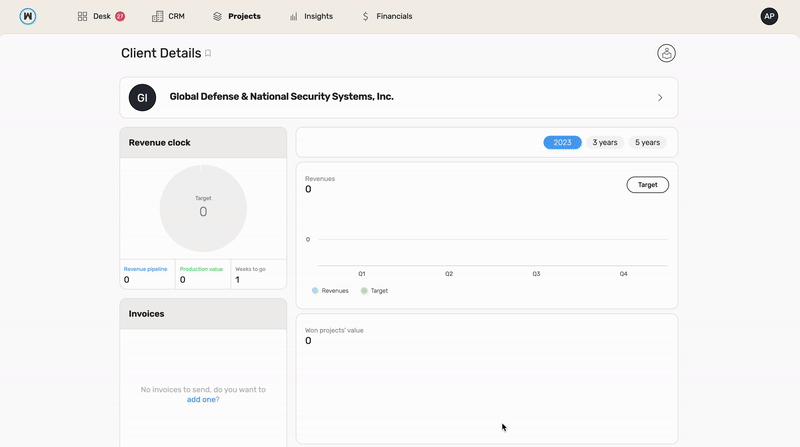
Client Dashboard
In the Client Details page, you’ll discover a variety of charts that summaries the history between your client and you company.
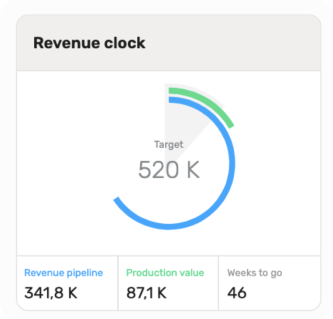
The revenue clock for the current year - Client
This revenue clock is based only on the specific client data. It’s like a visual progress tracker! Picture a round chart divided into three colors, showing different aspects of the client’s revenue.
- The gray part is like a countdown, telling you how many weeks are left in the year.
- The blue part is about the value of ongoing opportunities and projects with the client. It’s calculated based on how likely they are to succeed and their value.
- The green part is the work you’ve already done for the client, updated weekly by the project status added by the project managers.
- In the middle is our revenue target for the year. You can set it in the Revenue Target section.
Invoices - Client
The invoice widget in this page displays a list of invoices that need to be sent out for that specific client, following the project’s invoice plan.
If an alert is marked in red, it’s a high-priority task because the invoice should have been sent in the past. If it’s yellow, it means the invoice is due for this month or the next one; if it has no color it means the invoice is planned for a future date.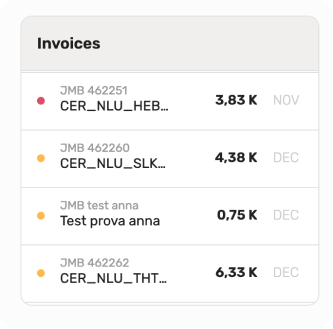
Filter your data view
The charts below typically show data for the current year, broken down into quarterly views. But if you’d like, you can switch things up by using the selector at the top right of the insights to check out data from the past 3 or 5 years.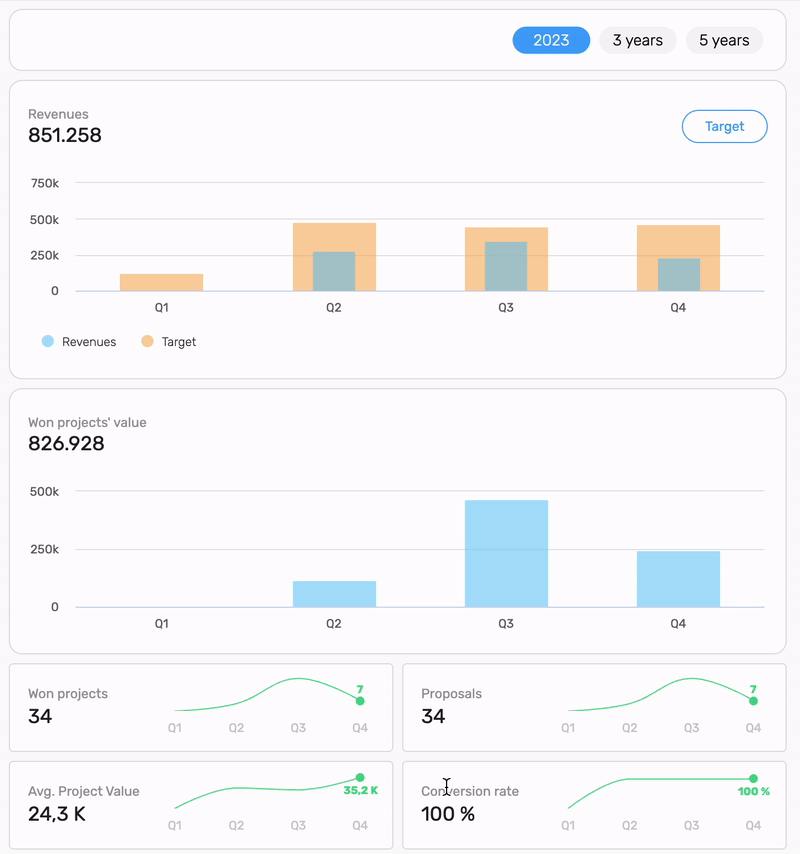
Revenues - Client
This chart presents a visual comparison of quarterly targets and production value for a client.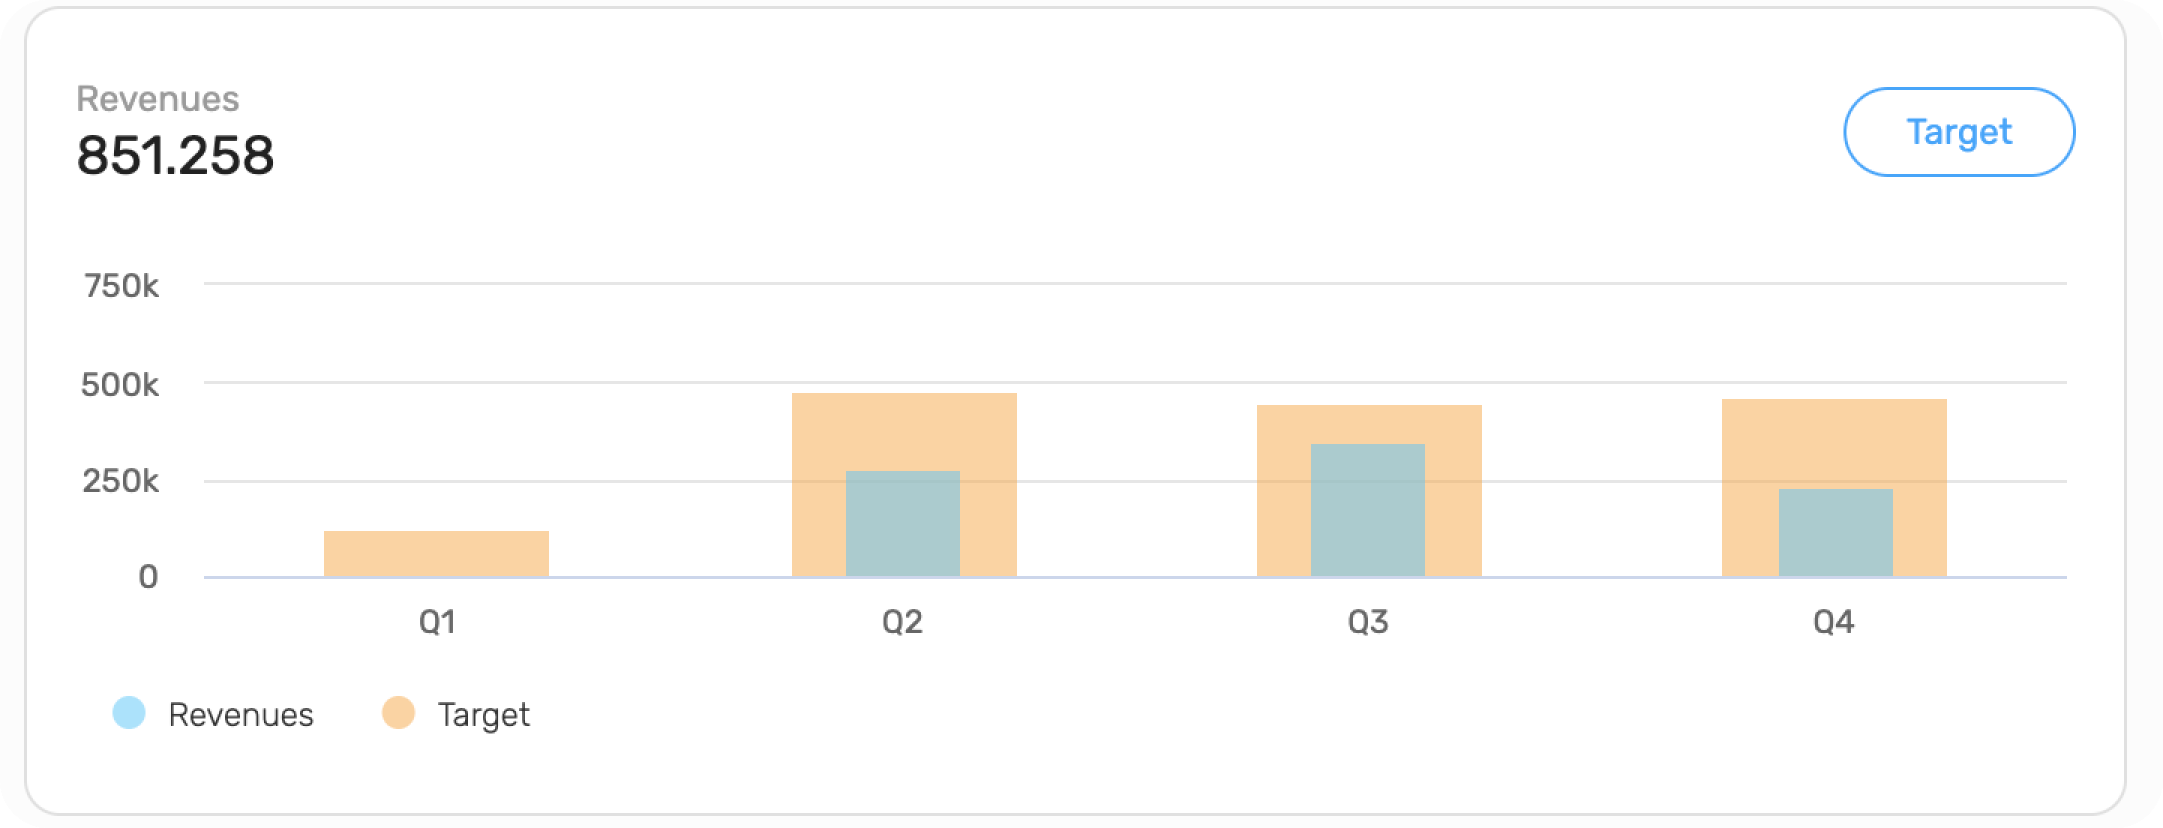
The yellow bars represent the revenue targets established for each quarter, providing a clear benchmark for expected performance. The blue histogram depicts the total value of the production plans for the client’s projects.
For past and completed months, the blue bars indicate the actual production value, confirmed by the weekly project status done by the project managers. This means that for the quarters that are complete, the production plan figures match the actual revenue generated.
For the ongoing and future quarters, the blue bars are based on the estimated production plan of the client’s projects. These estimates are projections that will be updated as more project statuses are confirmed.
The chart provides a snapshot of current and forecasted performance against targets, offering an at-a-glance indication of how closely the production aligns with goals throughout the year.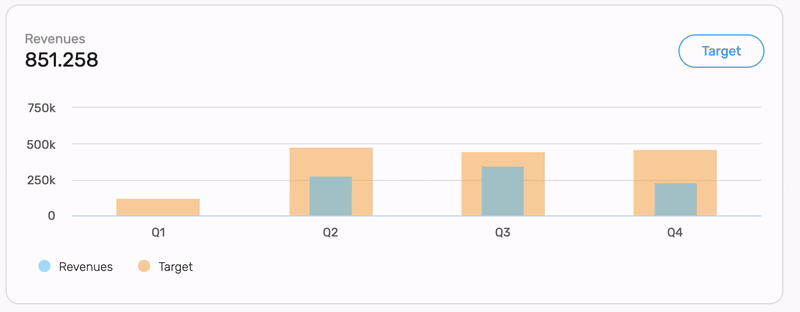
The chart’s legend feature lets you tweak how you see things based on what you’re checking out. Just click on ‘Revenues’ or ‘Target,’ and you can turn the blue bars on or off for the revenue or the yellow ones for the revenue targets. It makes the view more flexible, so you can focus on one set of data at a time, making it super handy for diving deep into the details or when you’re showing the data to others.
Won projects’ value - Client
This chart displays the value of projects won by quarter, representing the instances when the client have approved projects, which is a separate metric from when revenue is actually generated from production. This distinction is crucial because it separates the sales success from the operational execution.
It tracks the success of the sales team in securing projects. This is an indicator of market success and potential future revenue.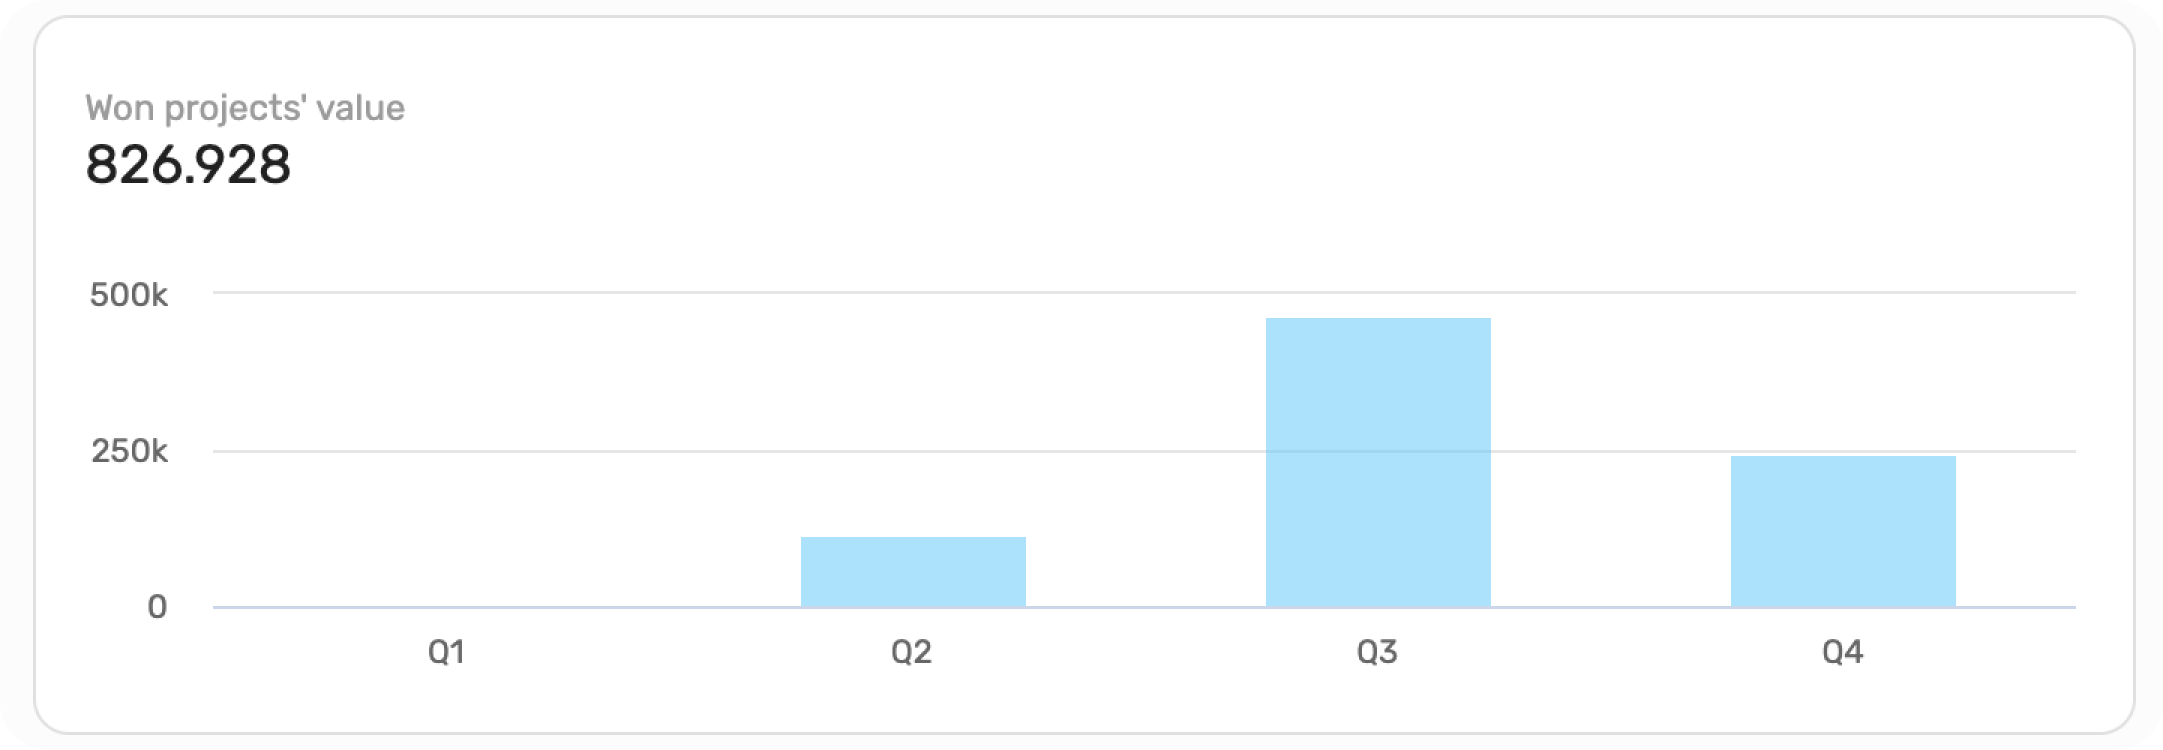
Sparklines
This is series of five performance indicators, each one of them is represented by a sparkline graph that depicts the trend over selected period.
Sparklines are color-coded to emphasize trends:
- Red indicates that the last value is worse than the first one.
- Blue suggests that the first and last values are the same.
- Green signifies that the last value is better than the first one.
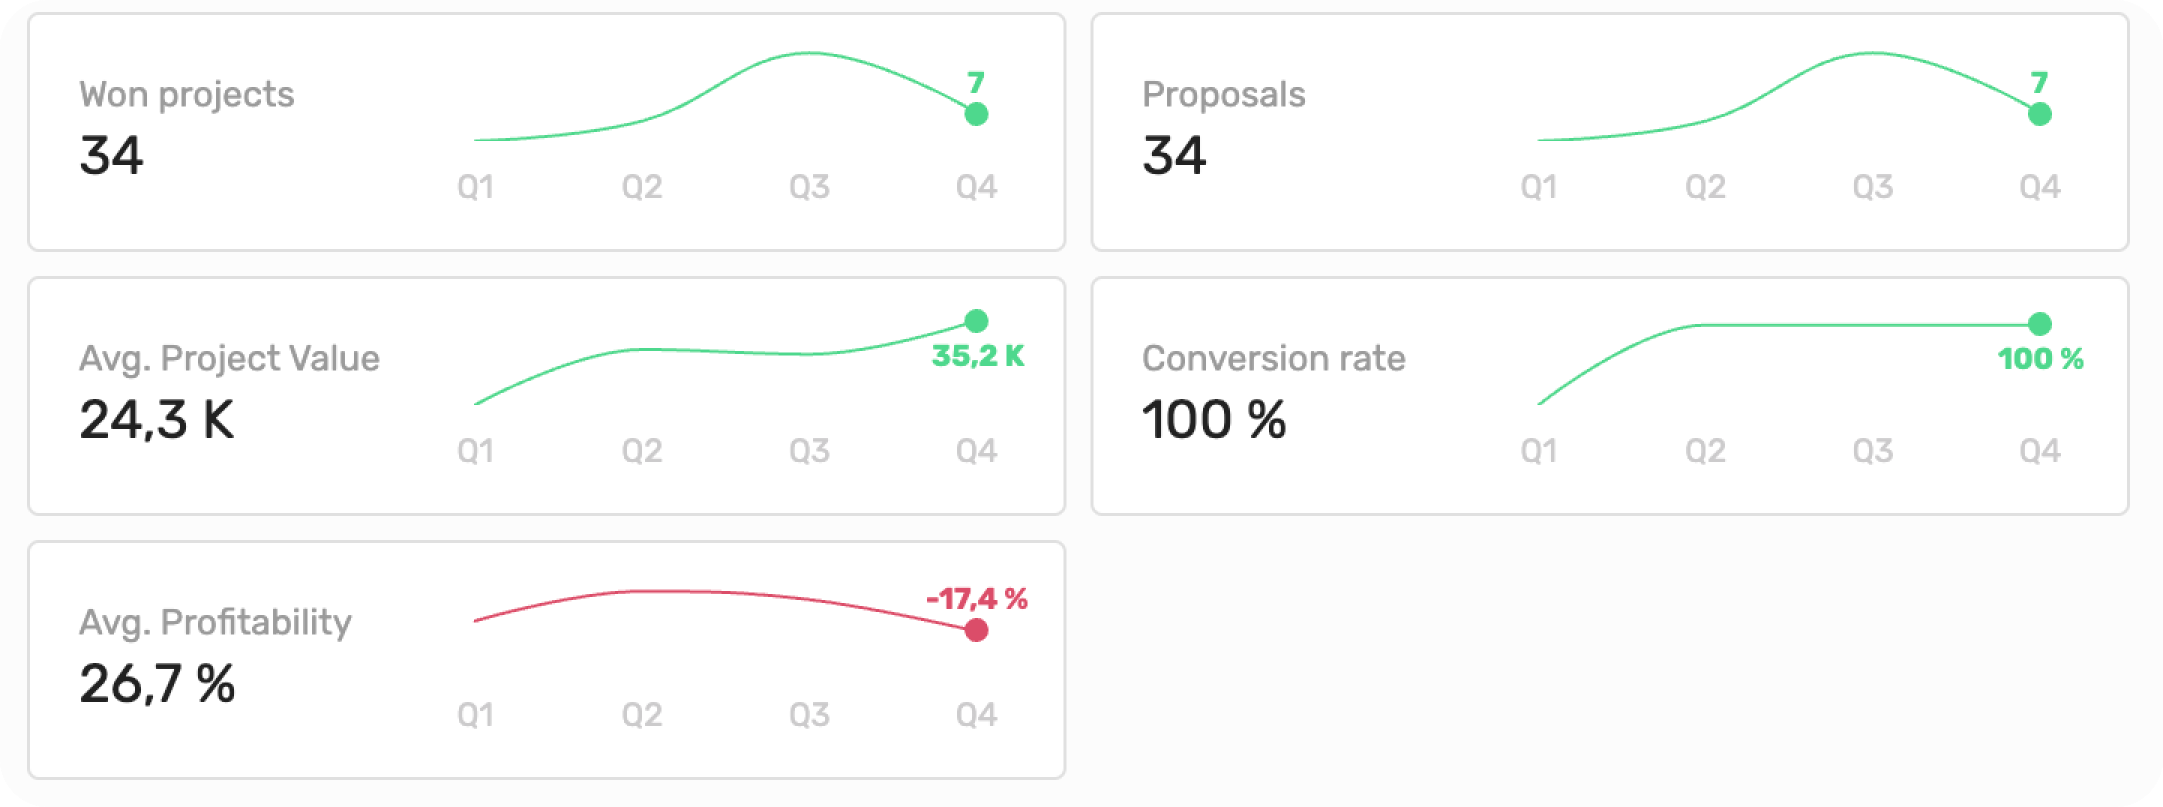
Won Projects
This metric shows the number of projects won (with 90% or 100% probability of success) by the company across the periods.
Proposals
Indicates the number of projects that reached a 90% probability of success (won) or dropped to a 0% probability (lost). [This indicates the number of proposals submitted to potential clients.]
Average Project Value
It represents the average economic size of all won projects.
Conversion Rate
This shows the success rate of converting proposals into won projects.
Average Profitability
This metric displays the average profitability percentage of all won projects within the selected time range.
Won projects
In this list you will find all your client projects with a 90% or 100% probability.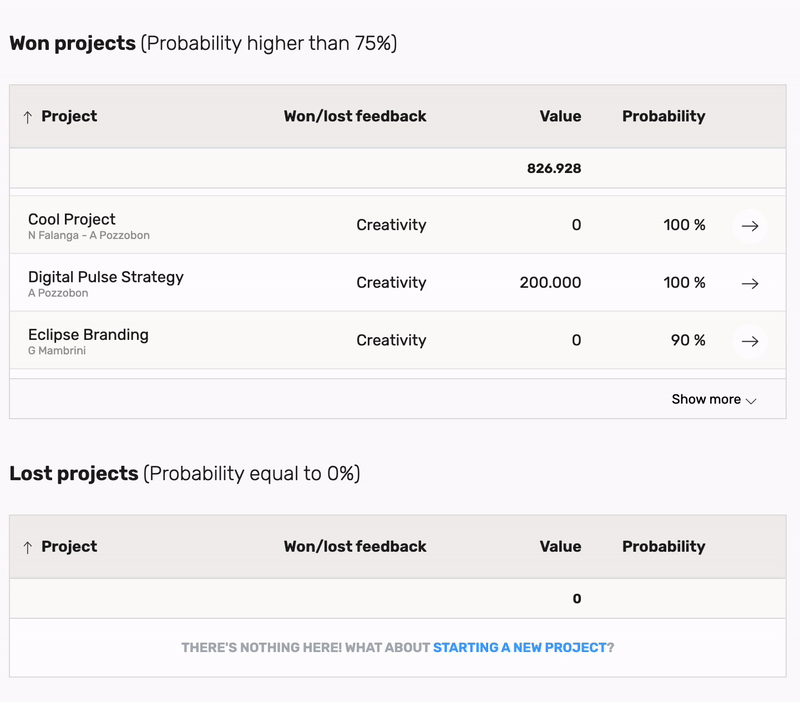
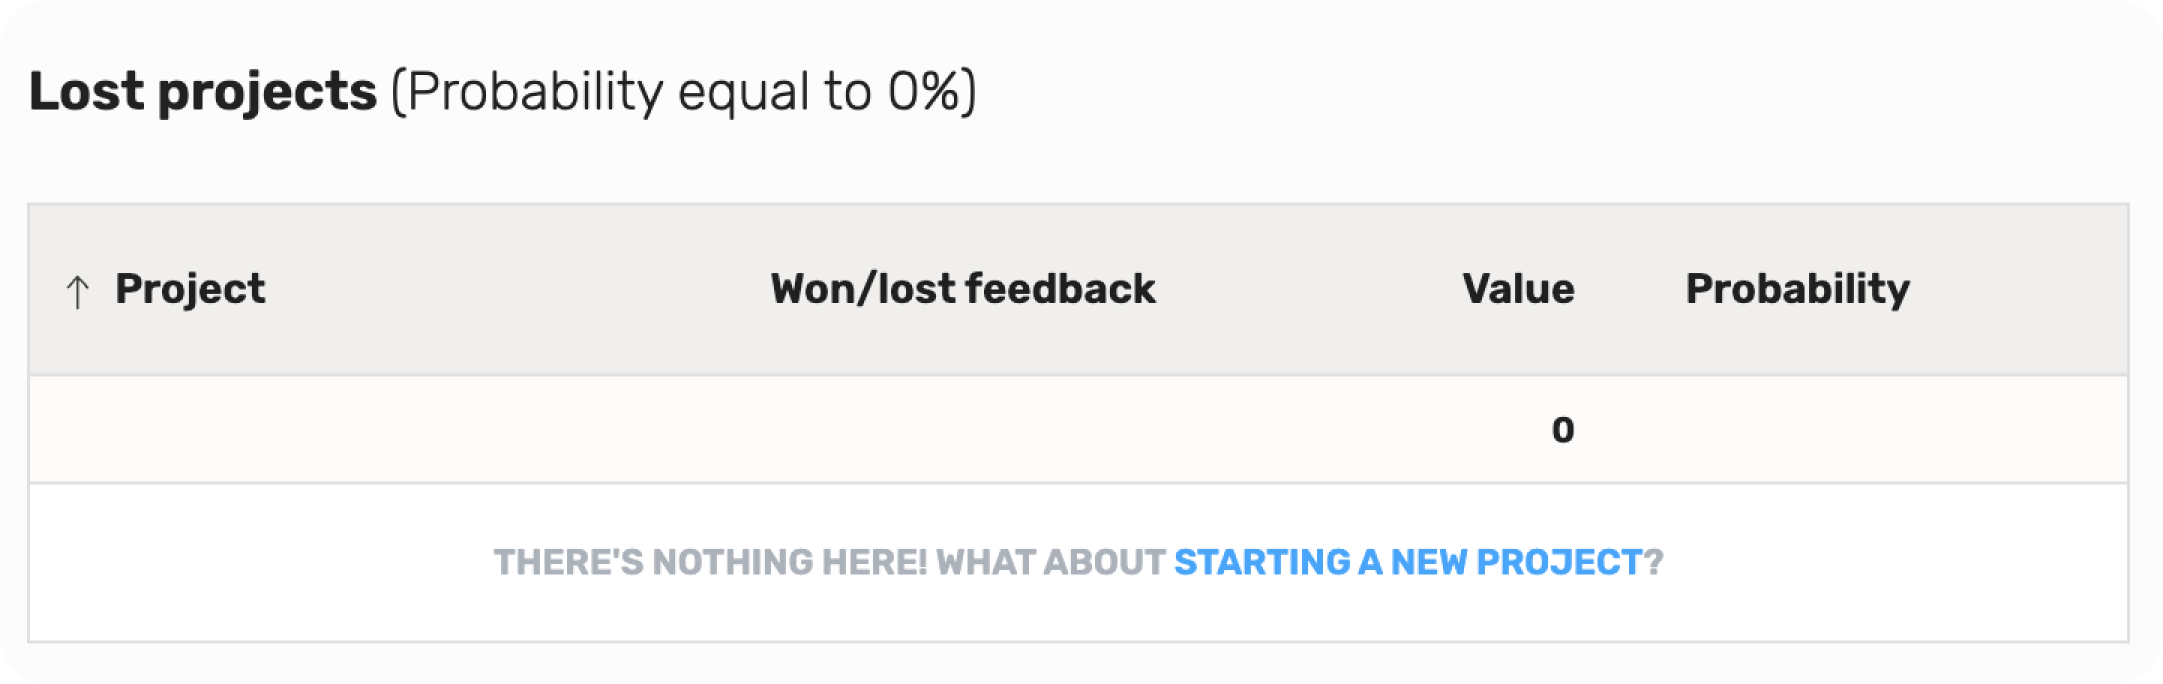
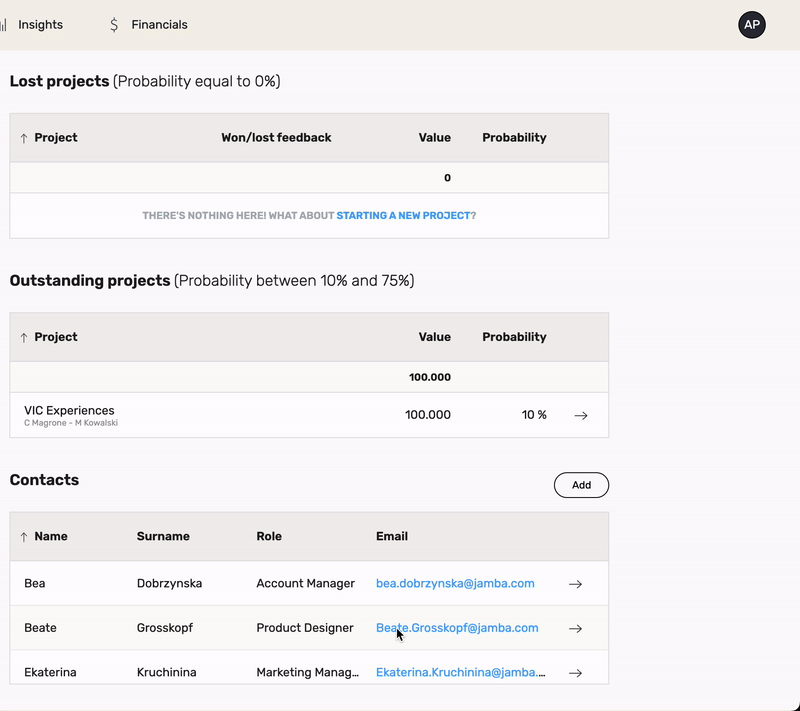
Lost Projects
In this list you will find all your client projects with 0% probability.
Won/Lost Feedback
🌈 For the won/lost project you can see the “Won/Lost Feedback” feature when you enable the related job order category’s flag in the company settings.
Outstanding Projects
In this list you will find all your client projects with a probability between 10% and 75%.
As the case shown above, if you see the message “There’s nothing here! What about starting a new project?”, it means there are no projects for that client in that particular status.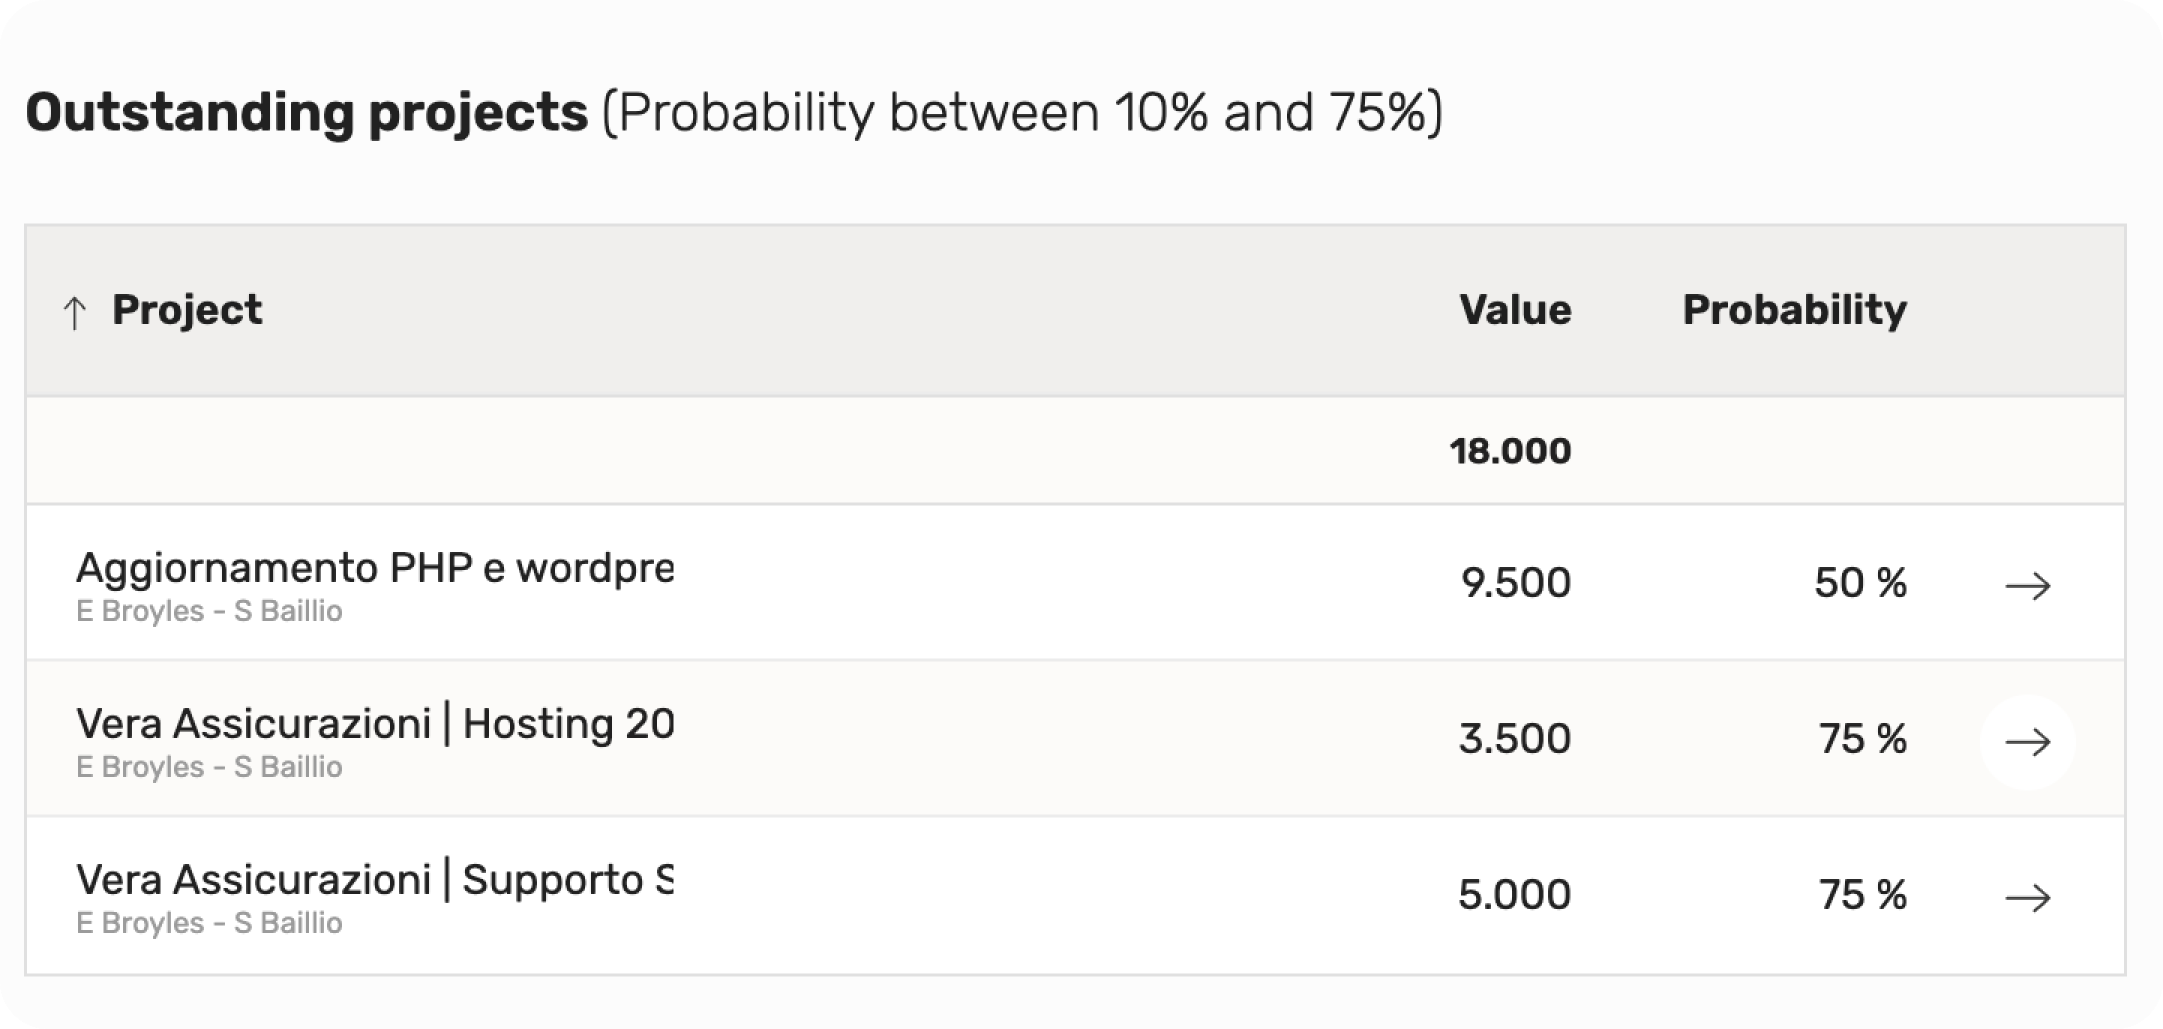
Contacts
At the bottom of the client details page, you’ll find a summary of the client’s contacts. Here, you’ll see their names, roles, and email addresses.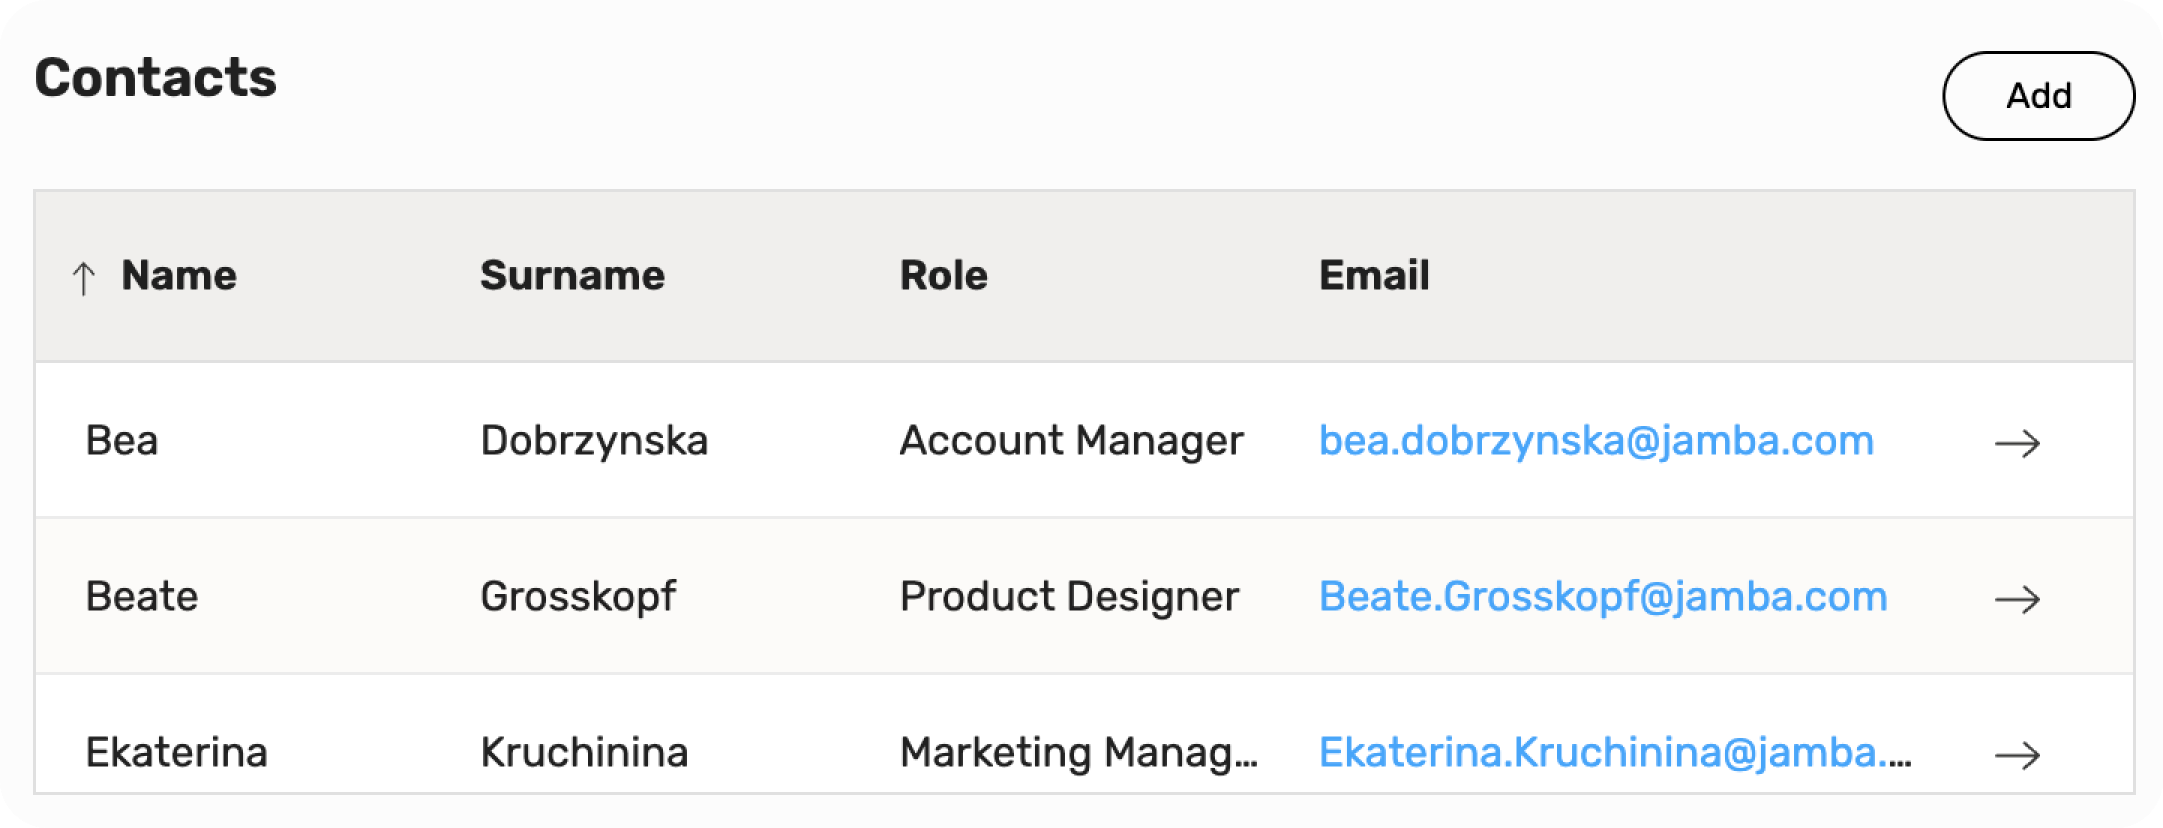
If you want to explore a contact’s details further, click on the right arrow in their row to open their contact panel. Here, you can make changes, add, or delete information as needed.
Add a new contact
To add a new contact to one of your client you have a couple of options: you can create them right from your opportunity panel, or if you already have all the information, you can upload their profile directly from here, following these simple steps.
- Click the “Add” button.
- Complete all the required fields:
- Name: enter the contact’s name.
- Surname: type his/her surname.
- Company: on this page, the dafault suggested company name corresponds to the customer profile you’re currently adding the contact to.
- Email: type the contact’s email address. - Click the “Save” button.
After taking a look at the list, you can dive into all the details about a client by just clicking on the right-arrow in their row.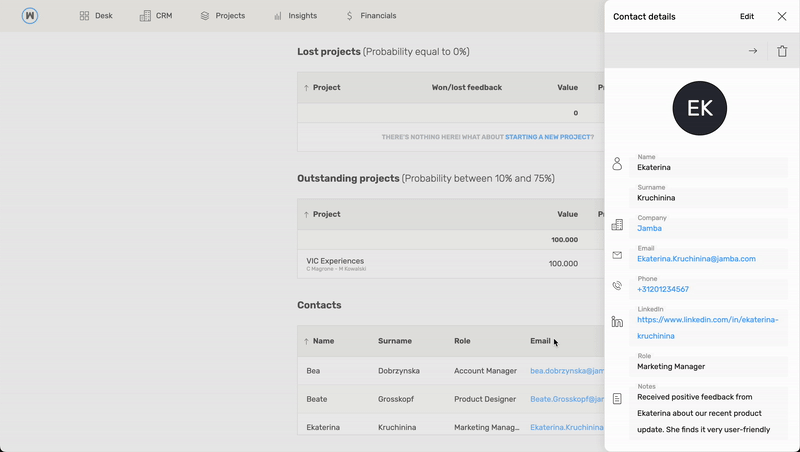
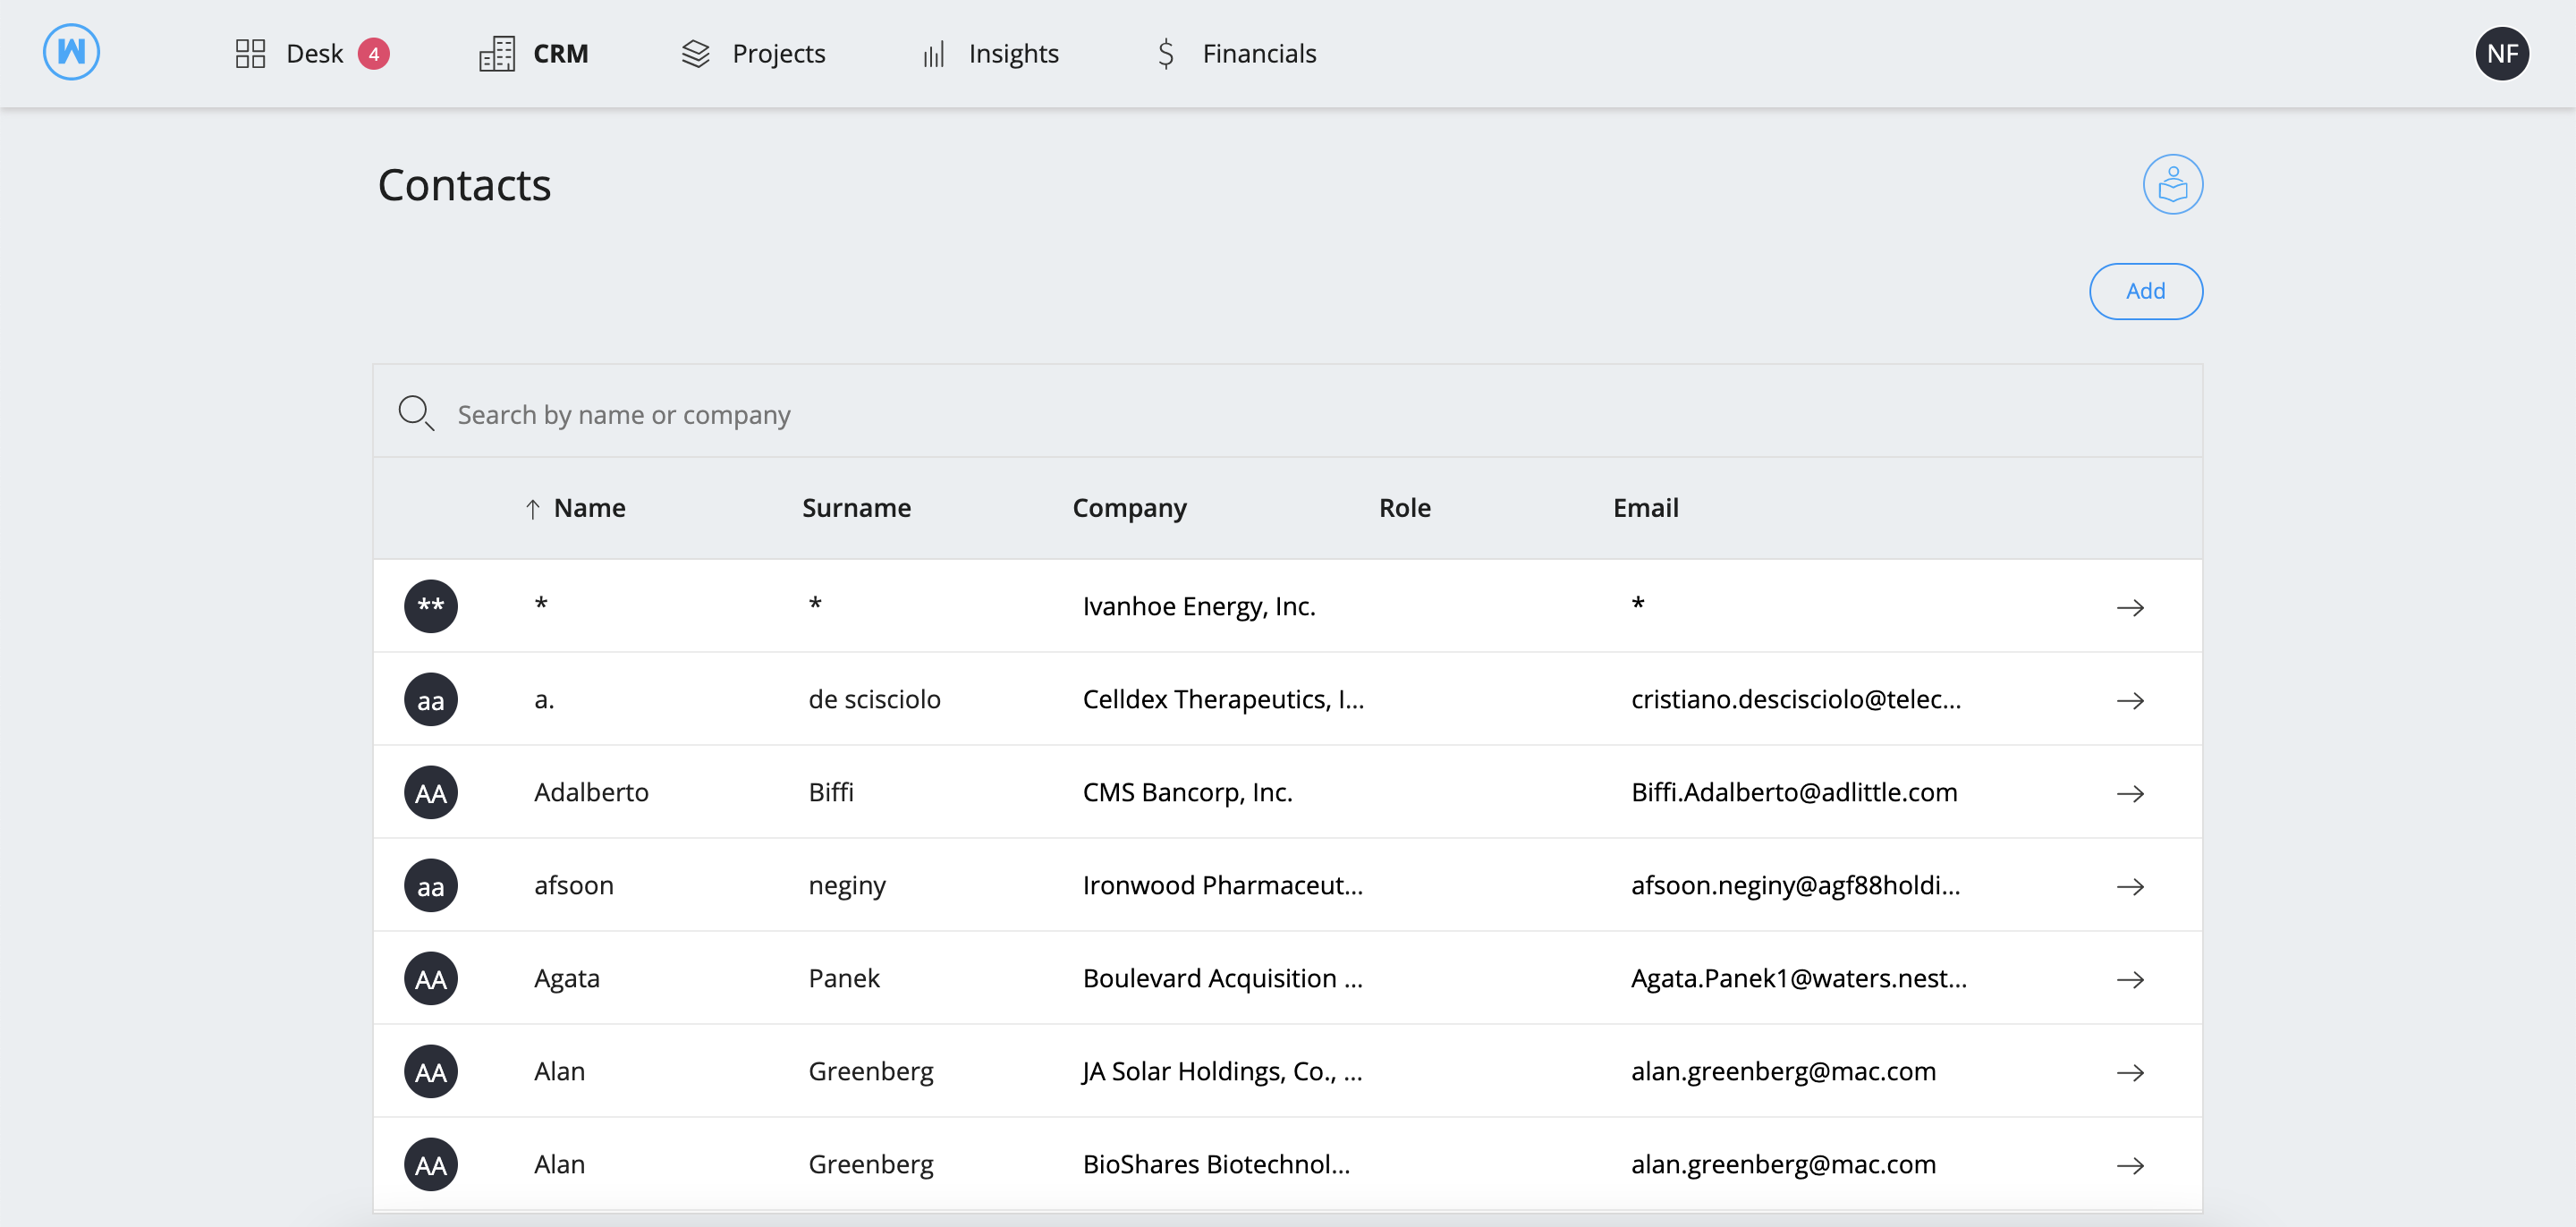
Contacts
In this section you have a list of your client’s contacts with details like their name, company they belong to, email and role.
Find this section in CRM > Clients > Contacts.
Add a new client contact:
- Click the “Add” button
- Fill in all the required fields
- Click on the “save” button
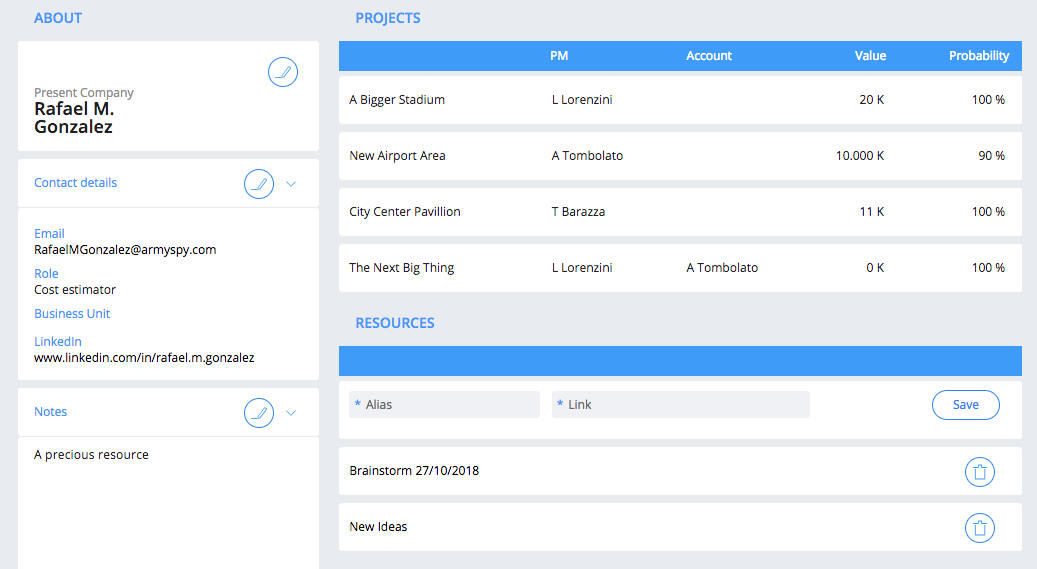
Client contact page
Click on the arrow to open the client contact page.
In the contact page you can find all the projects developed with this contact and all his resources.
A resource is just a link with a name to something external to WETHOD (like a document or a todo list).
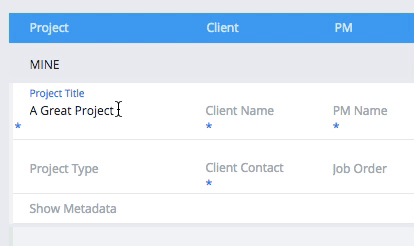
How to link a contact to a project? Just go to the pipeline and pick a name from the “Client Contact” field’s list (if you are creating a new project ensure to select the ‘Client’ field first):
Intercompany client
If your company is part of a group you can elevate some of your clients from “classical clients” to “intercompany clients”.
To do so you just need to click on the arrow to open the sidebar and assign the Intercompany ID by selecting it from a list containing all the companies which are part of your group.
This is particularly useful when you decide to use a job order category with the “Intercompany supplier” flag enabled.
Suppliers
Find this section in Projects > Wallet > Suppliers
In this section you can view all your suppliers and create new ones.
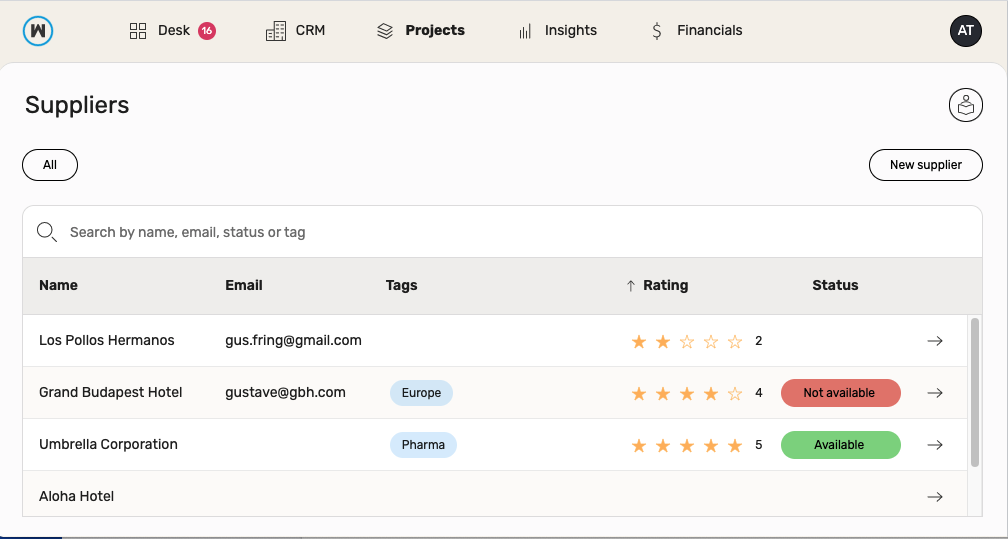
To add a new supplier:
- Click on the top left “New supplier” button and a sidebar will open
- Compile the supplier’s empty fields inside the sidebar
- Click on the “save” button
Note
You can only assign tags which was previously created in the “Supplier Settings”. Tags can be useful to catalogue the supplier with keywords (i.e. expertise, industry or geography)
Supplier’s status
It is possible to add a status that determines whether a supplier is available for contracts or not. To enable this feature and set your preferences on supplier’s status, head to Settings > Company > Suppliers or learn more from “Supplier Settings”.
Note
Orders can be sent to suppliers that are eligible for contract only.
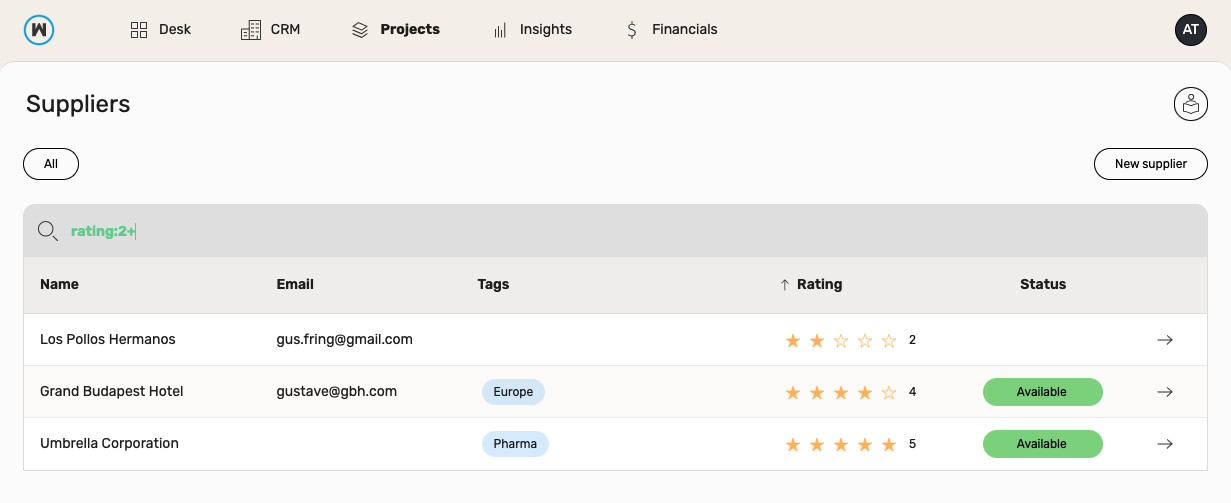
Advanced Search
By default you can search suppliers by name, email, status or tags just by typing in the search bar.
If you need something more, you can use these search query:
| Description | Query |
|---|---|
| Suppliers which get at least one order for a project with client's name containing "acme" | client:acme |
| Suppliers which get at least one order for a project which name contains "new site" | project:new site |
| Suppliers with rating greater than 2 | rating:2+ |
| Suppliers with rating lower than 3 | rating:3- |
| Suppliers with rating equal to 4 | rating:4 |
Note
You can search by status only if it’s enabled.
You can search by rating only if you have permissions to see it.
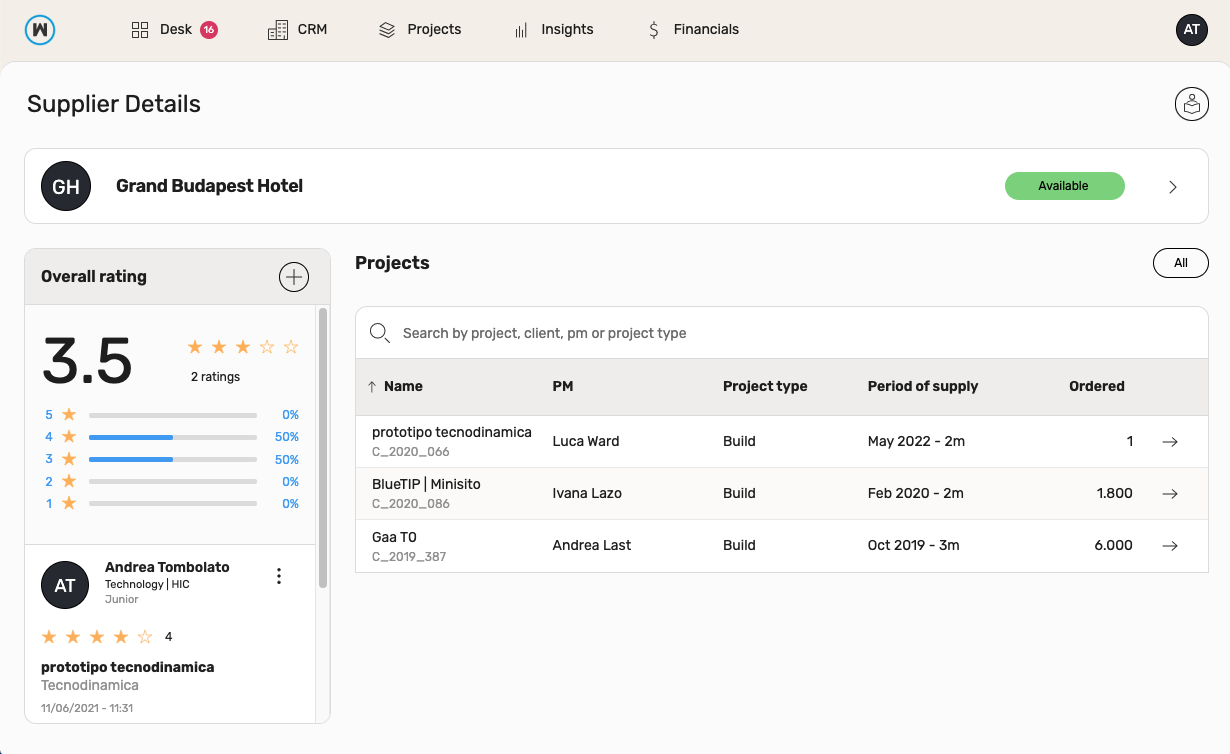
Supplier details
Each supplier’s row has got an arrow button which you can click to see supplier details.
Here you can:
- Edit details (from the sidebar)
- See all projects for which supplier get at least one order
- See, add and edit supplier ratings
A rating is composed by:
- A 1 to 5 numerical value, expressed as an amount of stars (required)
- A project to which rating refers (required)
- A comment to explain the rating value (not required)
Rating permissions can be managed from the permissions section, here you can express:
- Which roles can see rating related thing
- Which roles can create and manage their own ratings
- Which roles can delete others ratings
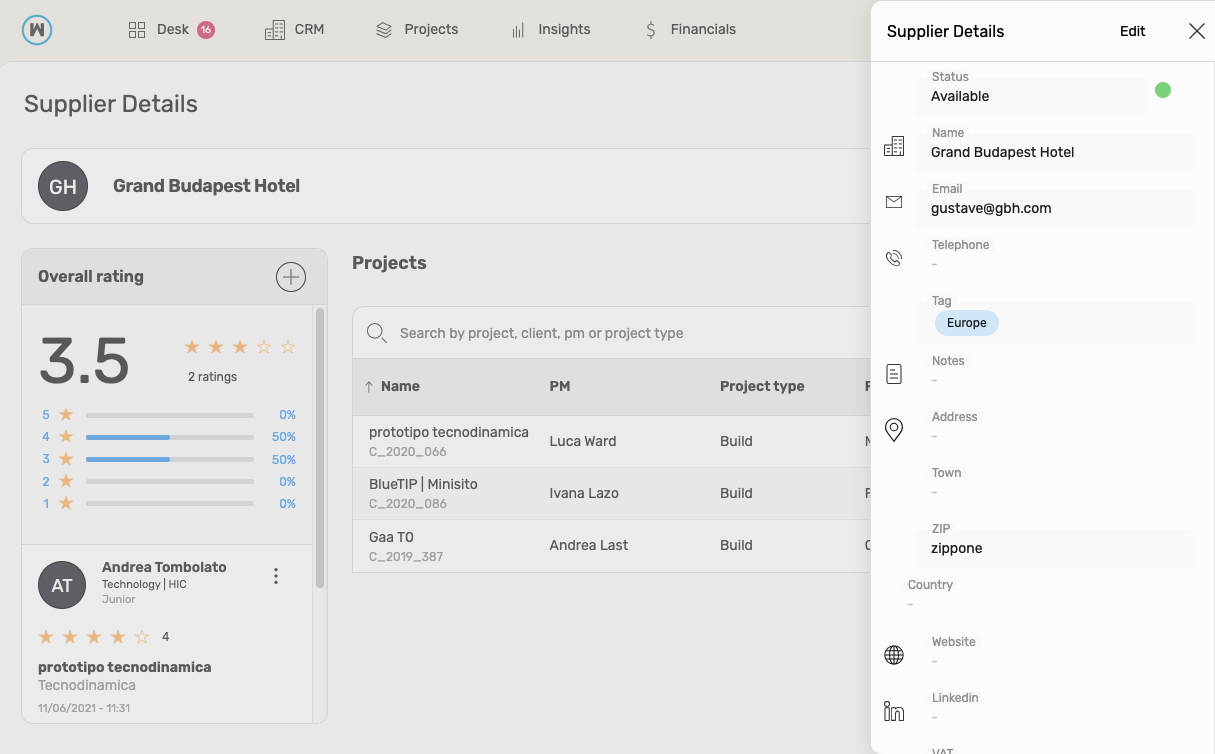

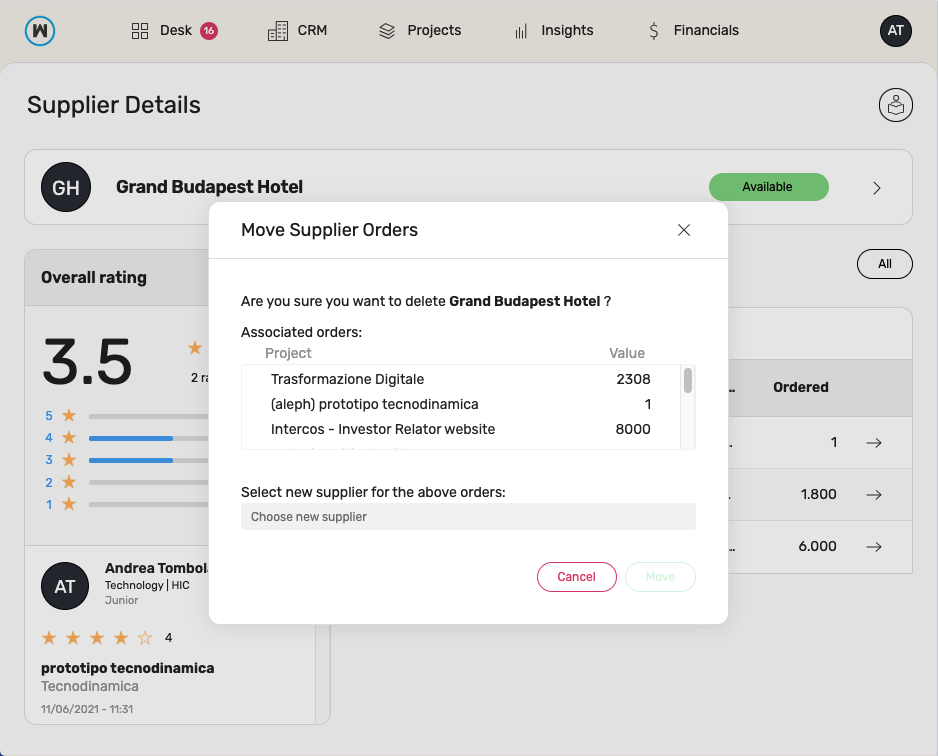
From sidebar you can try to delete a supplier but, if at least an order exist for it, you need to transfer all its orders to another supplier available for contract. This process is simplified by a modal that shows you all the orders linked to the supplier you’re deleting and let you pick another supplier.
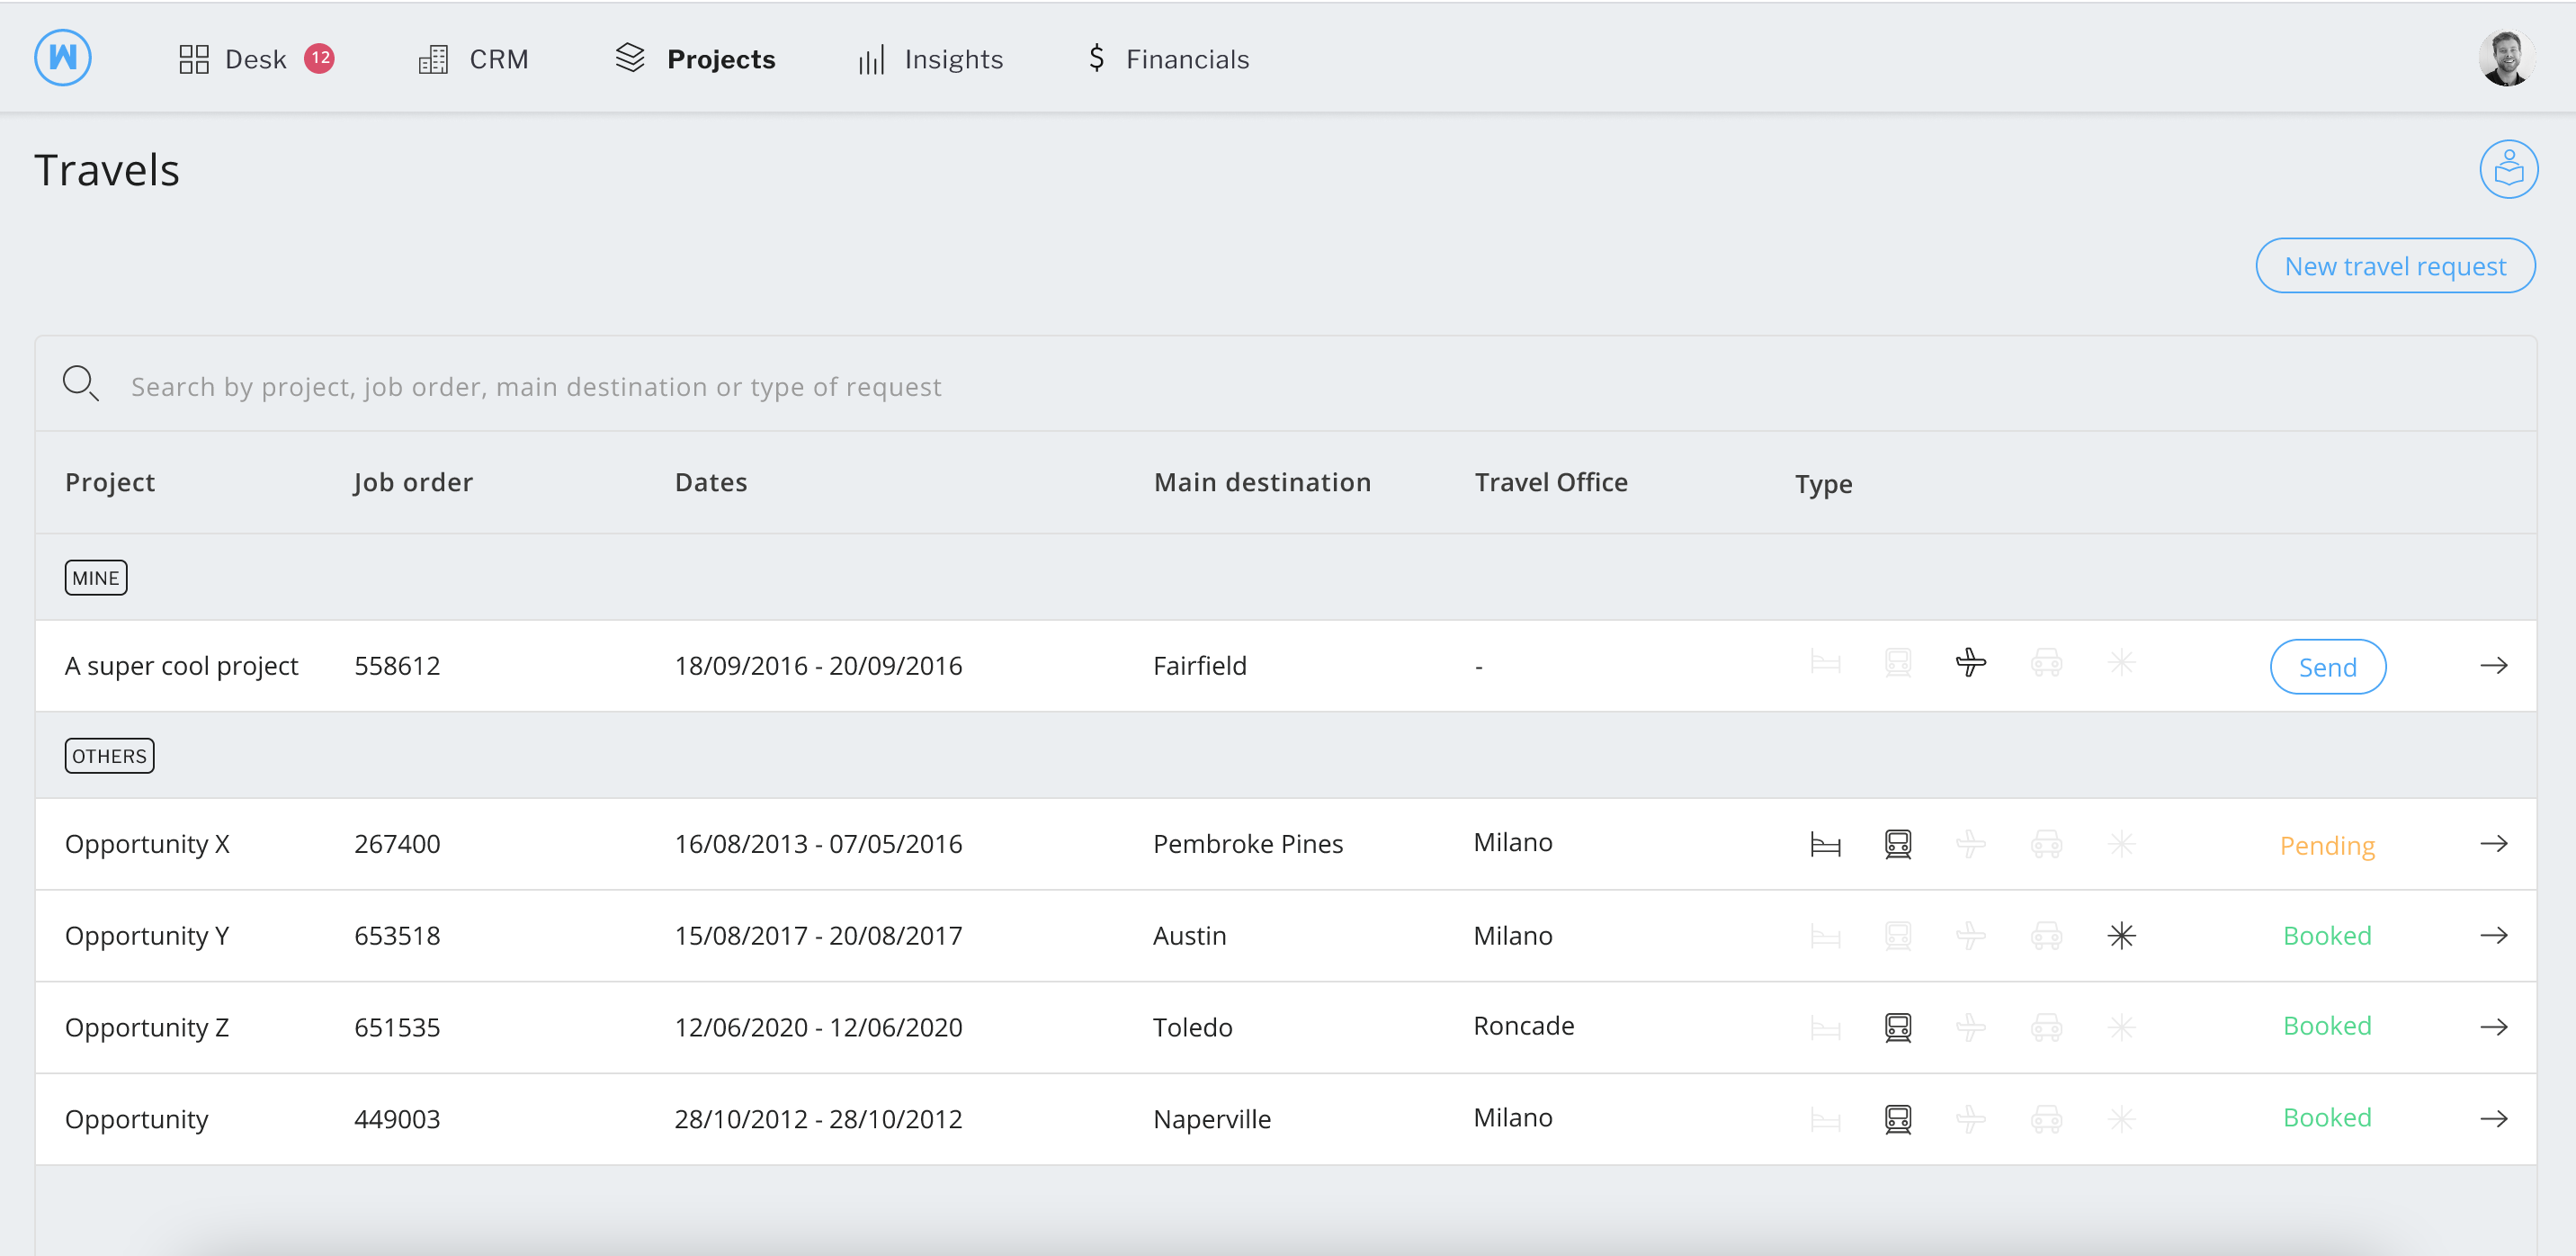
Travels
Send travel requests to your travel office and download your reservation/ticket.
Find this section in Projects > Wallet > Travels.
Create, edit and send travel requests
First, head to Setting > Company > Email Bot and insert the email address(es) as recipients for travel requests.
Create a new travel request:
- Click button New Request and a sidebar will open.
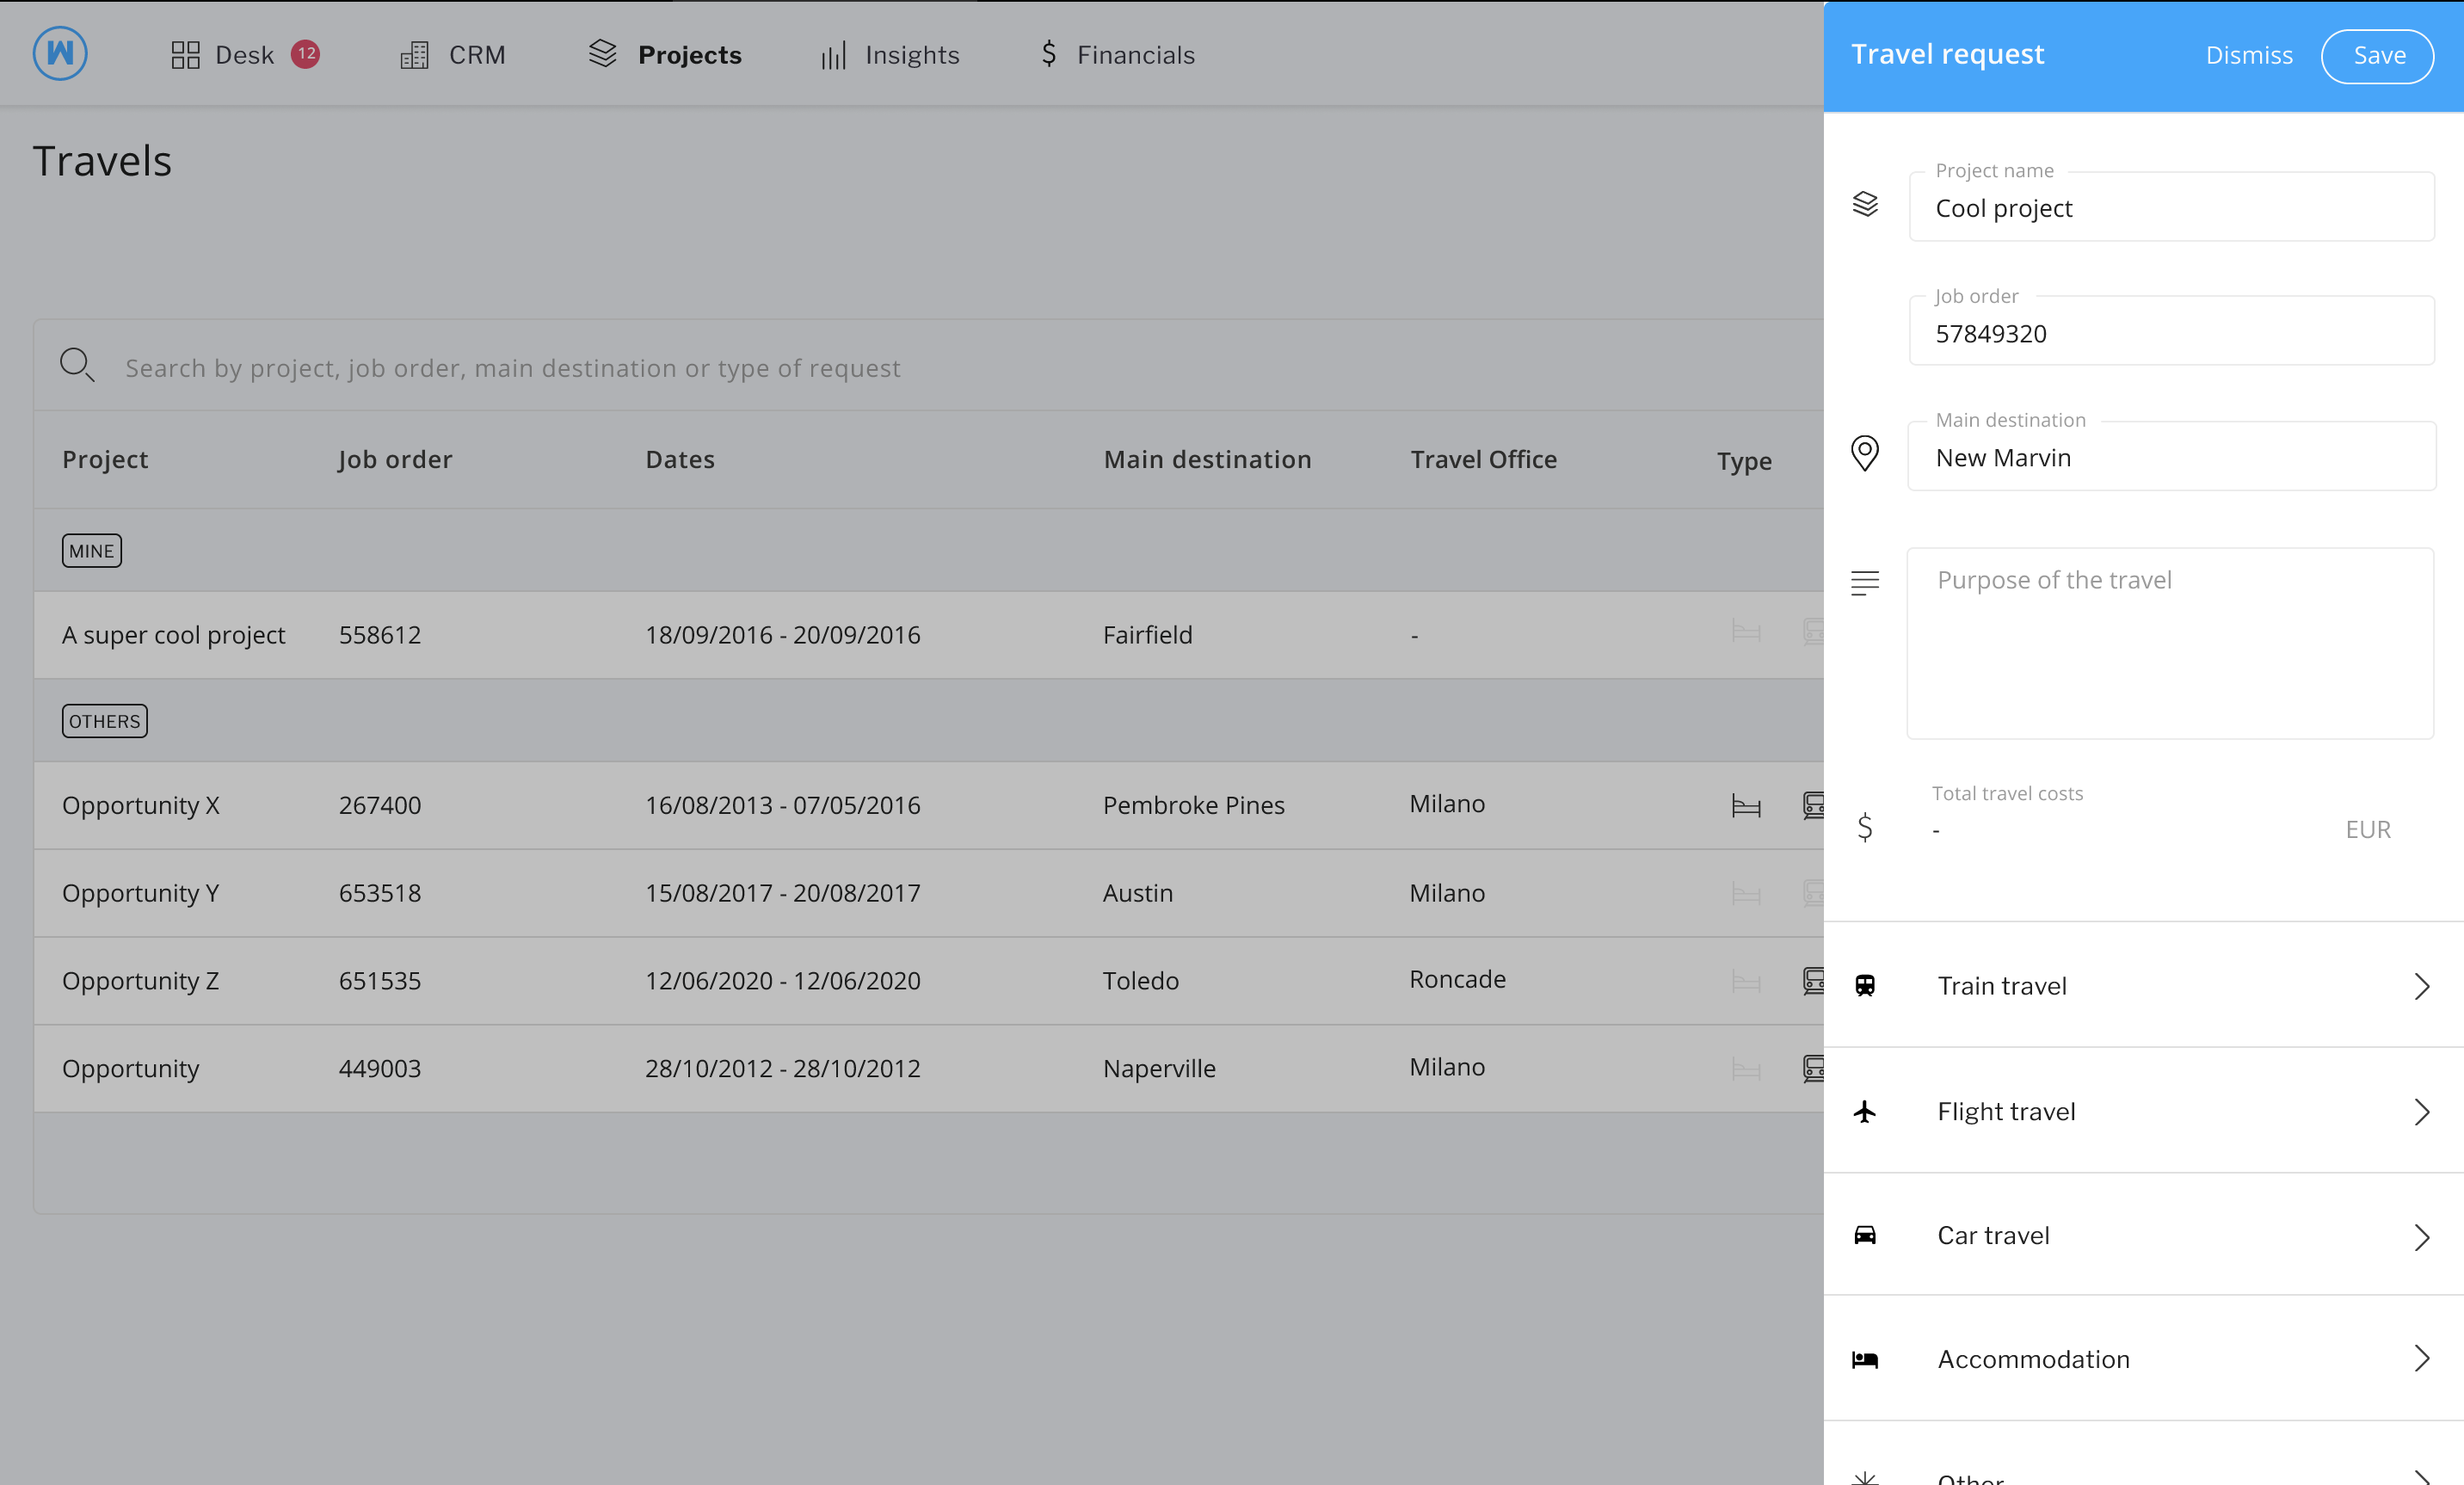
- Insert project name. The job order will be automatically filled by the system.
- Insert the main destination for this travel.
- If needed, write the purpose of the travel (i.e. meeting with the client).
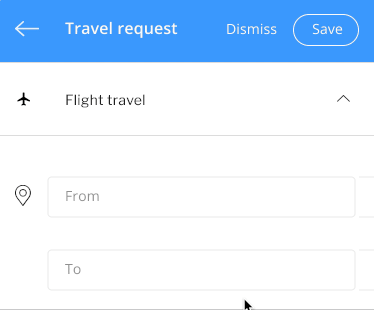
- Choose one or more categories of travel request between train, flight, car, accommodation and other.
- Insert the request details
- Click Save.
- Your request will be added to the list of travel requests.
Edit a travel request:
- Open a travel request from the list.
- Click Edit from the top right corner of the sidebar.
- Edit your travel request.
- Click Save.
Based on a specific permission’s set, some roles are able to edit other requests even when already sent.
Create more than one travel request for the same travel category:
- Open a travel request from the list or, if you are already in the sidebar, open an existing travel category request.
- Hover with the mouse on the name of the travel category, on the top of the sidebar.
- Click “+” to create a new travel request for the same travel category
- Insert details.
- Click Save.
- Your request will be added to the list of travel requests.
Send a travel request:
- Click the button Send.
- Choose a recipient for the request. To insert one or more email addresses as recipients head to the setting page.
- The recipient will receive an email with a link to your travel request.
- Travel request will be pending until the travel office accepts and confirms your request.
Insert costs and upload a reservation for a travel request:
When a travel request has booked, you might attach the reservation file to the travel request.
- Head back to the travel request email by searching for the references of the email object (i.e. user name, project name, business unit).
- Click the button Take me there.
- Open the travel request.
- Access to the travel category (i.e. train, flight, accommodation) for further details.
- Scroll down to the “Travel Office” section at the bottom.
- Insert the cost of travel or accommodation
- Specify a payment method (if needed)
- Upload reservations or travel tickets.
- Repeat steps 5 to 8 for each of the travel categories that has a travel request.
- Click Save on the top right corner of the sidebar.
- When all the reservations are completed and uploaded, click “Submit reservation”.
- An email with the booking confirmation will be sent to the person who made the travel request.
Who made the travel request will receive a booking confirmation email, with the link to download booking and reservation materials.
Download travel bookings and reservations:
If you received a travel booking confirmation email you might be able to download your travel ticket or reservation.
Only circled travel categories (view image below) have reservations or tickets available to download.

Click on the travel category icon and choose the files you want to download.
or
- Open the travel request’s details.
- Open the category of travel requested.
- Scroll down to the bottom and download the attached files.
- Have a good journey!
Download a spreadsheet with the list of travel requests:
- Click on “Download data”.
- Choose if you want to download all data or just a list of requests belonging to a time range.
- (Segment) Select the time range you want collect data from.
- Click on “Email me”.
Permissions
Based on different permission sets, a specific role can: edit and view requests made by other users in the company. Find these requests in the section Others.
Project Managers will be able to view and edit travel requests made by other users only if linked to projects they are managing.
Permission “edit sent” enables the user to insert costs, edit and reservation files to requests that have been already sent to a travel office.
Due to privacy concerns, it is not possible to download booking and reservation files from requests made by other people.
Expenses
Projects > Wallet > Expenses
The expense reimbursement process allows employers to pay back employees who have spent their own money for business-related expenses. These types of reimbursable expenses tend to occur when employees travel for work, but can be associated with other activities related to their employment, including, for example, certain purchases of work-related supplies or tools.
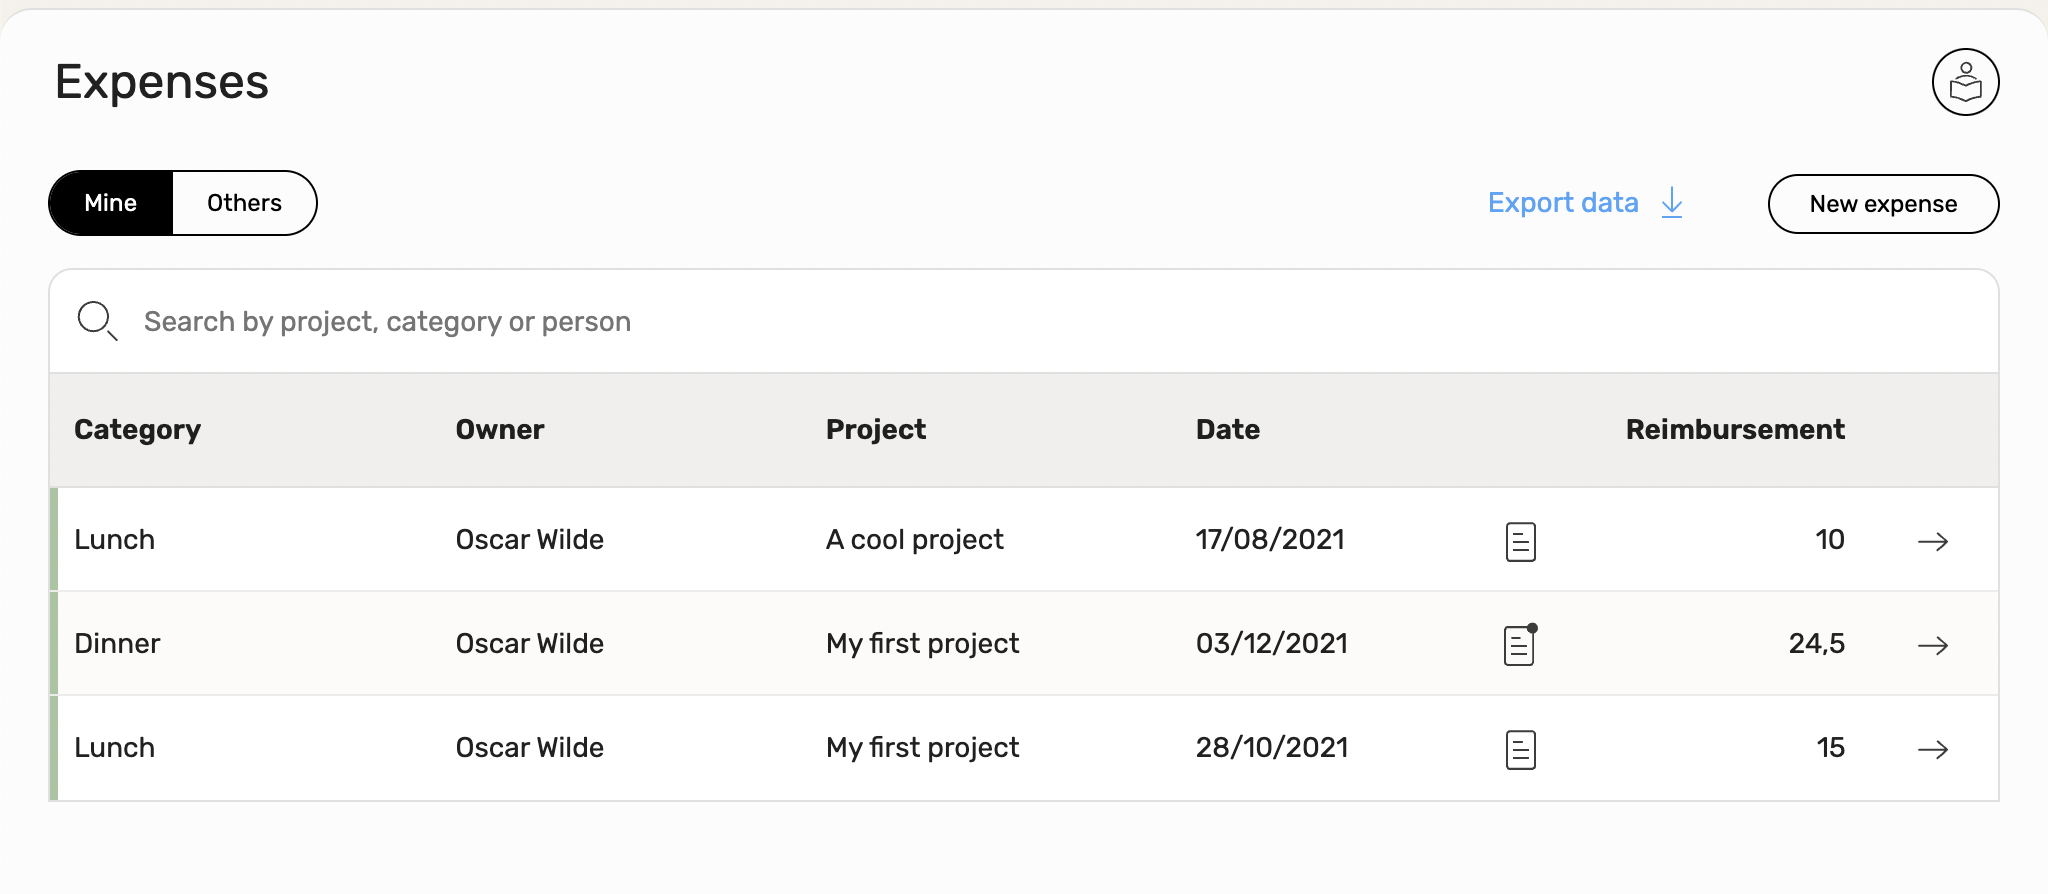
All expenses are listed with the following information at display:
- Job order category badge
- Category of expense
- Requested by
- Project
- Date
- Notes
- Reimbursement value (always expressed in master currency)
Based on permission roles, users can view, edit, delete their own expenses and/or others’ expenses.
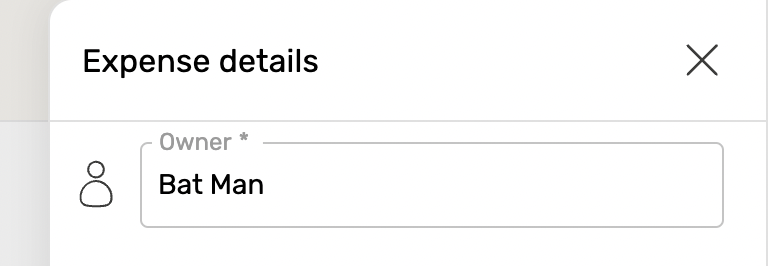
Users with permission to edit others’ expenses can also change the owner of the expense when creating or updating it from the sidebar details.
Note
All expenses linked to a project are listed in the widget “Orders” in the project report with a general “Expense” name, its date and value.
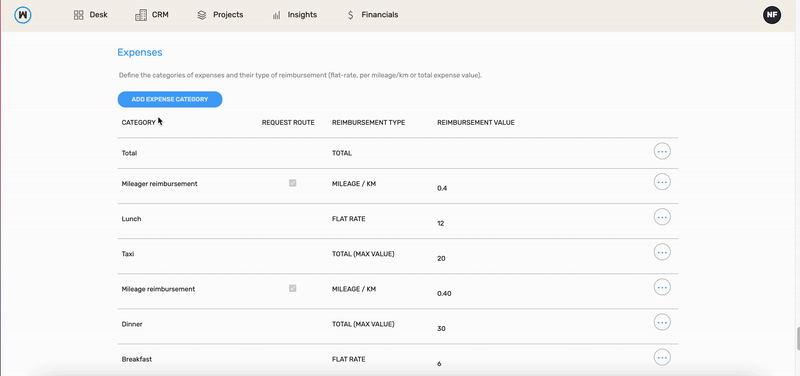
Type of reimbursement
- Flat-rate: whether the type of reimbursement is a fixed value (expressed in the reimbursement value field, required), regardless the value of the expense. i.e. Acme Inc. refunds each employee 12 for a lunch. Mario, who works for Acme, had a business lunch and spent 24,65. Mario will be refunded 12 by Acme Inc.
- Mileage/Km: whether the type of reimbursement is a fixed value (expressed in the reimbursement value field, required) per mile or kilometer declared by the employee. i.e. Acme Inc. refunds 0,40 for each km travelled. Mario, who works for Acme, made a business trip with his own car and travelled a total of 260km. Mario will be refunded 140 (260x0,40=140).
- Total: whether the employer refunds the whole expense declared by the employee. i.e. Acme Inc. refunds the total cost of a taxi trip. Wendy, in her business travel for Acme,took a taxi from London Victoria train station to the City and spent 30. Wendy will be refunded 30.
- Total (max value): whether the employer refunds the whole expense until a maximum refund value (expressed in the reimbursement value field, required) is reached. i.e. Acme Inc. refunds the total cost of a dinner up to 30. Britney, an account manager at Acme, had a business dinner with her clients and spent 250. Britney will be refunded 30.
- Quantity: whether the employer refunds a fixed value per unit. i.e. Acme Inc. refunds the 0,10 for each marker bought by an employee. Jason, a UX designer at Acme, bought 20 markers for a design workshop he conducted with a client. Jason will be refunded 2.
Set a category of expense
Learn how to insert categories of expenses that require a reimbursement process to pay back employees who have spent their own money for business-related expenses.
- Head to Settings > Company > Expenses.
- Click button Add expense category.
- Choose a name for the category of expense.
- Select the check box if route details are needed.
- Select the type of reimbursement.
- Insert the value of reimbursement (flat-rate, per mile/km, per unit or maximum).
- Press Save.
Note
To avoid retroactive changes it is not permitted to edit or delete a category of expense. Archive a category to hide it from the list.
How to insert a new expense
- Head to Projects > Wallet > Expenses
- Click button New Expense and a sidebar will open.
- Insert the name of the project linked with your expense.
- Choose the category of expense from the list.
- Insert the date in which this expense occurred.
- If required, insert the value of expense or the amount of miles/kilometres travelled.
- If required, insert location From - To.
- Add a note.
- If needed, upload a file that proofs your expense (i.e. a receipt)
- Click Save.
- Your expense will be added to the list.