Budget
Overview
The budget is where you can list all the resources you think you’ll need for the project.
Basically, this is the place where you define (for a project):
- How many people you need;
- Which experience levels you need;
- Which tasks are needed to get the job done;
- Who will do what;
- The external costs;
- The selling price.
Done? Now the budget must be approved by a supervisor and, once approved, the project manager can start planning and creating orders.
Budget approval
A user is able to approve a budget of a project if one of the following conditions is true:
- The user is the project account and its role has a flag on “approve” inside the budget section of the permissions settings.
- The user is the project manager and its role has a flag on “approve” inside the budget section of the permissions settings.
- The user’s role has a flag on “approve other” inside the budget section of the permissions settings.
Role based permissions for budgets can be managed from the permissions section.
Note
When a project reach 50% of probability, it’s a good practice to make a budget for it.
The Structure
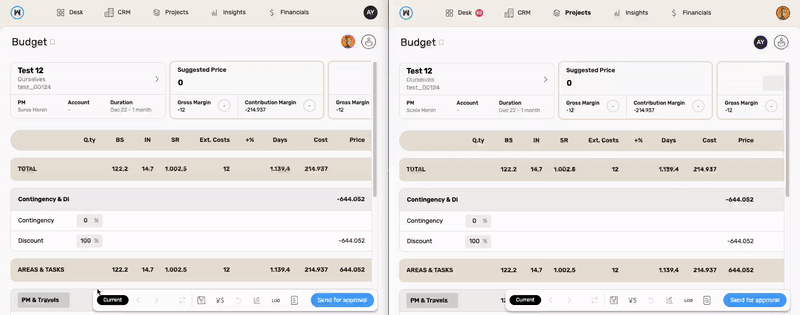
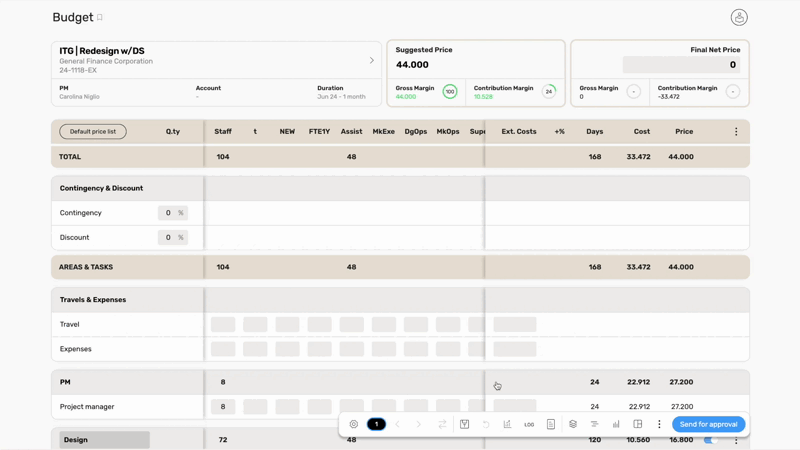
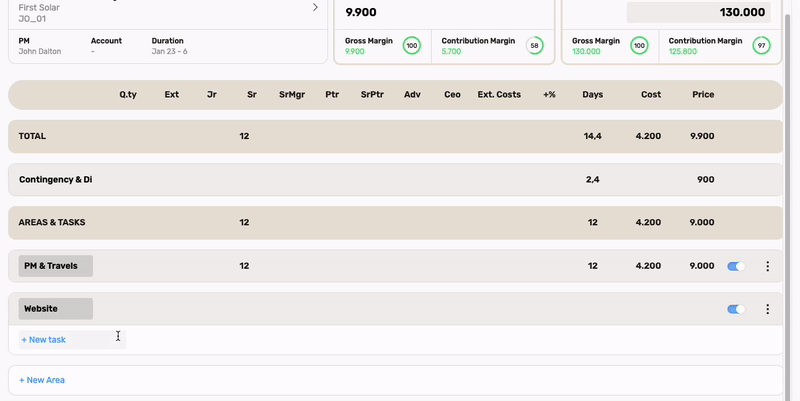
The budget section is composed by three main parts: project details, price details and the budget editor.

Project details
Positioned in the top left, this part shows project information details such as the client, project name, PM name and duration.

Price Details
Positioned in the top right, this part shows some details about the project’s price:
- Suggested price: budget total price minus applied discount
- Suggested price gross margin: suggested price minus budget total external costs
- Suggested price contribution margin: suggested price minus budget total costs
- Final net price: regardless of the suggested net price, you can decide on your own what you think is the best price for the project (new feature: By adding the comma you can use decimals for cents)
- Final net price gross margin: Final net price minus budget total external costs
- Final net price contribution margin: Final net price minus budget total costs

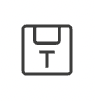
Budget editor
This is basically a table where you can assign days to a given user level of a task.
You will also be able to show/hide only the levels you need within that budget by clicking on the three dots on the top-right of the screen when the budget is in edit mode.
A task is a macro activity needed to complete the project, related tasks can be grouped into areas.
You can add new areas by using the “+ New Area” button: type in a meaningful name and hit enter.
An area can be minimized by clicking on it, this let you appreciate more areas all together on the screen.
Areas are grouped in order to show subtotals:
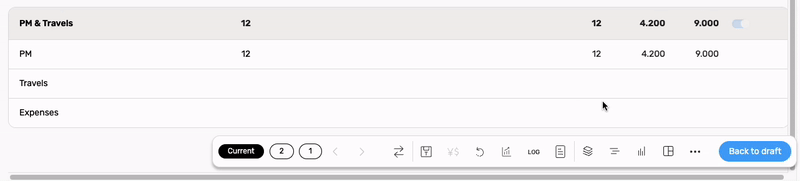
- Areas & Tasks contains all areas created by the user plus “PM & Travels” which is a special area that’s automatically added on each budget creation. This area contains two special tasks:
- Travels: external costs in this task appear as special cost row in Project Report economics where it is used to compare expected travel costs (coming from budget) and effective travels (created in Travels section)
- Expenses: external costs in this task appear as special cost row in Project Report economics where it is used to compare expected expenses (coming from budget) and effective expenses (created in Expenses section)
- Total contains:
- Contingency: life is unpredictable and the unexpected is behind every corner, so why not be prepared for it? A percentage of contingency means that you know your budget isn’t perfect so you’re estimating using more days, just in case. The contingency gives you more days and which you can use at every user level but, on the other hand, the suggested net price will grow
- Discount: the percentage of discount you want to apply to the Areas & Tasks total price
- New percentage input: a custom field you can add (multiple times), with a name and a percentage value. As contingency, this will be added to the suggested price.
For each external cost you can assign a markup: a percentage that indicates how much you want to earn on that external cost.
Positioned on the top of this section you can find the sum of the values for each column.
The first columns of the budget show how many work days you need for each user level:
- Ext. Cost: shows the sum of the external costs
- Days: the total amount of days
- Cost: the sum of the budget’s days multiplied by the cost of the user level that will take care of it. This value is also called internal costs
- Price: the suggested price we think is optimal to sell your project
This section can be used for real-time collaboration: you can see who is editing a budget you’re looking and all changes are propagated with no need to refresh the page.
Job titles
Job titles can be used in a budget to better specify a job figure or position needed to complete a task, for example: to complete task “Website redesign” you may need a junior designer and a senior developer, these are two distinct job titles related to “junior” and “senior” user level respectively.
Once defined in your company settings, you can add a job title to a task using the task’s options menu:
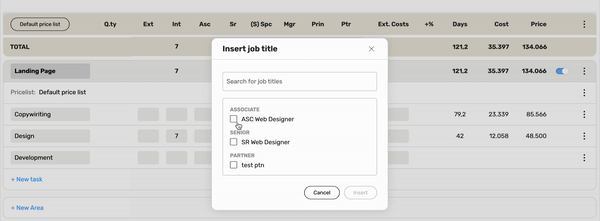
A job title has just one editable man-days column, that is the column related to job title level.
When you add job titles to a task, levels for that task become read-only and they display only job titles sums. For this reason, job titles can be added only to clean tasks, that are tasks without level man-days.
Job titles cannot be added to intercompany tasks, and if a task already has job titles they must be deleted before making the task an intercompany task.
Products
Products are created and managed in the Products section.
Products can be added to a budget by choosing them from a pick list of available products:

Only users with view permission on products can add products to a budget.
When a product is added to a budget, it is treated as special task where user can specify a quantity that tells how many “instances” of that products must be added. Cost is calculated the same way as a normal task but price is different:
- If product has a defined price than task price is product price * task quantity
- If product has no defined price than task price is calculated the same way as a normal task
In order to apply a discount or a markup you can change the price and external costs of the product template by clicking the 3 dots > edit button. It will open a modal to insert the new amounts and after that you can continue to use the product by setting the quantity (see above).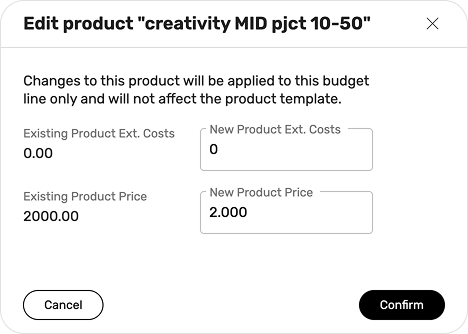
N.B. Product task cannot be made intercompany.
Pricelists
Pricelists are created and managed in the Pricelists section.
A pricelist defines level daily rates and costs used in a budget.
When creating a budget, a coherent pricelist is automatically assigned to it:
- If a default pricelist for that client exists, then it is assigned to the budget
- Otherwise wethod picks the company default pricelist
Pricelist can be changed for a budget by choosing the new one from a list of available pricelists.
Each budget area can be personalised with its own pricelist, except for the section Contingency & Discount, Travels & Expenses and PM. All the other areas can be tailored on a specific pricelist:

The Workflow
- Select a project from the Pipeline and click on its budget button;
- Compile the budget;
- Submit the budget for approval by clicking on the top left button “submit for approval”;
- When the budget is approved by a supervisor, you will be able to plan some resource on the project and start working on it;
- Whenever you need to modify the budget, you can set it back to draft and restart from point
- Each time a new budget version is approved, it’s saved and you can access it through the dropdown list under the Price’s Detail panel.
When a budget is submitted, a supervisor can appreciate all the changes by looking at the orange labels. This makes the approval process easier and faster.
Not sure if a budget’s area will fit? Just switch it off! Switching off an area will remove it from the budget estimate. You can always switch an area back at a later date whenever you wish.

Want to see the difference between two approved budget versions? Hit the Compare versions button and select the two versions you want to compare. Use the Clear button to compare between two other versions and click Close to end the comparisons.
Make a task intercompany
If your company is part of a group you can transform a normal budget’s task into an intercompany task: a special kind of task which presents only external costs and which can be assigned to another company of your group, the selected company become the supplier for the task.
An intercompany task is used to track work done within the same group and its useful to have a clearer view on the profit & loss.
Note
An intercompany task is expected to have just name and external costs, this means that you need to delete internal days and markup in order to complete the transformation.
Once you have created an intercompany task, you can invite a person (that is an employee belonging to the task’s supplier) to connect one of their projects to the task itself. The invited person will receive an email containing a link to connect the project.
When a project is successfully connected to an intercompany task, it became an intercompany project: its final net price, currency and probability are updated to reflect the intercompany task’s external costs and intercompany task’s project’s probability.
Note
Each time you update the probability of a project which presents intercompany tasks, the intercompany projects linked to that task are updated accordingly. Besides if you update an intercompany task’s external costs, the linked project’s final net is updated too.
You can send as many invitations as you want, but remember that just a project can be linked to an intercompany task.
If you delete an intercompany task, any connected project will be disconnected (they will not be automatically deleted).
Multicurrency budget
Sometimes may be useful to use currencies in your budget, especially when you work with clients or suppliers that use currencies different from yours.
Once you enable multicurrency for one of your budgets, you will be able to set final net price and external costs in currencies other than the company currency you’ve defined in your company settings.
Expressing a final net using a currency different from yours let you emit invoices using the same currency for that project.
Expressing an external cost using a currency different from yours let you emit orders using the same currency for that project.
Please consider tha currencies’ exchange rates refers to the budget’s creation date.
Note
Be aware that you can always disable multicurrency for a budget, but if you have created orders using currencies you need to manually update them. Invoices are automatically updated instead.

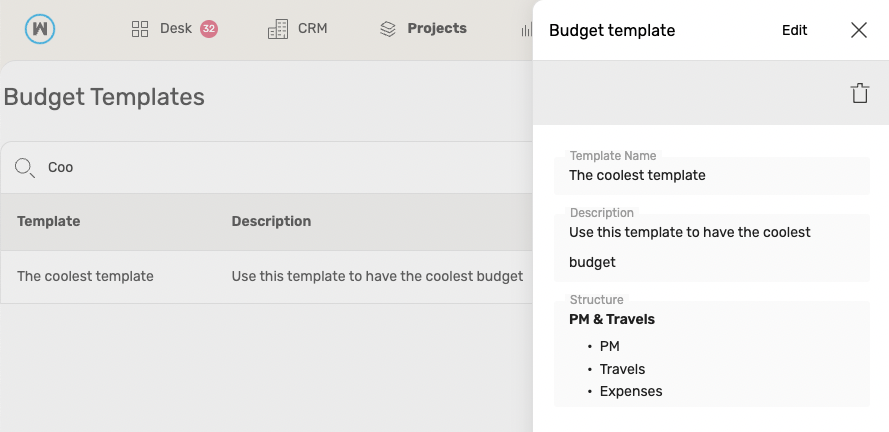
Create a template
You can create a template from a budget by clicking on the following button:
Saving a template means saving a budget’s structure (areas and tasks), this can be re-used by you or other people in your company in order to speed up the creation of budgets belonging to similar projects.
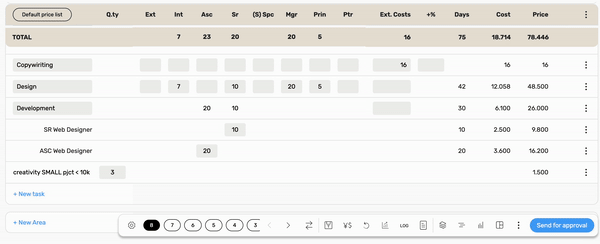
Each time you want to create a new budget, WETHOD will ask if you want to start from scratch or if you prefer to use a previously created template.
All the templates can be found in Projects > Toolbox > Budget Templates, here you can edit or delete them.