Settings
Account
Here you set your name, surname and password.
If you have the right permissions, you can:
- Change your invoice details;
- Import existing projects.
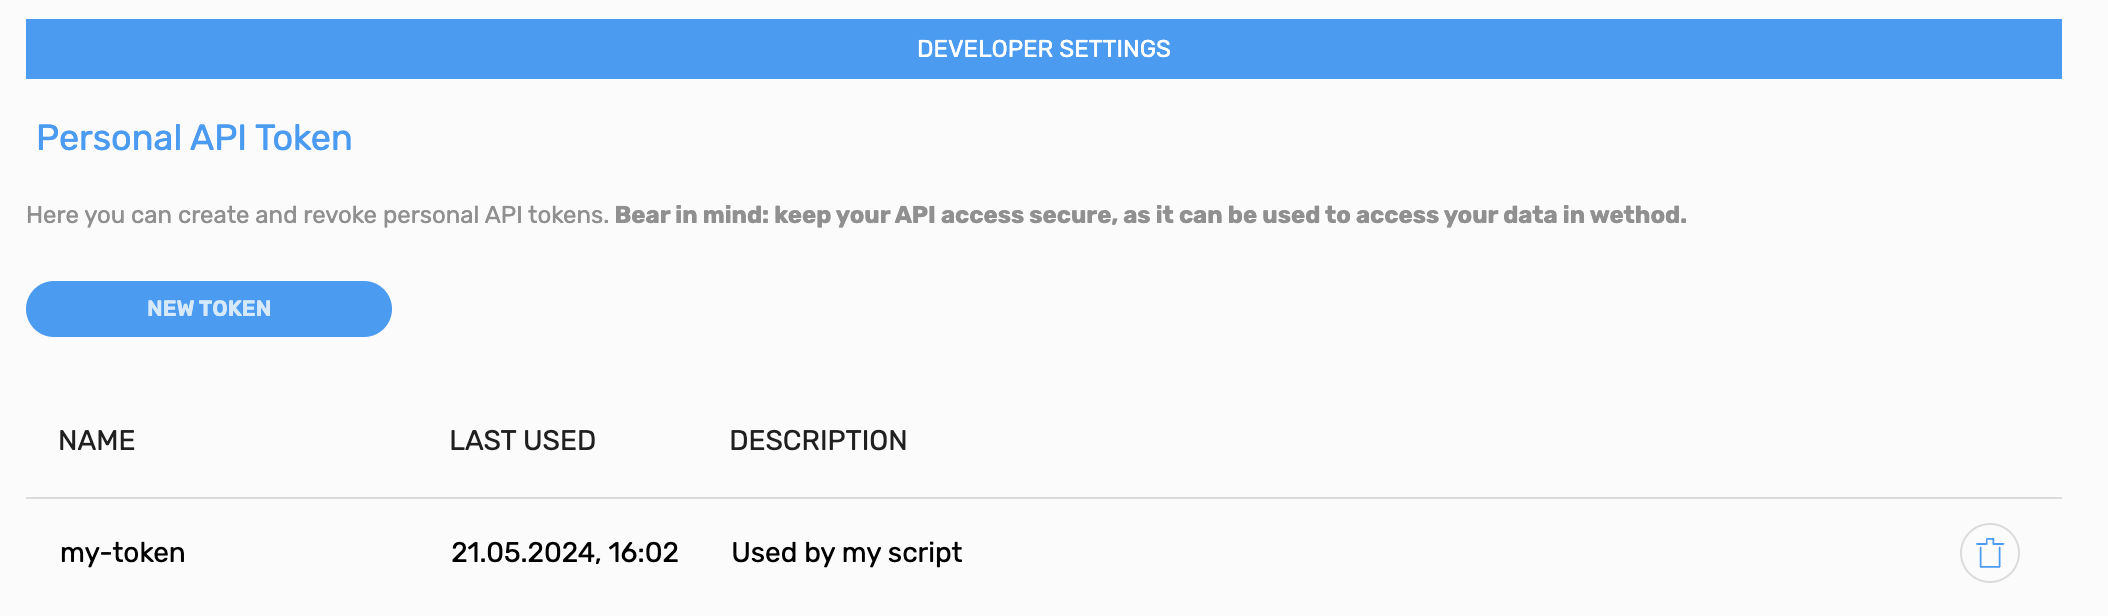
Developer settings
In this section you can generate your personal access tokens which allow you to access our public API, read more here.
You can create a new token by providing a name and optional description (where will this token be used?), once you create a token make sure to copy it as you won’t be able to see it again. A personal access token represents your account and therefore has access to the same companies you have access to and with the same authorizations
Each token shows the “last used” date, aren’t you the one using it? Delete it immediately to prevent unauthorized use.
Team
Since you have the right permissions, you can: invite people, assign specific roles and allow special permissions.
To invite a new teammate:
- Click on “New User”, then “Add manually“
- Assign a user level, a role and the email address of the person you want to invite;
- Click the “Save” button. Once done, an email will be sent to the given address.
To edit a user, click on the corresponding arrow to open the sidebar. Note that:
- Each user can have a job title (i.e. junior designer, senior developer, social media manager).
- You can assign tags.
- Creation and editing of tags is managed in Settings / Company.
- Each user can have an allocation manager, who is the person in the team that will receive notifications about user’s allocation requests.
- Being a user allocation manager does not automatically means you can approve or reject their requests, you need special permissions for that.
- Any team member can be an allocation manager of another team member.
- Assigning a capacity to an employee will reflect on the Timesheet, People Allocation and Allocation Requests actual capacity: they will show the number of hours that person is expected to work, rather than assuming a standard 40-hour week.
- You can specify also different capacities for different time periods. E.g. Full Time from 01/01/2025 to 31/01/2025 and Part Time from 01/01/2026.
- Creation and editing of capacities is managed in Settings / Company.
- Assigning a pricelist to an employee will impact their costs in the project report, when calculating the internal costs of a project (based on the amount of hours filled in the timesheet section by each employee for that project).
Note
Only super users can assign “super user” role.
Only super users can edit other super users’ role.
If there’s only one super user left, you cannot change its role.
Export and Import Metadata
To export all users’ metadata, click on the Export icon on the top-right corner of the table. This will generate an Excel file, which will be sent to your email.
You can edit the exported file to change users’ metadata, then you can import it by clicking on the top left “New User” button, then “Import metadata“
For the import to be successful you will need to follow these rules:
- the file cannot contain empty rows
- all cells under the tag columns must have one of the values that you have specified in the company settings
- you can assign more than one language (ex: Italian,English) and their corresponding level (ex:Native,C1)
- if a language is being assigned, you will need to assign also the corresponding level. Possible levels: Native, C2, C1, B2, B1, A2, A1.
- Email, Archived, Business Unit, Employee Job Titles and Employee level cannot be modified using this import
Company
Setting these parameters properly will help everything run smoothly across the platform - from planning to budgeting, from timesheets to reporting.
The settings you’ll find here let you tailor wethod to reflect the real structure of your company: working hours, office locations, holidays, cost levels, and professional roles.
We recommend going through them in this order and taking a few minutes for each section - these are small choices that will make a big difference in your day-to-day.
Full-Time Equivalent (FTE)
The FTE defines how many hours make up a standard working day in your company. If you don’t set a custom value, wethod will use the default: 8 hours per day.
This value matters because it impacts all areas where a conversion between hours and days happens - planning, timesheets, budgets, and reports. In short, it defines how much “one workday” is worth in your system.
⚠️ Once the FTE is set, no one will be able to have a daily availability (capacity) higher than that value. For example, if you set it to 6 hours, it won’t be possible to assign more than 6 hours per day to anyone.
We recommend defining it properly from the start and avoiding frequent changes - even a small adjustment can affect the economic and operational data linked to your projects.
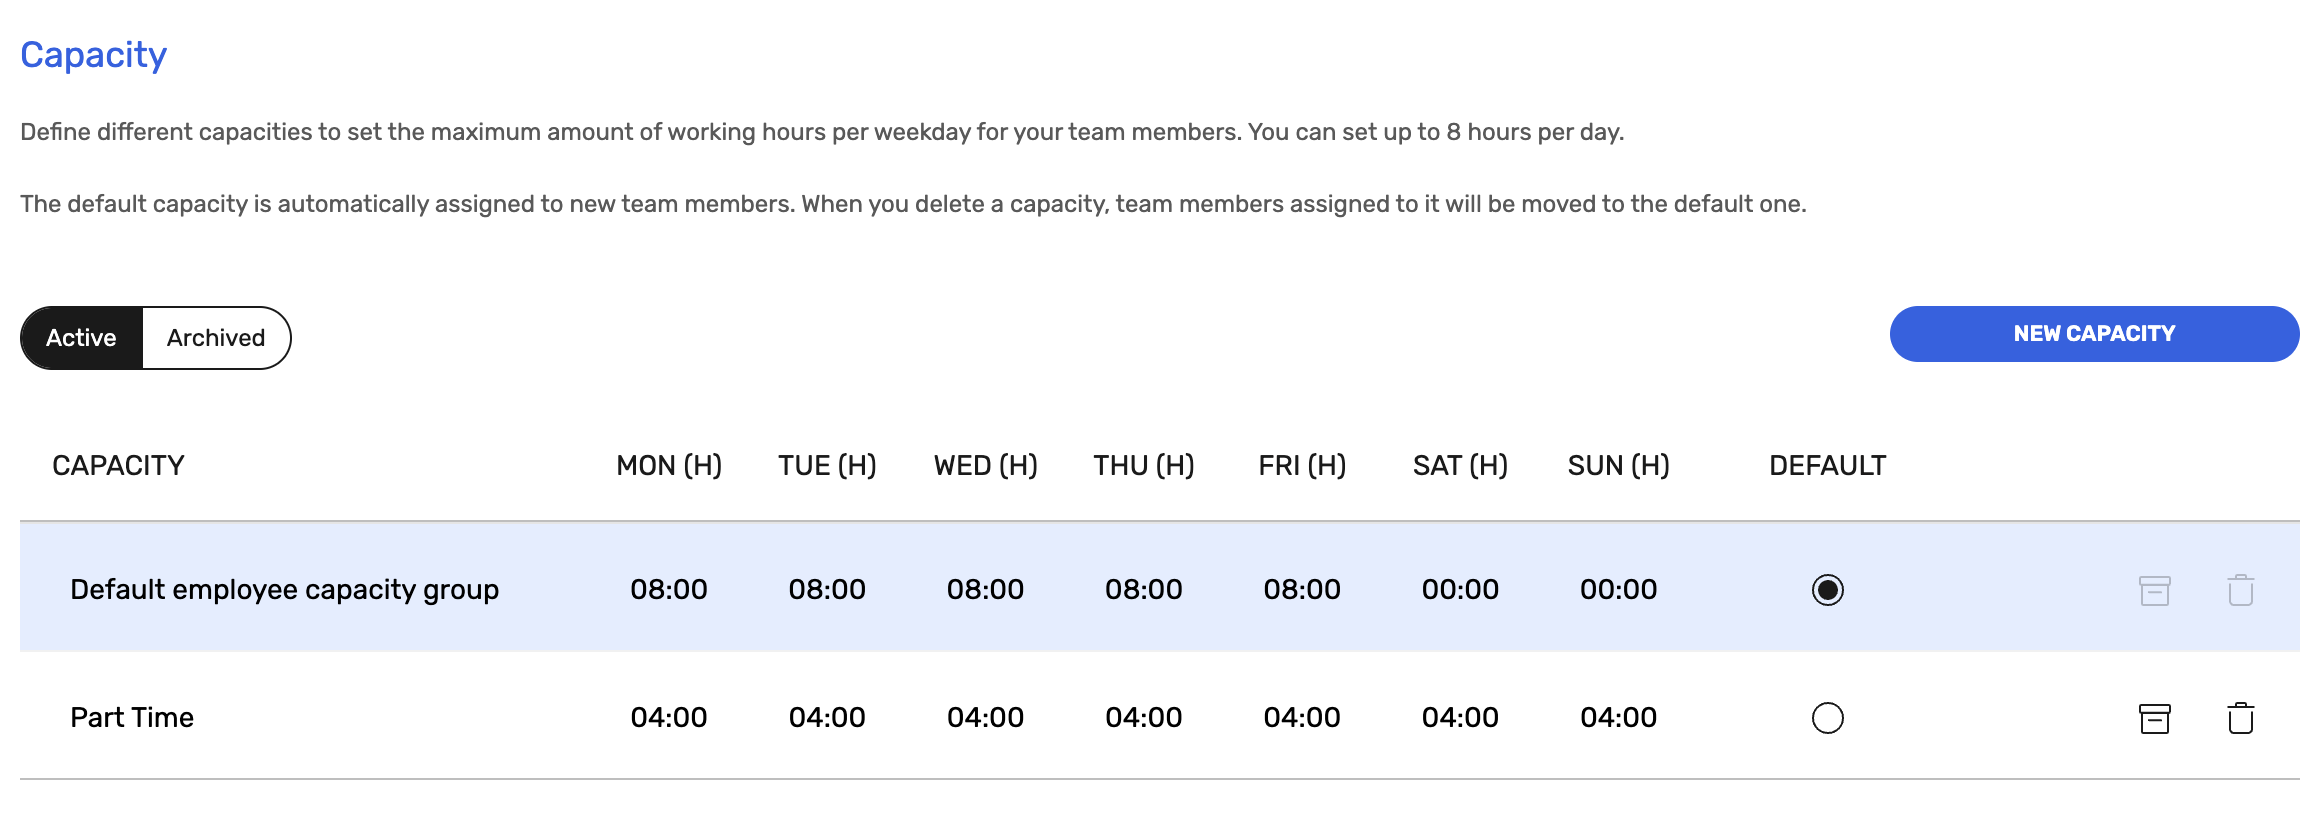
Capacity
In the Capacity table, you can define the daily working capacity for your team.
- By default, there’s a capacity called “default capacity group” which assigns 8 hours per day from Monday to Friday. This group that can’t be deleted, but you can edit it if needed.
- By clicking on New Capacity, you can create additional time configurations - handy if some people on your team work different hours (e.g., part-time, reduced hours, etc.).
- Any new capacity added can become the new default, by clicking on the “set as default” radio button. This means it will be attached to any new user added to the team.
- The group assigned to each person determines their availability in the planning section: for example, if someone works 4 hours a day, only those 4 hours will be schedulable, while the unavailable hours will appear in grey. Once defined, capacity groups can be assigned to company employees via the Team section.
- The **Timesheet, People Allocation and Allocation Requests **take actual capacity into account: they will show the number of hours that person is expected to work, rather than assuming a standard 40-hour week.
Fiscal Year
The Fiscal Year section allows you to align wethod with your company’s fiscal year, in case it doesn’t match the calendar year.
By default, the fiscal year runs from January to December, as it does for most European companies.
However, if your company follows a different calendar, you can easily change the starting month—reports and the profit & loss statement will automatically update based on the new configuration.
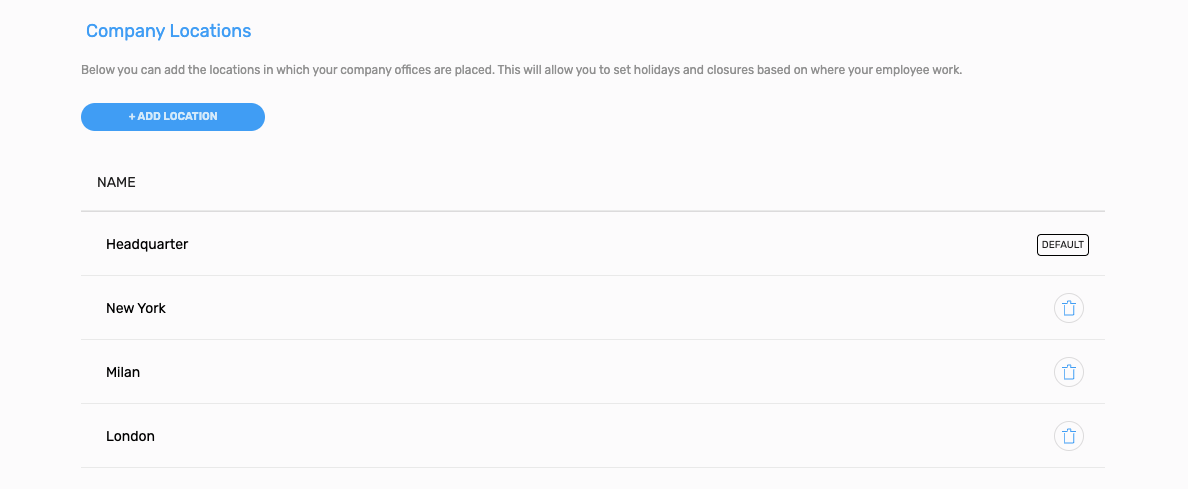
Company Locations
The Company Locations section allows you to set up the different offices or branches of your company.
This setting is useful for filtering team members based on their assigned location and, most importantly, it’s essential for assigning the correct Bank Holidays.
If your team works remotely and is spread across different cities - but still follows the holiday calendar of the main office - it’s best to set up just one Location. In that case, you can use tags to indicate where each person works, without complicating the holiday configuration.
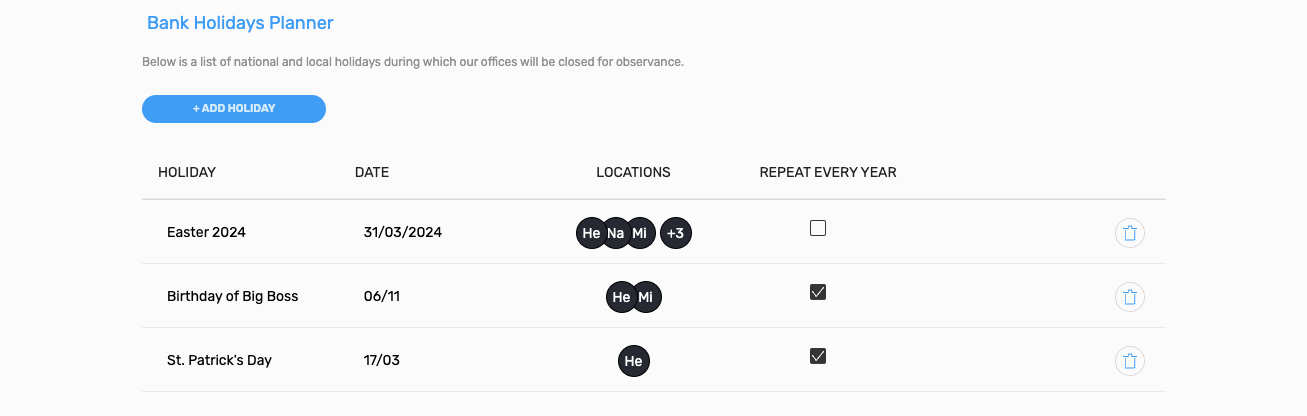
Bank Holidays Planner
In this section, you can upload your company holidays - these are national or local public holidays during which no work is expected.
Be careful not to confuse them with individual days off, like vacation or personal leave: holidays apply to the whole company or to a specific location, and follow the official national or regional calendar (e.g. New Year’s Day, Labor Day, etc.).
By clicking on Add Holiday, you can create a new holiday and choose whether it should repeat every year (handy for fixed dates like December 25th) or not, as in the case of Easter, which changes every year. It’s important to assign each holiday to one or more Company Locations, so the system knows which offices recognize that day as non-working.
You can assignee each location to the employees via the Team metadata import.
Once set, these holidays will have two effects:
- In the planning section, people won’t be schedulable on those days.
- In the timesheet and its export, you’ll see a yellow icon with a total of 0 expected hours, indicating it’s a holiday.
User levels
⚠️ Heads up: once a level is assigned to a person or used in a budget, it can no longer be deleted. So if you’re testing things out or not entirely sure, take a moment to double-check before creating new levels. When in doubt, it’s better to ask first. However, you can always rename a level and update its details at any time.
The User Level section lets you define different clusters of people within your company, each associated with a **standard daily cost **and a daily resale price.
It’s important to clarify: this isn’t about grouping people by job type (e.g. designer, developer, account manager), but by their cost to the company, which mostly depends on their salary range.
We recommend creating levels that group people with similar salary brackets—for example: *junior, senior, manager*—and assigning each level an identifying code.
Available settings include:
- Chargeability Target: a helpful analysis indicator that shows whether, based on timesheets, people in that level are actually working on sold (chargeable) projects.
- Code: a simple abbreviation of the name (e.g. jr, sr, pr) that will be displayed in the budget and people allocation sections.
- External: enable this only for levels created specifically for external vendors who will be filling in timesheets in the platform. If you’re just uploading external costs (no timesheets involved), you don’t need to create a level.
- Must be planned: if enabled, this means people in that level must be included in the planning. If they’re not, an alert will appear.
- Must do the timesheet: similar to the above, but related to the requirement to fill in timesheets.
- Default in budget: when this is active, the level will be suggested by default when creating new budgets.
Job Titles
The Job Titles table allows you to define, in relation to the previously configured User Levels, the type of professional role you want to estimate in the budget. For example, you can create a junior copywriter and link it to the junior level, or a senior designer connected to the senior level.
This setup lets you indicate more precisely what kind of role you expect to involve in a specific project activity during the budgeting phase—improving both the accuracy of your estimates and the clarity of your project plan.
Job Order Categories
Through Job Order Categories, you can configure the main project categories your company typically works with. Each category represents an organizational cluster- a set of projects that share common behavioral rules.
The purpose of this section is not to list every activity in detail, but to define the main types of projects along with their operational, financial, and management characteristics.
Why does it matter?
Defining project categories allows you to:
- automate certain management logics (e.g. automatic project status updates, economic value tracking based on invoices);
- align your financial reporting (e.g. capitalizable projects, marketing, internal…);
- create consistency in workflows: if a category requires “approval before planning” or must always be part of a program, those rules will be applied automatically;
- improve control and reporting at a company-wide level.
Need an example?
You could create a category called “R&D” for investment projects, set it as Capex (capital expenditures), and have its status update automatically over time. Or a “Sales” category for opportunities, where you track the reason a project was won or lost.
What you can configure for each category
Each Job Order Category can be customized through a range of options that define how it behaves in budgeting, planning, timesheets, and financial reporting. Here’s what each setting does:
- Name: the name clearly identifies the nature of the category and helps you recognize it throughout the platform;
- Color: the assigned color visually distinguishes projects in the People Allocation section. All projects belonging to the same category will share the same color, making it easy to identify them at a glance;
- Chargeable: marks projects as billable. wethod will check that:
- there is a budget greater than zero;
- timesheeted hours count toward chargeability;
- the full value has been invoiced before archiving;
- Plan upon approval: people can only be scheduled after planning is approved. Recommended only for planned absences (e.g. approved vacation). ⚠️ If enabled, you must also activate “Everybody can plan”, otherwise users won’t be able to submit requests. Make sure to assign a location manager in the Team section to handle approvals.
- Everybody can plan: anyone can plan on the project—not just the PM or account owner
- Unlimited planning: lets you plan even if the budget runs out. Useful for:
- absences (vacation, sick leave, etc.)
- internal projects you want to monitor only after the factthe projects in this category can be planned regardless budget availability ⚠️ You still need to set at least one hour of initial budget—after that, planning is treated as unlimited.
- Hours type: defines the nature of the timesheet hours:
- Workable (default)
- Vacation time off: reduces vacation allowance
- Leave time off: reduces leave allowance
- Non workable: other absences (e.g. sick leave, parental leave) — tracked but don’t affect allowances
- Must be in program: requires the project to be part of a Program (a view that groups multiple projects). ⚠️ Not recommended unless you’re managing structured or multi-level projects.
- Invoice driven budget: the project’s economic value updates based on actual invoices. Ideal for:
- time & material projects
- projects where the final price may differ from the estimate. wethod will update the budget, invoice plan, and production value automatically. You can then set a budget with an approximate price and let the issued invoices adjust the final price as a result of the delta between the ‘invoice plan’ and the real invoice.
- Capex: marks the project as an investment. Internal and external costs can be capitalized across multiple fiscal years in the Financials section.
- Ext. Cost: Tells wethod where to allocate external costs in the P&L:
- On goods sold – costs directly related to revenues (before the gross margin). Example: production costs or supplies necessary to deliver the sold product or service.
- Before contribution margin – costs allocated to the personnel section in the P&L. Example: costs related to internal projects that should be reported as personnel expenses.
- On G&A – general and administrative operating costs. Example: administrative projects, general consultancy, or back-office activities.
- On Marketing – costs related to marketing and communication activities. Example: advertising expenses or marketing campaigns attributed to marketing projects.
- Won/lost feedback: when a project’s probability goes from 0% to 100% (or vice versa), wethod asks for the win/loss reason. Reasons can be set up in the Won/Lost Feedback section. Great for sales projects and funnel tracking.
- Track opportunity stage: lets you define a custom sales stage (e.g. prospecting, proposal sent, negotiation). The stage links to probability and helps build a personalized sales funnel.
- Job Order Categories Group: just below the category table, you can create Groups of Categories. Handy if you have categories with similar settings but slight differences (e.g. project tracking) and still want to group them for reporting. Example: Client Auto (chargeable, no status tracking) and Project Client (chargeable, with status tracking). You can group them together for clearer analysis.
- Automatic Timesheet: when enabled, timesheets are automatically filled every weekend, copying hours from People Allocation.
This means:
- you can’t edit the current week’s timesheet manually
- if you need to make changes, do it in the planning section You can still edit past weeks if needed.
👉 Recommended only for tightly scheduled activities like vacation or leave. For other projects, better to let people log actual hours manually, even if they differ from the plan.
- Project Status: controls how the status of projects in this category is updated weekly. Remember: status is not just timesheet-based—it should reflect how much work is left. Options:
- Work days to complete: the PM enters remaining workdays
- Automatic: status auto-progresses based on project start and duration
- Completed percentage: enter a weekly completion percentage—more visual, but subjective
- Intercompany supplier (only visible if the intercompany module is active): an invoice for a project in this category cannot be sent if the project is not an intercompany project or if its intercompany client does not appear as an actual company client
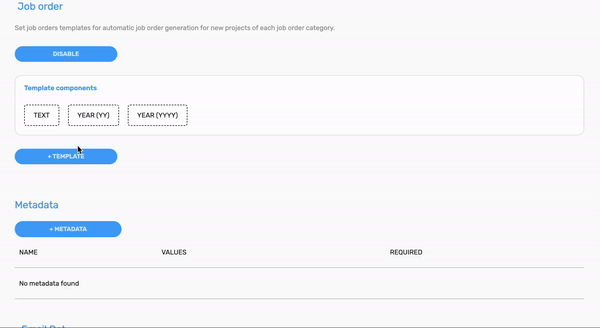
Job Order
This section lets you set up automatic generation of project codes (Job Orders) to keep everything tidy, consistent, and traceable. It’s useful for distinguishing internal vs. client work, and avoids messy, manual naming.
Each code is built from one or more dynamic elements (template components)—you can mix and match fixed text, the current year (YY or YYYY), and a progressive number with a minimum number of digits.
You can also reset numbering each year, as long as the year is part of the template.
You can link one or more Job Order Categories to each template—this gives you tailored codes for different project types, while keeping a coherent structure.
Project Metadata
Add a detail depth to a project in pipeline with metadata tags. Add a new tag, specify its values and check the box if required. Metadata tags are useful to reach a better insight within a single cluster of data, i.e. in the report Sales Pipeline.
Team Metadata
- You can define team metadata (tags) in this table and then assign them using the team section
- Each metadata is composed by a category and a tag value
- You can defined an illimitate number of categories and tags
Email Bot
Here you can insert the email addresses to which send invoices, orders and travel requests.
Project Won/Lost Bot
Here you can insert the email addresses to which send notifications each time someone of your teammates won or lost a project. A project is considered to be lost when its probability is 0 and won when its probability is 90.
Project Types
Create and manage labels that you can assign to projects in pipeline. A project type is basically composed by a name, you can than aggregate it’s values by using a group or use a short label to better identify a project type;
Timesheet
Here you can choose whether to use the simplified or the detailed view. When the simplified view is enabled you will be able to fill your timesheet for the whole week in a single page. You can choose to fill the total amount of hours of the week or to fill worked hours daily by using the Daily Mode toggle. This toggle can be set as “daily” at company level, therefore for all team members, using the “Always” value in the dedicated select list. When the detailed view is enabled, you will be able to fill in your timesheet day by day, and also specify in which budget area your worked on. See the timesheet section for further details. You can also set a weekly or daily reminder for your employee to fill in the timesheet. Only users that have set timesheet as required will receive the email. You will also be able to enable time limitation for timesheet. See the timesheet section for further details.
Project
- Required contact: Whether the client’s contact is required in order to create a Project
- Required Job Order: Whether the Job Order is required for a Project to show up on Timesheet and Project Status sections
- Wasted Hours: Whether the wasted hours mechanism is enabled or disabled
Project status
This feature allows the user to edit on a weekly basis the risk status for each project.To add a new risk status click on “Add risk status”, choose a colour, edit the name then click “save”.
People allocation
- Unlimited planning: plan without budget constraints
- Use 7-days week calendar: to display Saturdays and Sundays in calendars
- Highlight weekends: display Saturdays and Sundays in People Allocation using a special pattern and show a warning when user tries to allocate on these days (learn more). This feature can be enabled only if “Use 7-days week calendar” is enabled too
Project opportunities
From this section you are able to create a new status or edit the existing ones. Stages can be reordered using the drag and drop and you can edit their name, color and description.The order you see in this section is the same that will be applied when ordering your opportunities by the stage column.Please mind that the default status blank can’t be edited and reordered while Lost and won statuses can’t have their description updated.If you deleted an opportunity stage all opportunities that were using that stage will have their stage switched to blank.Only custom stages can be deleted.Also please note that in order to assign a stage different than blank to an opportunity you have to be sure that the JOC assigned to the opportunity is tracking the opportunity status.For more information check the Job Order Category settings section.
Currencies
A list of all the known currencies, each one can be made available or set as master (a.k.a. the currency you currently use in your company)
Fiscal Year
Here you can change the initial month of your company’s fiscal year. All report and tables showing temporal data will update. Automatic job order generation and automatic invoice number will follow the fiscal year start, so you might get duplicated job order or invoice number if you change it. Remember that you can always manually change them and also set a different progressive number to start with in the job order settings than the default 1.
Won/Lost Feedback
Here you can define some possible reasons which can led to the win or loss of a project. A project is considered won when its probability reaches 90 or above, on the other hand it’s considered lost when it goes down to 0. Users will be able to choose one of these reasons from the projects pipeline (remember to enable the related job order category’s flag). This feedbacks will be then shown on the Client Details page and can be edited from the “More Action > Edit Feedback” button in the projects pipeline.
Project & Team Review
Here you can:
- Enable/disable Project & Team Review
- Choose the review mode, you can select between a partial or a 360° team review, whether the team should be able to review just the project and its manager or the project and all team members (incl. the manager).
- Allow to submit incomplete project or team review, when the user has insufficient evidence to vote a specific criterion.
- Add or edit criteria in order to evaluate projects and team members. The reviewer will be asked to express a rate for each of the chosen criteria
- Set a minimum number of unique reviewers to collect feedback from before showing review’s results in the profile page and the project canvas (this is useful to keep a review anonymous)
- Decide for which job order categories and minimum project’s value WETHOD will ask for review on archive.
Suppliers settings
- Categories and subcategories of suppliers This feature allows the user to visually browse the list of suppliers and filter suppliers by category or subcategories. To set categories and subcategories for your suppliers (i.e. Hospitality - Catering) start with categories. Click on “new category”, add a name and assign a colour of your choice and hit “save”. Eventually, for each category it is possible to add subcategories and save them.
- Status of suppliers This feature allows the user to determine a status of a supplier and if it is eligible for contracts or not. To set status for your suppliers hit the button “Enable”. Once the feature is enabled, hit “New status”, add a name for your status, assign a colour of your choice and put a check if suppliers with this status will be available for contracts. Remember that a user can issue an order only to suppliers that are available for contracts.
Expenses
Manage categories of expenses
Bank accounts
Set the list of bank accounts available for invoicing matters in your company. To each one, you can associate a name and an IBAN code. You can then select for each of your clients the appropriate bank account usually used for payments.
VAT rates
Set the list of VAT rate options that may be applied to an invoice. To each one, you can associate a short label (to easily recognize it), the rate and a more complete description of it. You can then select for each of your clients the appropriate VAT rate usually used for invoicing. Split payment for VAT: In some cases, legislation in Italy requires that when a state-owned company pays for an invoice, it pays VAT directly to the tax authority and the net amount to the supplier of goods and services. Suppliers must display the split amounts on the documents they issue to the client.
Payment terms
Manage all the types of payment terms agreed with your clients for invoicing matters. Associate a name and specify when the payment should be issued: is it 30 net days after the issue of the invoice or is it 30 net days (end of the month)?
Company Order Plan View
Here you can set your preferences about the way you want to visualise the company yearly orders, in the Company Order Plan page. Check here to see how this setting affects the visualisation of data.
Job titles
Can be used in a budget to better specify a job figure or position needed to complete a task, for example: to complete task “Website redesign” you may need a junior designer and a senior developer, these are two distinct job titles related to junior and senior user level respectively. Each person in your team can be assigned a job title, this makes it possible to filter people by job title in the People Allocation section. A job title cannot be deleted, it can only be archived. A job title is related to a single user level and this level can be chosen only during job title creation.
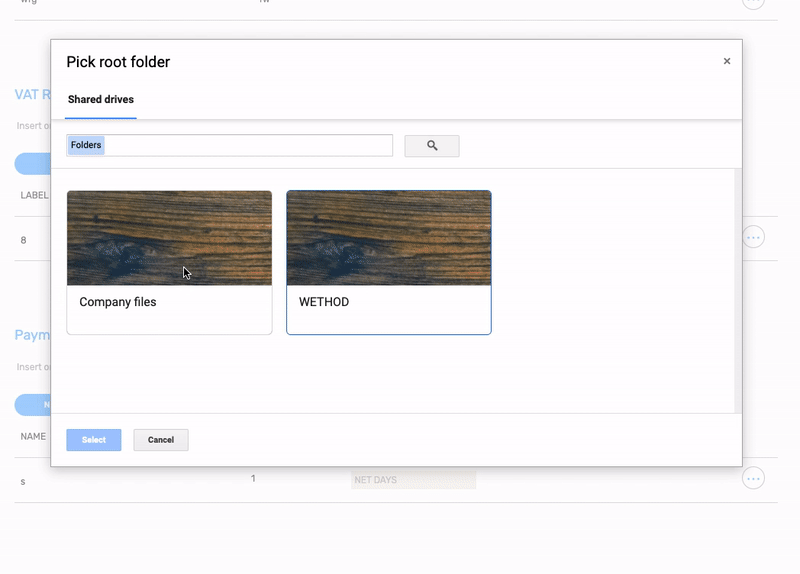
Google Drive Sync
Manage Google Drive integration with project canvases. To enable this integration you will be prompted to allow wethod access to your Google Drive and you will need to choose a folder inside one of your shared drives to use as root for all the files to keep in sync. This functionality works by sharing the selected root folder with wethod, so it can create folders and upload files in the place of the user. In order for this to work, you need to be sure to have enough Google Drive permissions to share the selected root folder with someone else (Manager or Content manager). When the integration is enabled, you can:
- See the root folder you have chosen
- See the canonical path used to link a project to its Google Drive folder. For a project “New website” with client “ACME” and job order “1234” the canonical path will be root folder > ACME > New website - 1234, all the canonical path components are Google Drive folders (“New website - 1234” is a single folder)
- Choose which job order categories need to be kept in sync
- Add default folders to create automatically each time a new Google Drive project folder is created
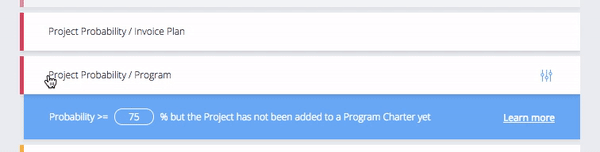
Alerts Engine
Here you can manage the alerts for your company, for each alert you can: enable/disable it, change its priority and edit its parameters (if required).
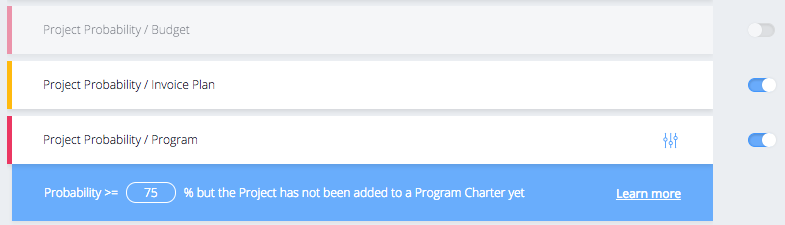
Changing an alert’s priority is as simple as positioning your cursor on the current priority and click on the new one:
Permissions
Here you can set permissions for the various user’s role:
- Budget, Invoices, Orders, Pipeline, Planning, Project Status, Timesheet, Data Freezing Engine: who can do what;
- Dashboard: which widgets are available to who;
- Header: which section of WETHOD are available;
- Reports: which sections of *Reports *are available;
- Settings: who can access Settings.
Note
Only super users can access Permissions page.
Super user settings’ permissions cannot be changed.
Here the word “other” means “of his/her teammates”. For example: in the budget table, “view other” means “view his/her teammates budget”.
The roles “Account” and “PM” are dynamic: you can assign them only from a project.
To create a new role:
- Click on the top left “+ add role” button;
- Assign a name to the newly created role;
- Click the “save” button.
Note
You cannot create two roles with the same name.
Profile
A place where you can introduce yourself to the people of your team.
Your portfolio is made up of different information, let’s explore them.
Profile pic & basic information
Here you can just edit your profile pic, for the other information please refer to the relative section:
- Your name can be edited from the account section
- Your tags and your level can be edited from from the team section if you have the right permissions
Contact information
In which way people can contact you? Add a phone number, a Skype username and even a LinkedIn account if you want.
Skills
What are your secret weapons? When adding a skill you can pick from the list a skill already used from another person of your team, otherwise don’t be afraid to create a new one.
When a skill is not used anymore, it will automatically be deleted.
Interests
Got any hobby or passion? When adding an interest you can pick from the list of interests already used from another person of your team, otherwise don’t be afraid to create a new one.
When an interest is not used anymore, it will automatically be deleted.
Short Bio
Just a brief presentation about yourself.
Languages
How many languages do you know? List them and choose a level for each one.
Levels are based on the Common European Framework of Reference for Languages (CEFR)
Portfolio
All the projects you are proud of.
OKR, Sponsorships & Year Resolution
OKR is an abbreviation for Objective and Key Result, a technique for defining and tracking objectives used by companies like Google, Uber and Twitter. Every person in your team is prompt to define some objectives for each quarter of the year, an objective is made up of key results. A key result is an expectation whose progress can be quantitatively measured and scored, completing all the key results of an objective means that you have completed that objective too.
A common way to decide which objectives are really meaningful for your personal growth and for your company is discussing them with a sponsor: a person in your team that you want to take as a mentor.
To select a sponsor just pick it from the list you see by editing the “Sponsored by” section. All the people that have chosen you as sponsor will appear in the “Sponsor of” section.
You can use the year resolution to sum up the meaning of all your objectives.
Want to learn more about OKR? Take a look at this good article.
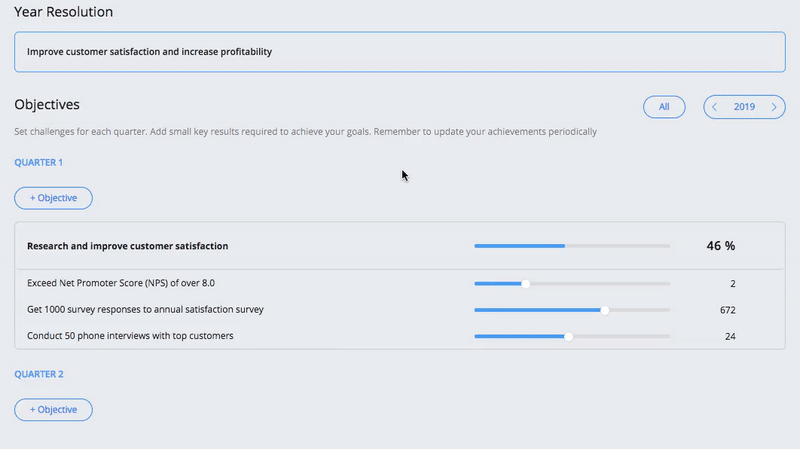
For every quarter you can set a status based on how the discussion about that quarter’s OKR is going:
- Draft if the OKR isn’t completely defined yet
- Discussed if all the objectives have been discussed and approved by your sponsor. From this step on, you can just edit the Key Results progress
- Checked if quarter ends and your sponsor positively evaluated your progress. In this step you are no more able to edit the quarter’s OKR

Trends
Here you can find some reports about the user’s behaviour, each report is obtained by using a moving average of the last 3 or 12 months’ available data. For each report you can appreciate:
- The general trend, identified by the line’s color: red if the last point you see is worst than the first one, green otherwise
- The last available value, identified by the marker’s color. The meaning of the color is explained in the chart’s legend
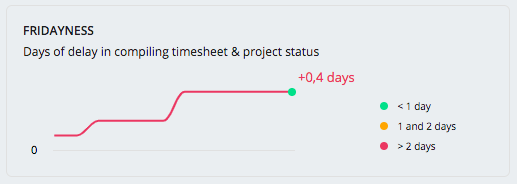
Fridayness
The days of delay in compiling timesheet and project status: the more you wait to compile them, the more your report goes up.
Timesheet and project status are meant to be compiled on Friday (this is why they are placed under the Friday section 😉); if you compile them on Saturday you get a +1 day on the report, if you compile them on Sunday you get a +2 days on the report and so on.
Automatic timesheet is added by wethod on Sunday night, this means all users with planning on this kind of projects will see their Fridayness counter going up even if they can do nothing about it. To avoid this, projects from JOC with automatic timesheet are removed from Fridayness calculation.
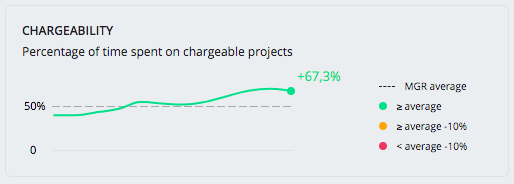
Chargeability
The percentage of timesheet done on chargeable projects. The dashed line is useful to understand how teammates with the same level are doing. Do you work for money or for glory?
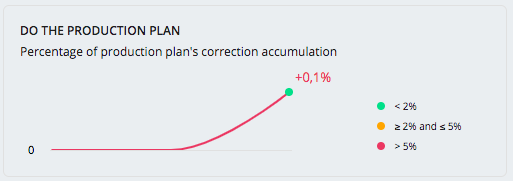
Do The Production Plan
The percentage of production plan’s correction accumulation: when you edit a project status in the past or when a new month starts, the production plan is recalculated in order to find possible mismatches between the production you planned and the actual production.
The adjustments (or accumulation) are reported as orange monthly apex and are used to compute the moving average for this chart. So, how accurate is your production planning?
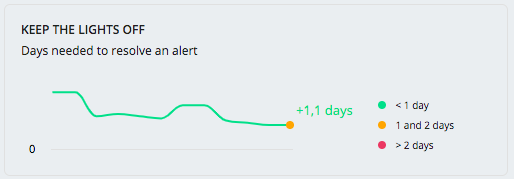
Keep The Lights Off
Alerts are made to be solved and this report shows how many days you take to solve yours (on average).
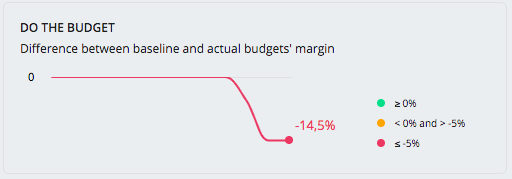
Do The Budget
The difference, in terms of margin, between budget’s baseline and budget’s last approved version. Only finished project (that is projects archived with probability equal to 100%) are taken into account.
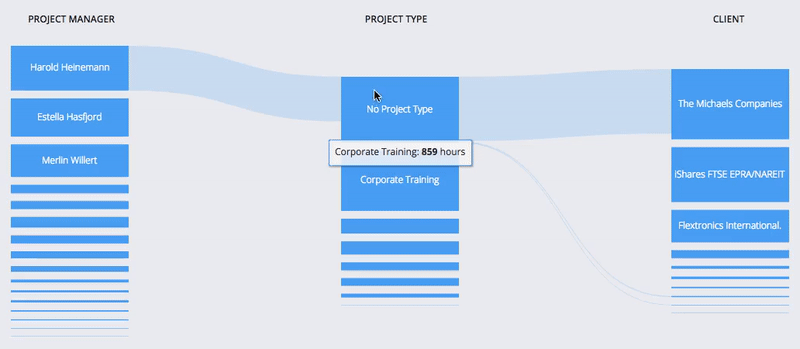
Working Connections
Here you can appreciate the connections between project’s manager, type and client of timesheet you have done in the last 12 months, position your cursor over a link or a rectangle to get more information.
By clicking on a rectangle you can highlight all the outgoing connections and clicking on a connection let you see all the projects involved in that connection.
Kudos
Each team member has a section in the profile page, called Kudos, with the results of the reviews received in a year both as a team member and as a project manager. The widget “What people say” collects all the written reviews received in a year.
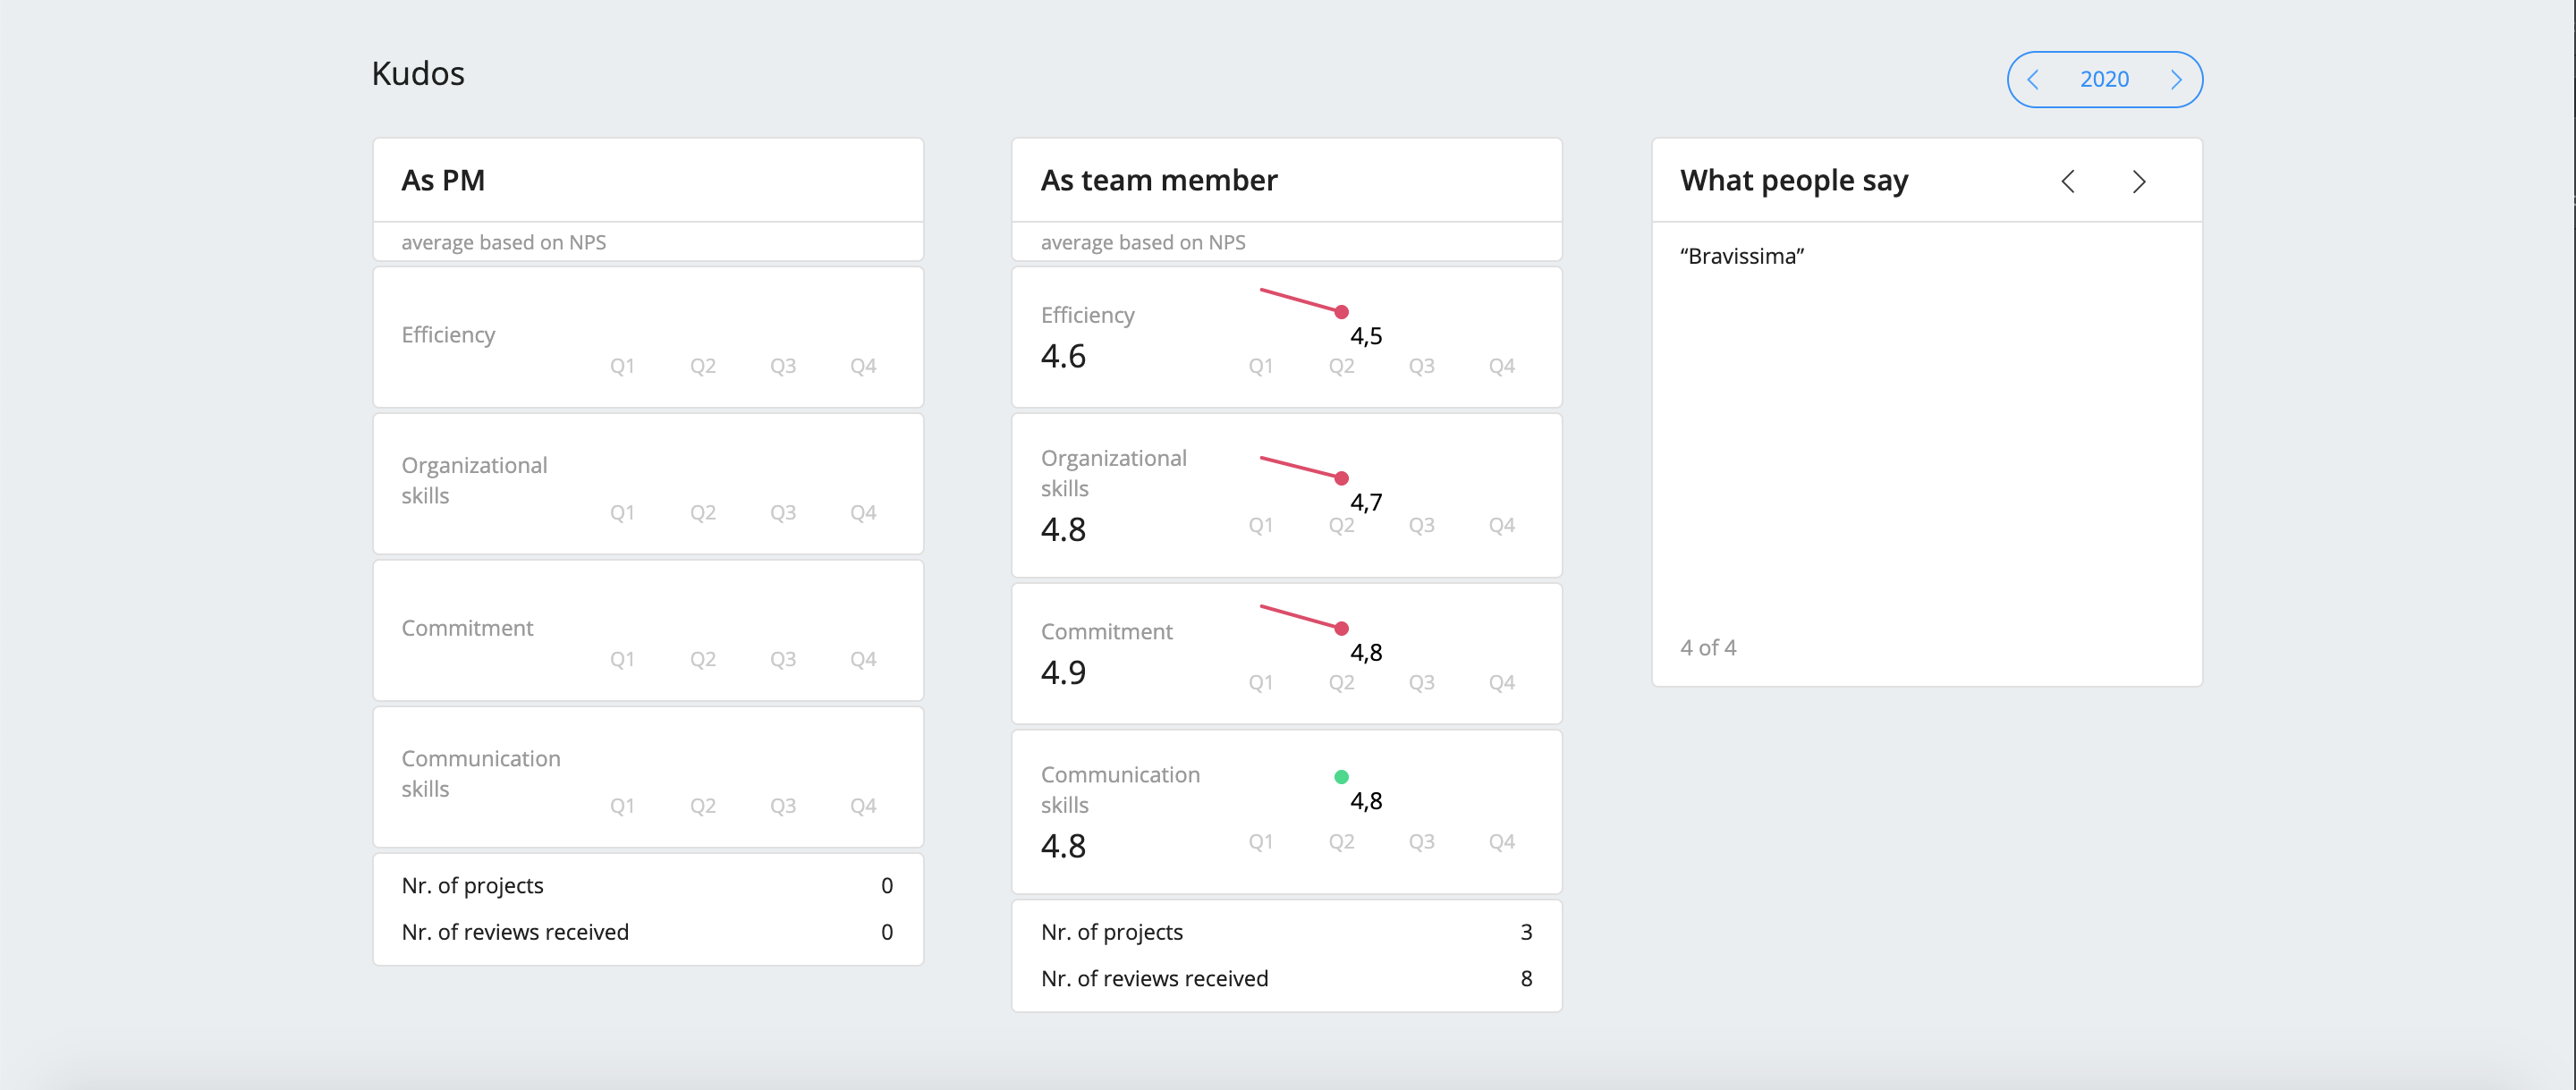
These results are based on the average Net Promoter Score and are calculated considering the number of reviews received and the projects worked on in a year.
The average Kudos of a project are shown on the project’s canvas page, with the average result for each criterion.
Switch Company
If you have a different WETHOD company linked to the same account, from here you can switch from one another.
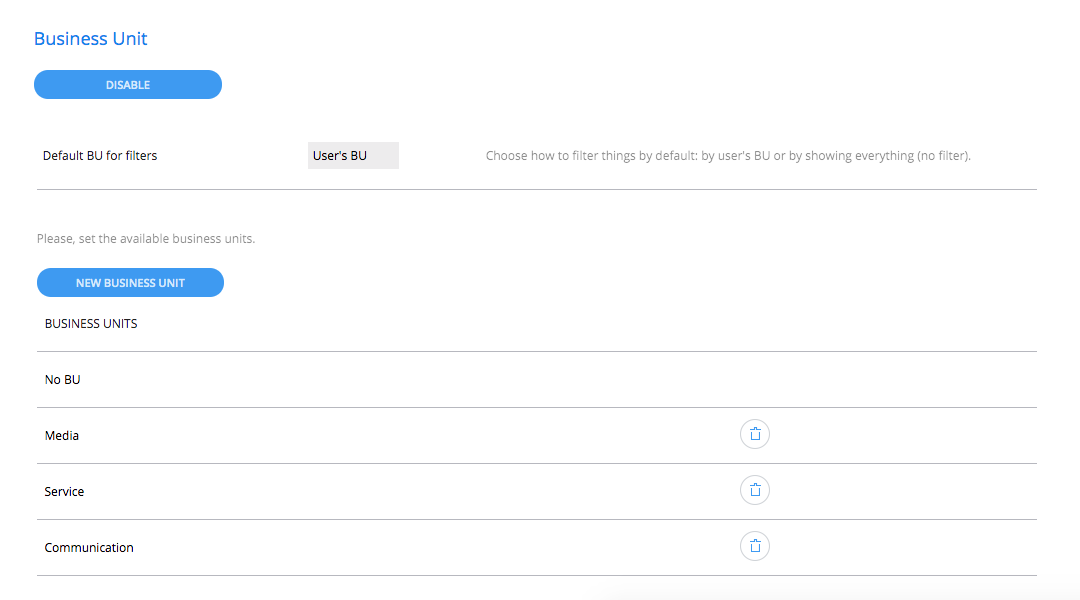
Business Unit
The “Business Unit” module is useful to manage teams that work as independent operational units. From settings, you can enable the module, set the business units and specify some default behaviours. Once the module is enabled, it allows to associate projects, team members and insights with the business units in your company.
Default BU for filters: “User’s BU” or “All”. Choose whether to show the users data from the whole company or from the BU they’re belonging to as a default.
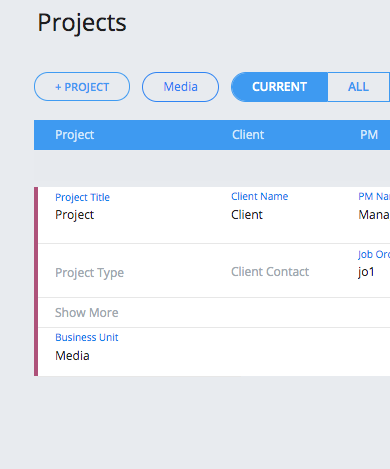
Projects’ Business Unit
To assign a business unit to a project you can go to project list, find your project and click on “Show more”. Click on the field named “Business Unit” and select an option from the list.
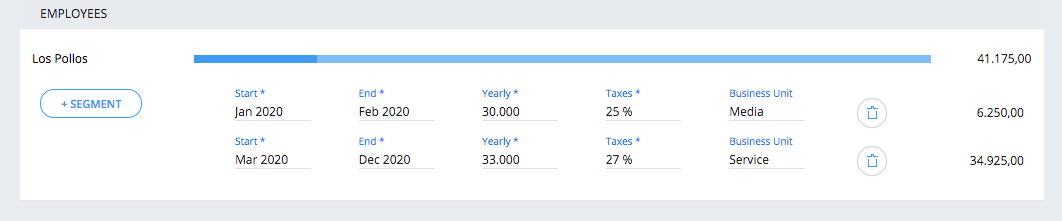
Team members’ Business Unit
Wethod keeps a record of each time a user changes its business unit. All the data coming from previous planning and timesheet will remain linked to the business unit(s) the user belonged to at the time. To assign a business unit to each of the employees head to the payroll section.
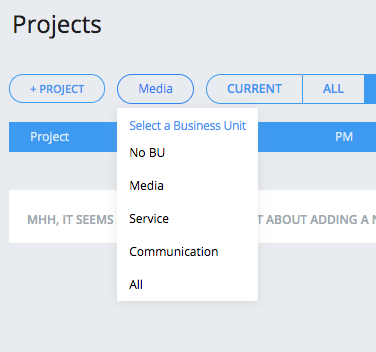
Business Unit Filters
When the Business Unit module is enabled you will find filters in all sections of the application where it’s necessary a view by business unit. Do you think it’s missing a filter in a specific section or page in wethod? Please, contact us.
Planning Cross-Business unit
In the permissions settings you set whether a user in a business unit is allowed to plan people from other business units:
- same-bu people on inter-bu projects: whether you can plan people from your business units on projects of other business unit.
- inter-bu people: whether you can plan people of other business unit (to projects of all business units).
Products
You can find this section in the app menu under Projects > Toolbox > Products.
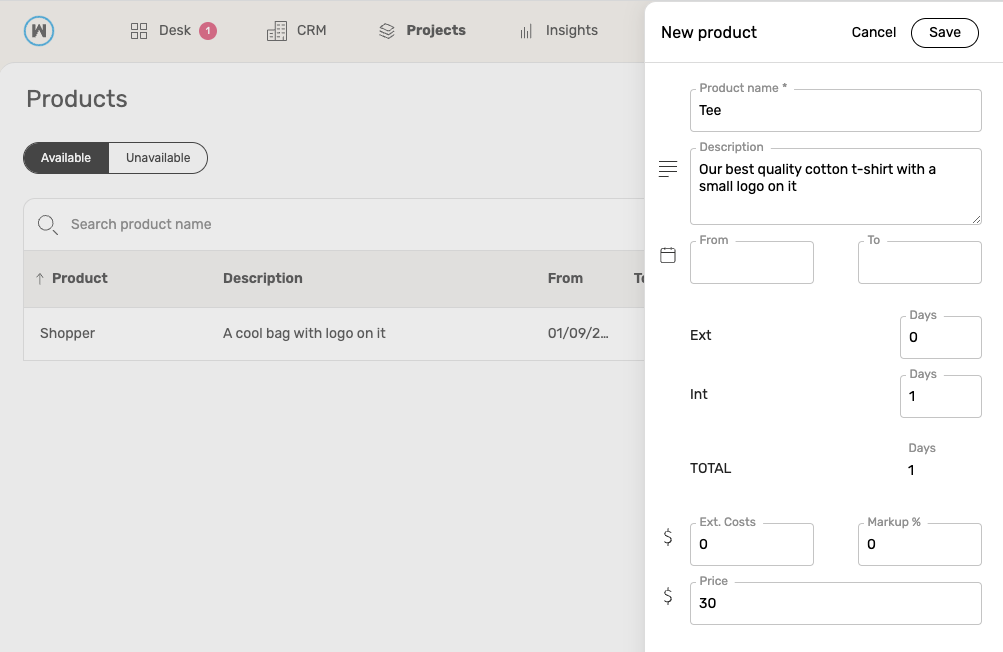
A product is a special kind of pre-compiled budget task, representing an activity requiring well-known man-days and costs.
For example let’s say that a digital agency knows that its best-selling event needs 2 days and 1000 € to be organized and delivered, instead of recreating this task for each client, the agency can create a single product and add it to different budgets when needed.
A product has:
- Name
- Description
- From - To: specify a period of time during which product is available to be added to a budget.
- If only “From” is specified then product is available starting from that date
- If only “To” is specified then product is available from its creation until the date specified by “To”
- If “From” and “To” are not specified then product is always available
- Days: man-days needed for every user level in order to ship the product
- External costs: costs needed to ship the product
- Markup: percentage of markup applied on external cost to calculate the price
- Price: price of a single instance of the product. If not defined it’s calculated based on man days cost, external cost, markup and quantity
Specific permissions let you control who can view or edit this section.
Only “From” and “To” attributes can be edited, they can be used to change availability of a product after its creation.
If a user creates a product with a markup and a price, the markup is not used to calculate the price because the user-specified price is used instead.
Pricelists
You can find this section in the app menu under CRM > Toolbox > Pricelists.
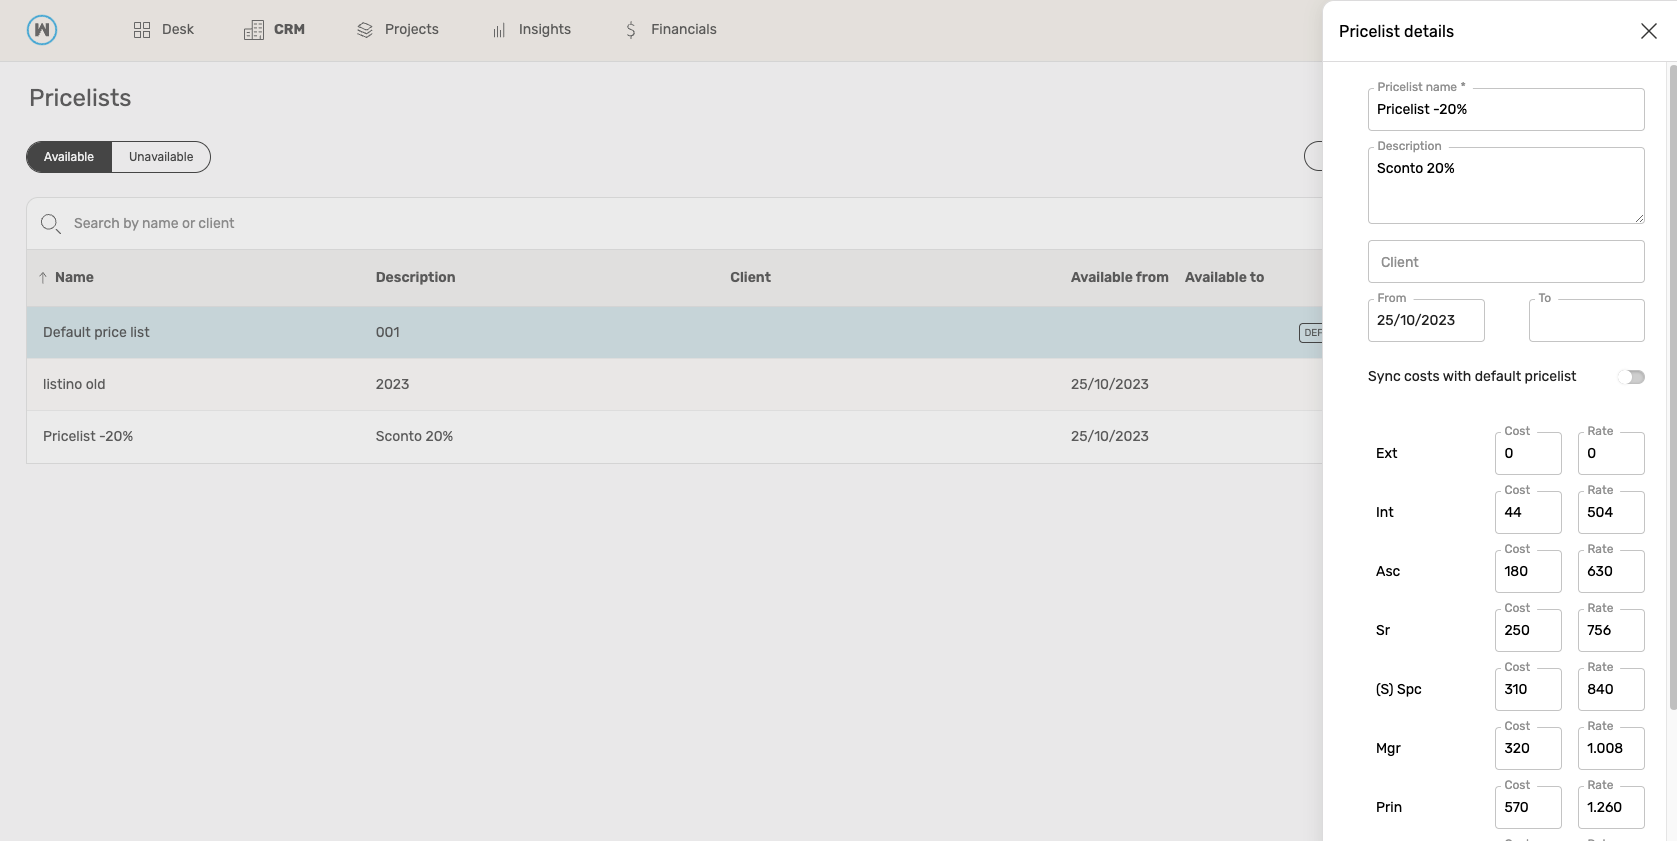
A pricelist defines a set of daily rates and costs that can be used to tailor a project budget.
For example, you might have a pricelist named “Germany” for projects based in Germany and another named “Italy” for projects in Italy, each specifying the relevant daily rates & cost for their respective country.
Each company has a default pricelist that sets the standard daily rates and daily costs for the company. This default pricelist is marked with a “default” label and has a light blue background.
A pricelist can be specific to a client, and each client can have multiple associated pricelists. Additionally, each budget area within your projects can be customized with its own pricelist.
For each client, only one pricelist can be designated as the default. This default pricelist is automatically applied to newly created budgets for that client. Default client pricelists are marked with a “default” label.
For each client, only one pricelist can be designated as the default. This default pricelist is automatically applied to newly created budgets for that client. Default client pricelists are marked with a “default” label.
If no client default pricelists exist for a project client, the company default pricelist will be used.
The pricelist can have an expiration date.
A company default pricelist cannot be used as client pricelist.
A pricelist has:
- Name
- Description
- From - To: specify a period of time during which pricelist can be used in a budget
- If only “From” is compiled then product is available starting from “From”
- If only “To” is compiled then product is available from its creation until the date specified by “To”
- If “From” and “To” are not specified then product is available from its creation
- Rates: daily rates for every user level
- Cost: daily costs for every user level
- Sync cost with default pricelist
- Client
Specific permissions let you control who can view or edit this section.